Difference between revisions of "Add a new archival description"
| Line 12: | Line 12: | ||
| − | 2. Click the | + | 2. Click the ''add new'' text that appears in the [[Column header|column header]] or click the [[Add new button|add new button]] at the foot of the list; ICA-AtoM takes you to a blank [[Edit screen|edit screen]] for data entry. |
| Line 19: | Line 19: | ||
| − | 4. You can quit the create process at any time by clicking the cancel button in the [[Button block|button block]]; no new record will be created. | + | 4. You can quit the create process at any time by clicking the ''cancel'' button in the [[Button block|button block]]; no new record will be created. |
| Line 29: | Line 29: | ||
*A [[Delete button|delete button]] now appears for deleting the record. | *A [[Delete button|delete button]] now appears for deleting the record. | ||
| − | *A save button now appears for saving any changes made since creating the record or the last save. | + | *A ''save'' button now appears for saving any changes made since creating the record or the last save. |
| − | *The cancel button now means: "do not commit the data entered since the record was created or the last save". | + | *The ''cancel'' button now means: "do not commit the data entered since the record was created or the last save". |
Revision as of 11:57, 14 July 2008
Please note that ICA-AtoM is no longer actively supported by Artefactual Systems.
Visit https://www.accesstomemory.org for information about AtoM, the currently supported version.
Create a new archival description
Main Page > (UM) User manual > UM-3 Add / edit content > UM3.1 Add / edit archival descriptions > UM-3.1.1 Create a new archival description
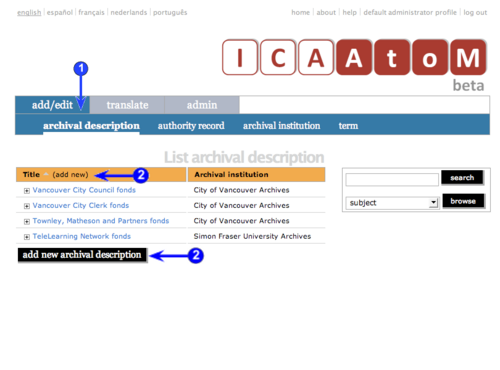
1. On the main menu bar, click the add/edit > archival description tab; ICA-AtoM takes you to the list screen showing all existing archival descriptions at the highest level of description.
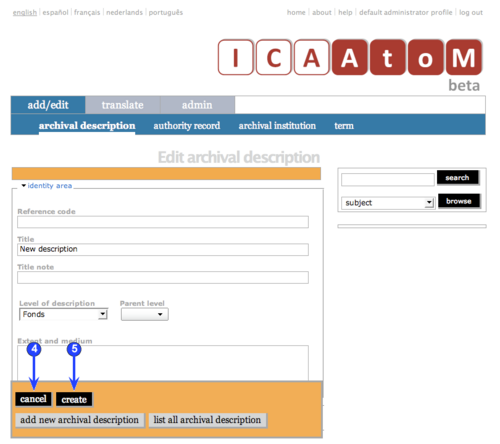
2. Click the add new text that appears in the column header or click the add new button at the foot of the list; ICA-AtoM takes you to a blank edit screen for data entry.
3. Enter data.
- See Data entry pages (UM-3.1.4 - UM-3.1.13) for detailed explanations and notes on fields.
4. You can quit the create process at any time by clicking the cancel button in the button block; no new record will be created.
5. Click the create button in the button block to commit the new record.
6. Note that the button block changes after you click the create button.
- A delete button now appears for deleting the record.
- A save button now appears for saving any changes made since creating the record or the last save.
- The cancel button now means: "do not commit the data entered since the record was created or the last save".

