Difference between revisions of "Virtual appliance"
| (32 intermediate revisions by 3 users not shown) | |||
| Line 1: | Line 1: | ||
| − | + | The virtual appliance allows you to try ICA-AtoM on your personal computer if you don't have access to a webserver on which to install ICA-AtoM. | |
| − | + | == What is it? == | |
| − | + | A [[wikipedia:Virtual appliance|virtual appliance]] is one file containing a minimal operating system and server software. You can "play" this file with a free virtual machine player like VMware Player or Sun VirtualBox. | |
| − | + | When you play the virtual appliance, it starts the second operating system and server software inside the player, on top of your existing operating system. There is no need to reboot or install anything except the player. You can then connect to the web server running inside the virtual machine player with your regular web browser. | |
| − | |||
| − | + | == Minimum hardware requirements == | |
| + | |||
| + | * Processor: Pentium IV or higher | ||
| + | * RAM: 256B unallocated memory | ||
| + | * Hard Drive space: a minimum of 1GB to test the system on a small scale (i.e. use the available test files or import a small set of test files) | ||
| + | |||
| + | |||
| + | == vmserver == | ||
| + | |||
| + | === Install Sun Virtual Box === | ||
| + | |||
| + | There are VirtualBox versions available for every major operating system. | ||
| + | |||
| + | Download and install Sun VirtualBox, http://www.virtualbox.org/wiki/Downloads | ||
| + | |||
| + | |||
| + | === Download vmserver appliance === | ||
| + | |||
| + | [http://www.ica-atom.org/download/ica-atom-1.3.1-VMDK.tbz ica-atom-1.3.1-VMDK.tbz] (442M, MD5: e59ba7fc96d5ec90366a3b41ef01b186) | ||
| + | |||
| + | Unzip the vmserver appliance. This should result in the following two files appearing in a folder: | ||
| + | * A file with extension vmdk, where the entire appliace is encapsulated. For example: disk0.vmdk. | ||
| + | * A configuration file with extension vmx. For example: ubuntu.vmx. | ||
| + | |||
| + | |||
| + | <div class="note"> | ||
| + | |||
| + | If you have trouble unzipping the file, try [http://peazip.sourceforge.net/ PeaZip].<br /> | ||
| + | See the related discussion on the ICA-AtoM User Forum [https://groups.google.com/d/msg/ica-atom-users/hXkdKhVOGmk/TkX5pnjlg5QJ here] | ||
| + | |||
| + | </div> | ||
| + | |||
| + | === Setup appliance in VirtualBox === | ||
| + | |||
| + | ==== Add vmserver appliance to VirtualBox ==== | ||
<ol> | <ol> | ||
| − | |||
| − | < | + | <li> |
| + | |||
| + | Open the Sun VirtualBox virtual machine. | ||
| + | |||
| + | </li> | ||
| + | |||
| + | [[File:0-new.png]] | ||
| + | |||
| + | <li> | ||
| + | |||
| + | Click "New" | ||
| + | |||
| + | </li> | ||
| + | |||
| + | [[File:1-Start-vmserver-setup.png]] | ||
| + | |||
| + | <li> | ||
| + | |||
| + | Click "Next" | ||
| + | |||
| + | </li> | ||
| + | |||
| + | [[File:2-set-name-vmserver-setup.png]] | ||
| + | |||
| + | <li> | ||
| + | |||
| + | Enter a Name e.g. "ICA-AtoM" | ||
| + | |||
| + | </li><li> | ||
| + | |||
| + | Set OS type as operating system "Linux" version "Ubuntu" | ||
| + | |||
| + | <div class="note"> | ||
| + | |||
| + | This setting refers to the operating system that is run inside the virtual appliance, not your own host operating system | ||
| + | |||
| + | </div> | ||
| + | |||
| + | </li><li> | ||
| + | |||
| + | Click "Next" | ||
| + | |||
| + | </li> | ||
| + | |||
| + | [[File:3-set-mem-vmserver.png]] | ||
| + | |||
| + | <li> | ||
| + | |||
| + | Set Base Memory Size to "256MB" | ||
| + | |||
| + | </li><li> | ||
| + | |||
| + | Click "Next" | ||
| + | |||
| + | </li> | ||
| + | |||
| + | [[File:4-use-existing.png]] | ||
| + | |||
| + | <li> | ||
| + | |||
| + | Select Use Existing Hard Disk | ||
| + | |||
| + | </li> | ||
| + | |||
| + | [[File:5-click-folder-icon.png]] | ||
| + | |||
| + | <li> | ||
| + | |||
| + | Click Folder/Arrow icon for Virtual Media Manager | ||
| + | |||
| + | </li> | ||
| + | |||
| + | [[File:6-virtual-media-manger-add.png]] | ||
| + | |||
| + | <li> | ||
| + | |||
| + | Click "Add" | ||
| + | |||
| + | </li><li> | ||
| + | |||
| + | Browse to location of disk0.vmdk and click select/Open (ubuntu-vmserver folder) | ||
| + | |||
| + | </li> | ||
| + | |||
| + | [[File:7-select-disk.png]] | ||
| + | |||
| + | <li> | ||
| + | |||
| + | Highlight newly added disk and click select | ||
| + | |||
| + | </li> | ||
| + | |||
| + | [[File:8-finish-add-vmserver.png]] | ||
| + | |||
| + | <li> | ||
| + | |||
| + | Click "Next" | ||
| + | |||
| + | </li> | ||
| + | |||
| + | [[File:9-finish.png]] | ||
| + | |||
| + | <li> | ||
| + | |||
| + | Review selections, click "Finish" | ||
| + | |||
| + | </li><li> | ||
| + | |||
| + | ICA-AtoM should be visible on the left hand side of VirtualBox | ||
| + | |||
| + | </li><li> | ||
| + | |||
| + | Right click ICA-AtoM in VirtualBox | ||
| + | |||
| + | </li> | ||
| + | |||
| + | [[File:0-settings.png]] | ||
| + | |||
| + | <li> | ||
| + | |||
| + | Choose Settings | ||
| + | |||
| + | </li> | ||
| + | |||
| + | [[File:SelectSystem.png]] | ||
| − | <li> | + | <li> |
| − | + | Select System | |
| − | <li> | + | </li> |
| + | |||
| + | [[File:EnablePAE.png]] | ||
| + | |||
| + | <li> | ||
| + | |||
| + | Enable PAE/NX checkbox | ||
| + | |||
| + | </li> | ||
| + | |||
| + | [[File:2-selectnetwork.png]] | ||
| + | |||
| + | <li> | ||
| + | |||
| + | Select Network | ||
| + | |||
| + | </li> | ||
| + | |||
| + | [[File:3-select-host-only.png]] | ||
| + | |||
| + | <li> | ||
| + | |||
| + | Choose "Host-Only Adapter" in "Attached to" drop down | ||
| + | |||
| + | </li> | ||
| + | |||
| + | [[File:5-click.OK.png]] | ||
| + | |||
| + | <li> | ||
| + | |||
| + | Click OK | ||
| + | |||
| + | </li> | ||
| − | |||
</ol> | </ol> | ||
| + | <br /> | ||
| + | <br /> | ||
| + | <br /> | ||
| + | |||
| + | ==== Troubleshooting the Host Only Network Adapter ==== | ||
| + | |||
| + | ---- | ||
| + | |||
| + | <strong>Having trouble with selecting the network?</strong> | ||
| + | <br /> | ||
| + | <br /> | ||
| + | If not skip ahead to [https://www.ica-atom.org/doc/Virtual_appliance#Start_the_machine Start the machine] | ||
| + | <br /> | ||
| + | <br /> | ||
| + | You might have to configure the settings. In the Virtualbox, go to File > Preferences > Network, and click "Add New" (it's the little green "+" symbol to the right - see the screenshot below). You will see a "VirtualBox Host-Only Ethernet Adapter" or a "vboxnet0" added to the list of host-only networks: | ||
| + | <br /> | ||
| + | <br /> | ||
| + | [[File:add_new_host-only_network.png]] | ||
| + | <br /> | ||
| + | <br /> | ||
| + | Click the screwdriver icon on the right-hand side to Edit the options for the host-only network | ||
| + | <br /> | ||
| + | <br /> | ||
| + | [[File:adjustNetworkSettings.png]] | ||
| + | <br /> | ||
| + | <br /> | ||
| + | Below are some sample IP ranges for the Adapter and the DHCP Server, which should work for you as well. Ensure that the DHCP server is enabled, and if the values are empty, use the samples below: | ||
| + | <br /> | ||
| + | <br /> | ||
| + | [[File: hostOnlyAdaptorDetails.png]] | ||
| + | [[File: DHCP_ServerDetails.png]] | ||
| + | <br /> | ||
| + | <br /> | ||
| + | Now go back and follow the previous steps - when you select the network as "Host-Only" it should work this time! | ||
| + | <br /> | ||
| + | <br /> | ||
| + | <div class="text-alert"> | ||
| + | '''See also:''' Virtual box How-to Guide for managing [https://www.grid-appliance.org/wiki/index.php/VirtualBox_4.2.4_How_To#Network_Settings network settings] including host-only network adapter settings. | ||
| + | </div> | ||
| + | <br /> | ||
| + | <br /> | ||
| + | |||
| + | ---- | ||
| − | === | + | ==== Start the machine ==== |
| − | + | <ol> | |
| − | + | [[File:0-start.png]] | |
| − | + | <li> | |
| − | + | Click Start | |
| − | |||
| − | |||
| − | |||
| − | |||
| − | |||
| − | |||
| − | |||
| − | |||
| − | + | </li> | |
| − | + | [[File:1-complete-boot.png]] | |
| − | |||
| − | |||
| − | |||
| − | |||
| + | <li> | ||
| − | = | + | Wait for boot to complete. You do not need to enter the Ubuntu (or "ica-atom") password (bottom of the boot-up screen). You can simply minimize this window for now. |
| + | <br /> | ||
| + | <div class="text-alert"> | ||
| + | If you do wish to enter the user and password, both are simply "'''demo'''" in the ICA-AtoM virtual appliance | ||
| + | </div> | ||
| + | <br /> | ||
| + | </li> | ||
| − | . | + | [[File:3-ica-atom.png]] |
| + | <li> | ||
| − | + | Open your web browser and go to the following URL: http://192.168.56.101/ | |
| − | + | </li><li> | |
| + | Your web browser is now communicating directly with the server inside the virtual appliance, just as if you were pointing your web browser to http://ica-atom.org/ or any other online website | ||
| − | + | </li><li> | |
| − | + | You will now complete the basic ICA-AtoM installation steps on the copy of the application running inside the virtual appliance | |
| − | + | </li> | |
| − | + | <li> | |
| − | + | Click the 'Continue' link on the System Checks page | |
| − | + | </li> | |
| − | + | </br> | |
| − | http:// | + | ==== Set up your new site ==== |
| + | |||
| + | [[File:4-ica-atom.png]] | ||
| + | |||
| + | |||
| + | <li> | ||
| + | |||
| + | Don't adjust the default database settings. Accept the default database name ("qubit") and user ("root"). Just press "Save and continue" | ||
| + | |||
| + | </li> | ||
| + | |||
| + | [[File:5-ica-atom.png]] | ||
| + | |||
| + | |||
| + | |||
| + | <li> | ||
| + | |||
| + | Give your new ICA-AtoM site a title and (optional) site description | ||
| + | |||
| + | </li> | ||
| + | |||
| + | <li> | ||
| + | |||
| + | Create an administrator account for yourself, completing the mandatory username, email, and password fields | ||
| + | |||
| + | </li> | ||
| + | |||
| + | [[File:6-ica-atom.png]] | ||
| + | |||
| + | <li> | ||
| + | |||
| + | Click "Save and continue" | ||
| + | |||
| + | </li><li> | ||
| + | |||
| + | Congratulations, you have a running copy of ICA-AtoM! See the [[user manual]] for instructions on how to use the software | ||
| + | |||
| + | </li><li> | ||
| + | |||
| + | Be sure to follow the [[#Turn off virtual appliance|turn off virtual appliance]] instructions below when you are done so that you save any data you have entered and avoid starting a new ICA-AtoM installation | ||
| + | |||
| + | </li><li> | ||
| + | |||
| + | The next time you want to use your ICA-AtoM virtual appliance, just open the Sun Virtual Box player, "Start" the ICA-AtoM virtual appliance and point your browser to, http://192.168.56.101/ | ||
| + | |||
| + | </li> | ||
| + | |||
| + | </ol> | ||
| + | |||
| + | |||
| + | ---- | ||
| + | |||
| + | |||
| + | ==== Turn off virtual appliance ==== | ||
| + | |||
| + | |||
| + | [[File:7-ica-atom.png]] | ||
| + | |||
| + | |||
| + | <ol> | ||
| + | <li> | ||
| + | |||
| + | At the end of your session, turn off the VirtualBox virtual machine by going to Machine > Close | ||
| + | |||
| + | </li> | ||
| + | |||
| + | [[File:8-ica-atom.png]] | ||
| + | |||
| + | </br> | ||
| + | <li> | ||
| + | |||
| + | Select the "Save the machine state" option | ||
| + | |||
| + | </li> | ||
| + | |||
| + | </ol> | ||
| + | |||
| + | <div class="note"> | ||
| + | |||
| + | If you don't select the "Save the machine state" option you will lose any data you have entered and have to complete the ICA-AtoM installation anew the next time you start the virtual appliance. | ||
| + | </div> | ||
| + | </br> | ||
| + | |||
| + | This is from the VirtualBox help manual: | ||
| + | |||
| + | <blockquote> | ||
| + | |||
| + | 3.4.3. Saving the state of the machine | ||
| + | |||
| + | When you click on the "Close" button of your virtual machine window (at the top right of the window, just like you would close any other window on your system) (or press the Host key together with "Q"), VirtualBox asks you whether you want to "save" or "power off" the VM. | ||
| + | |||
| + | The difference between these three options is crucial. They mean: | ||
| + | |||
| + | Save the machine state: With this option, VirtualBox "freezes" the virtual machine by completely saving its state to your local disk. When you later resume the VM (by again clicking the "Start" button in the VirtualBox main window), you will find that the VM continues exactly where it was left off. All your programs will still be open, and your computer resumes operation. | ||
| + | |||
| + | Saving the state of a virtual machine is thus in some ways similar to suspending a laptop computer (e.g. by closing its lid). | ||
| + | |||
| + | Send the shutdown signal. This will send an ACPI shutdown signal to the virtual machine, which has the same effect as if you had pressed the power button on a real computer. So long as a fairly modern operating system is installed and running in the VM, this should trigger a proper shutdown mechanism in the VM. | ||
| + | |||
| + | Power off the machine: With this option, VirtualBox also stops running the virtual machine, but without saving its state. | ||
| + | |||
| + | This is equivalent to pulling the power plug on a real computer without shutting it down properly. If you start the machine again after powering it off, your operating system will have to reboot completely and may begin a lengthy check of its (virtual) system disks. | ||
| + | |||
| + | As a result, this should not normally be done, since it can potentially cause data loss or an inconsistent state of the guest system on disk. | ||
| + | |||
| + | The "Discard" button in the main VirtualBox window discards a virtual machine's saved state. This has the same effect as powering it off, and the same warnings apply. | ||
| + | |||
| + | </blockquote> | ||
| + | |||
| + | </br> | ||
| + | |||
| + | <div class="note"> <strong>Still having issues?</strong> </br> Try searching for answers on our [https://groups.google.com/forum/?fromgroups=#!searchin/qubit-dev/virtual$20appliance Google Groups disscussion page], or in the list of [http://code.google.com/p/qubit-toolkit/issues/list?can=2&q=virtual+appliance&colspec=ID+Milestone+Component+Type+Status+Priority+Owner+Summary+Opened&cells=tiles issues]. You can also find the user manual for Oracle's VM Virtualbox [https://www.virtualbox.org/manual/ here], and a Virtualbox FAQ page [https://www.virtualbox.org/wiki/User_FAQ here]. Oracle also maintains its own user forums where issues can be discussed and resolved through community support - check it out [https://forums.virtualbox.org/index.php here]. | ||
| + | </div> | ||
| + | </br> | ||
| + | |||
| + | == KVM == | ||
| + | |||
| + | <div class="note"> | ||
| + | |||
| + | This section is for Linux users only. | ||
| + | |||
| + | </div> | ||
| + | |||
| + | |||
| + | === Install KVM === | ||
| + | |||
| + | KVM is part of the Linux kernel, check with your distribution for installation methods. | ||
| + | |||
| + | |||
| + | ==== Debian/Ubuntu ==== | ||
| + | |||
| + | <ol> | ||
| + | |||
| + | <li> | ||
| + | |||
| + | Run the following to check if your processor supports KVM (if nothing is printed you can not use KVM) | ||
| + | |||
| + | <pre> | ||
| + | $ egrep '(vmx|svm)' --color=always /proc/cpuinfo | ||
| + | </pre> | ||
| + | |||
| + | </li><li> | ||
| + | |||
| + | Install KVM | ||
| + | |||
| + | <pre> | ||
| + | $ sudo aptitude -DR install qemu-kvm | ||
| + | </pre> | ||
| + | |||
| + | </li> | ||
| + | |||
| + | </ol> | ||
| + | |||
| + | |||
| + | === Download KVM appliance === | ||
| + | |||
| + | [http://qubit-toolkit.org/VEbuild/ica-atom-kvm-1.2.0.tgz ica-atom-kvm-1.2.0.tgz] (214 MB, [http://qubit-toolkit.org/VEbuild/md5sum.list md5]) | ||
| + | |||
| + | Unzip the KVM appliance. This should result in the following two files appearing in an ubuntu-kvm folder: | ||
| + | * disk0.qcow2 | ||
| + | * run.sh < this file can be modified to preserve settings | ||
| + | |||
| + | === Run appliance in KVM === | ||
| + | |||
| + | <ol> | ||
| + | |||
| + | <li> | ||
| + | |||
| + | Change directory to the location of KVM image, | ||
| + | |||
| + | <pre> | ||
| + | $ cd /path/to/image/ubuntu-kvm | ||
| + | </pre> | ||
| + | |||
| + | </li><li> | ||
| + | |||
| + | Start KVM appliance instance (-m sets the memory in MB in this case 256MB, -redir tells the host machine to direct port 8000 to 80 on the guest instance) | ||
| + | |||
| + | <pre> | ||
| + | $ sudo kvm -m 256 -redir tcp:8000::80 disk0.qcow2 | ||
| + | </pre> | ||
| + | |||
| + | </li><li> | ||
| + | |||
| + | Wait until the machine is completely booted (you will see Ubuntu shell login) | ||
| + | |||
| + | </li><li> | ||
| + | |||
| + | ICA-AtoM is now reachable at http://localhost:8000/ | ||
| + | |||
| + | </li> | ||
| + | |||
| + | </ol> | ||
Latest revision as of 10:20, 11 July 2013
Please note that ICA-AtoM is no longer actively supported by Artefactual Systems.
Visit https://www.accesstomemory.org for information about AtoM, the currently supported version.
The virtual appliance allows you to try ICA-AtoM on your personal computer if you don't have access to a webserver on which to install ICA-AtoM.
What is it?
A virtual appliance is one file containing a minimal operating system and server software. You can "play" this file with a free virtual machine player like VMware Player or Sun VirtualBox.
When you play the virtual appliance, it starts the second operating system and server software inside the player, on top of your existing operating system. There is no need to reboot or install anything except the player. You can then connect to the web server running inside the virtual machine player with your regular web browser.
Minimum hardware requirements
- Processor: Pentium IV or higher
- RAM: 256B unallocated memory
- Hard Drive space: a minimum of 1GB to test the system on a small scale (i.e. use the available test files or import a small set of test files)
vmserver
Install Sun Virtual Box
There are VirtualBox versions available for every major operating system.
Download and install Sun VirtualBox, http://www.virtualbox.org/wiki/Downloads
Download vmserver appliance
ica-atom-1.3.1-VMDK.tbz (442M, MD5: e59ba7fc96d5ec90366a3b41ef01b186)
Unzip the vmserver appliance. This should result in the following two files appearing in a folder:
- A file with extension vmdk, where the entire appliace is encapsulated. For example: disk0.vmdk.
- A configuration file with extension vmx. For example: ubuntu.vmx.
If you have trouble unzipping the file, try PeaZip.
See the related discussion on the ICA-AtoM User Forum here
Setup appliance in VirtualBox
Add vmserver appliance to VirtualBox
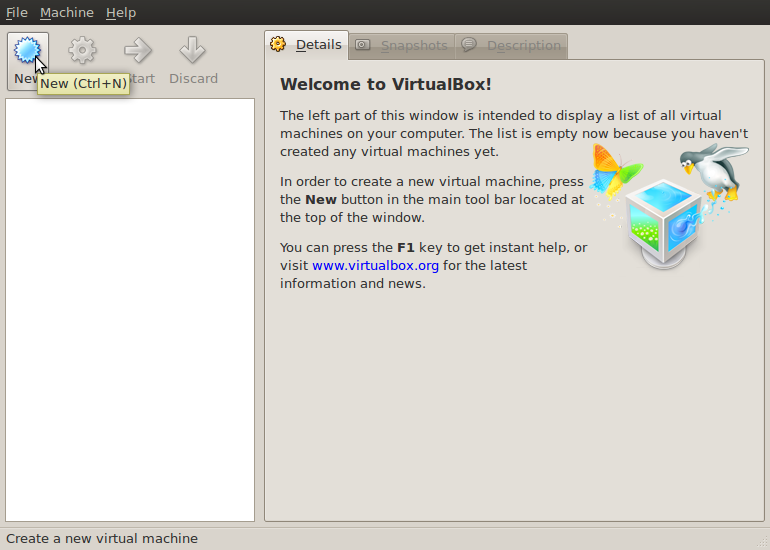
- Open the Sun VirtualBox virtual machine.
- Click "New"
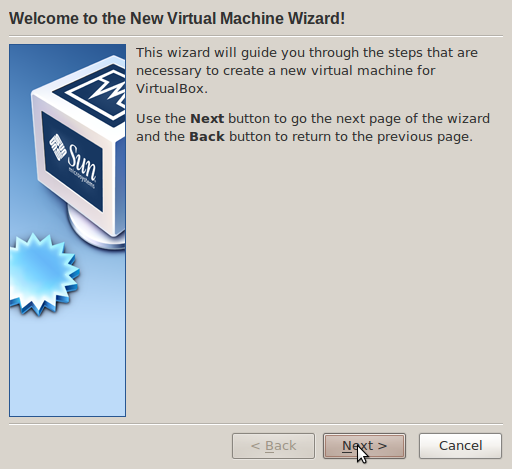
- Click "Next"
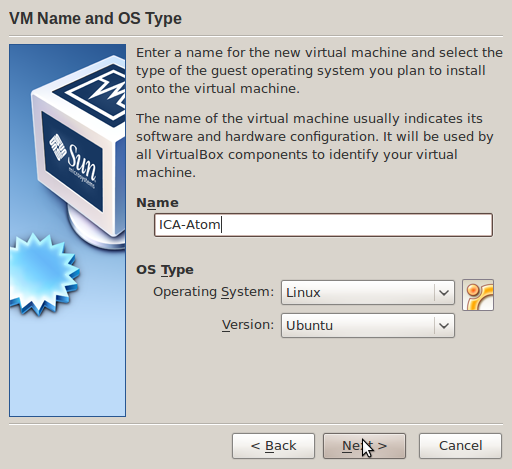
- Enter a Name e.g. "ICA-AtoM"
-
Set OS type as operating system "Linux" version "Ubuntu"
This setting refers to the operating system that is run inside the virtual appliance, not your own host operating system
- Click "Next"
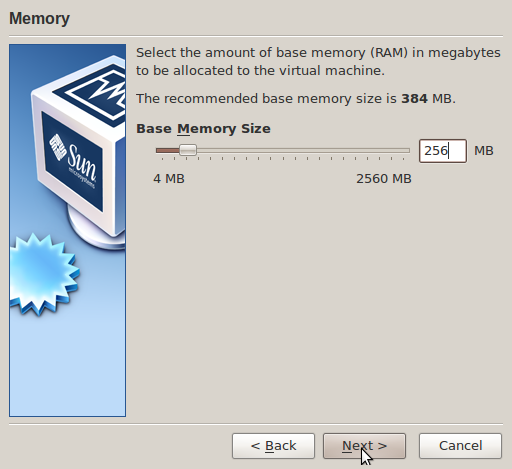
- Set Base Memory Size to "256MB"
- Click "Next"
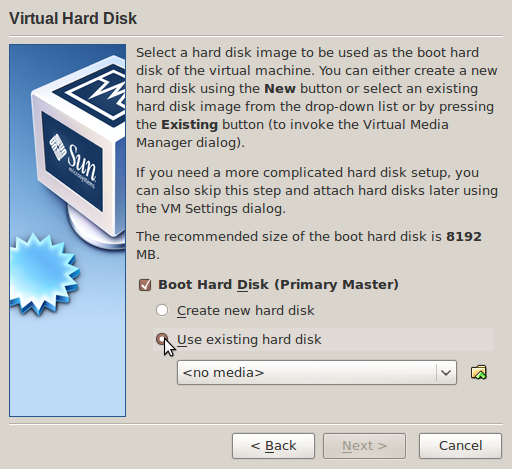
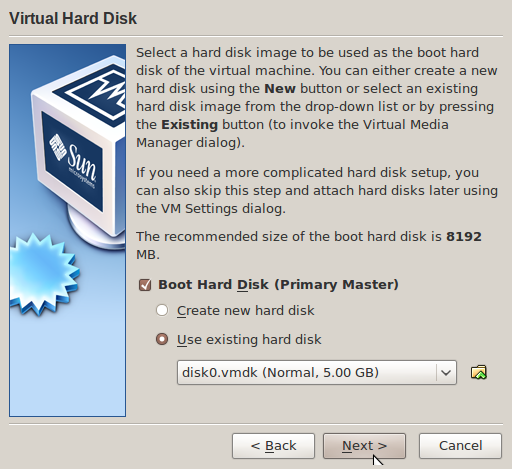
- Select Use Existing Hard Disk
- Click Folder/Arrow icon for Virtual Media Manager
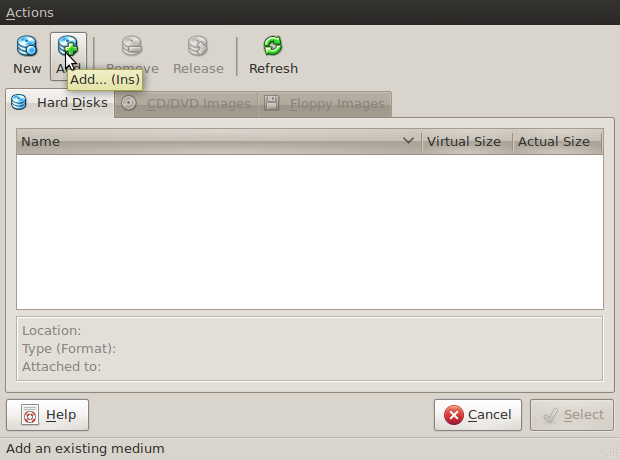
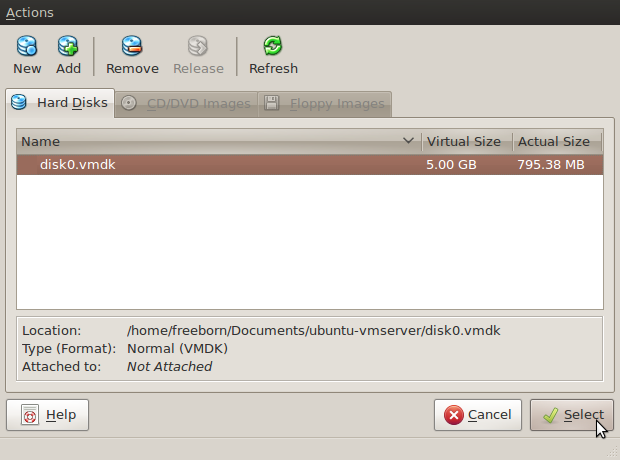
- Click "Add"
- Browse to location of disk0.vmdk and click select/Open (ubuntu-vmserver folder)
- Highlight newly added disk and click select
- Click "Next"
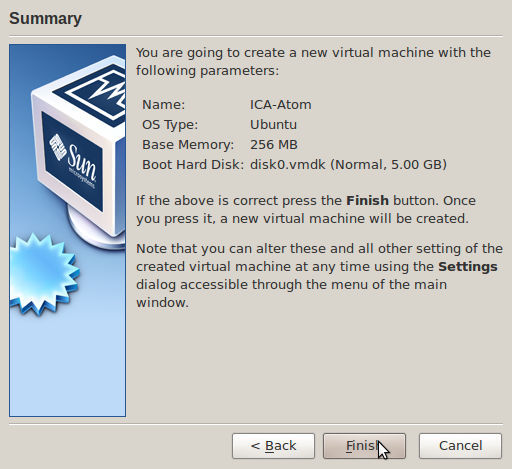
- Review selections, click "Finish"
- ICA-AtoM should be visible on the left hand side of VirtualBox
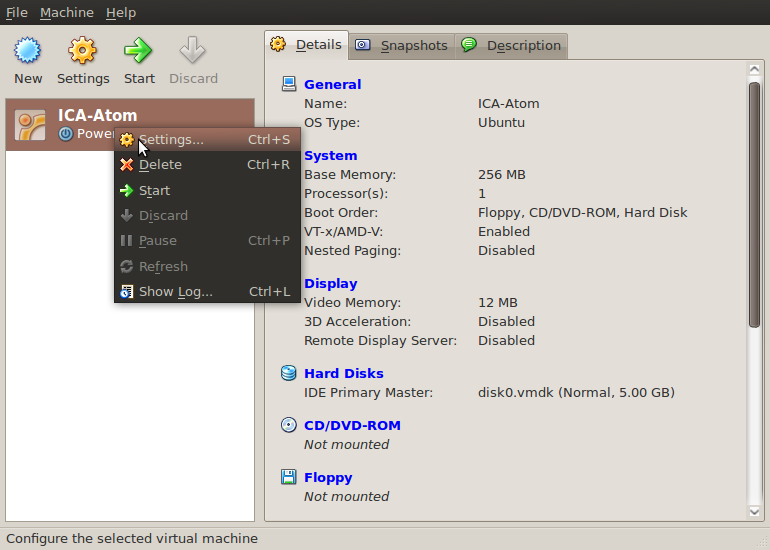
- Right click ICA-AtoM in VirtualBox
- Choose Settings
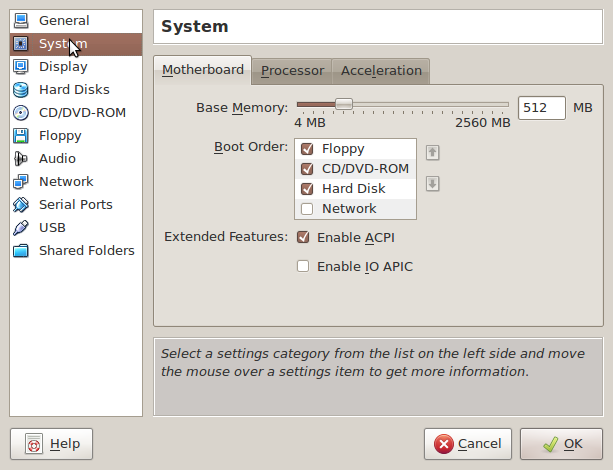
- Select System
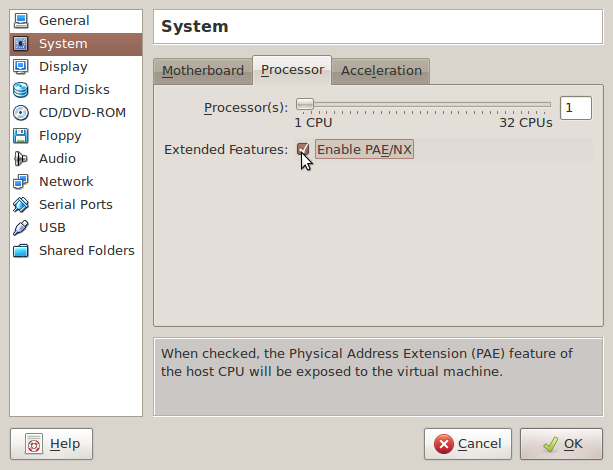
- Enable PAE/NX checkbox
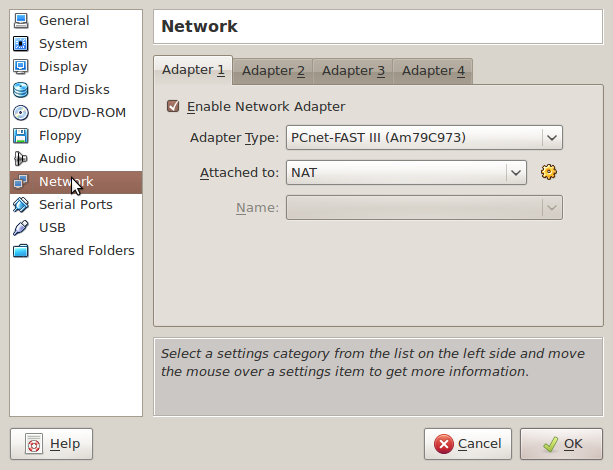
- Select Network
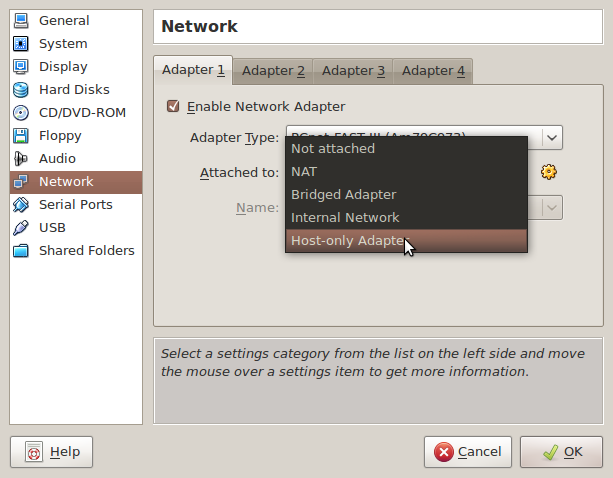
- Choose "Host-Only Adapter" in "Attached to" drop down
- Click OK
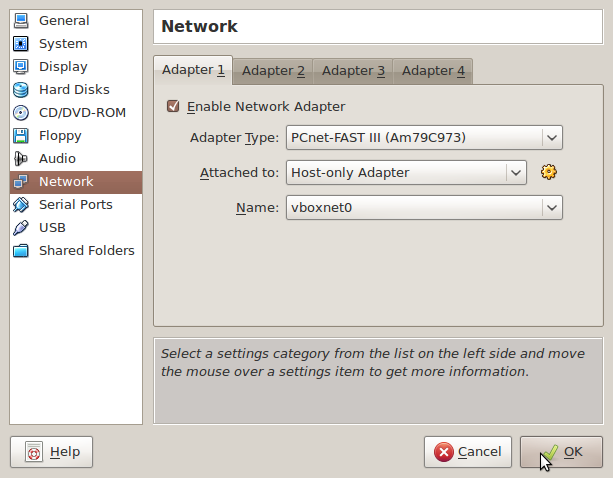
Troubleshooting the Host Only Network Adapter
Having trouble with selecting the network?
If not skip ahead to Start the machine
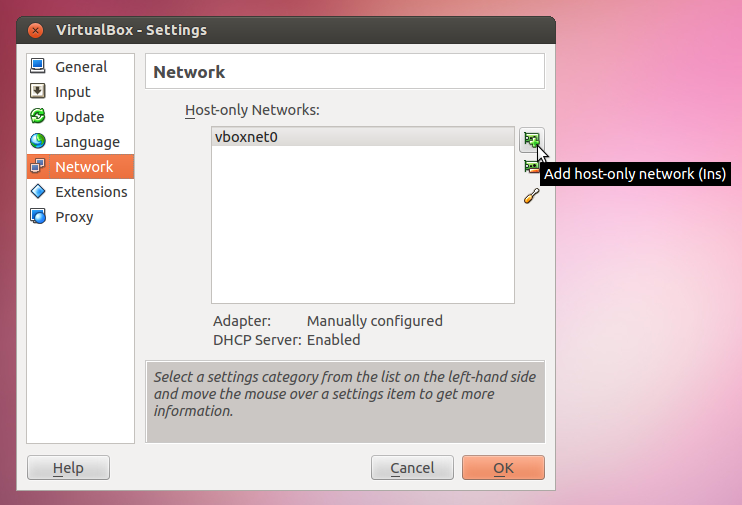
You might have to configure the settings. In the Virtualbox, go to File > Preferences > Network, and click "Add New" (it's the little green "+" symbol to the right - see the screenshot below). You will see a "VirtualBox Host-Only Ethernet Adapter" or a "vboxnet0" added to the list of host-only networks:
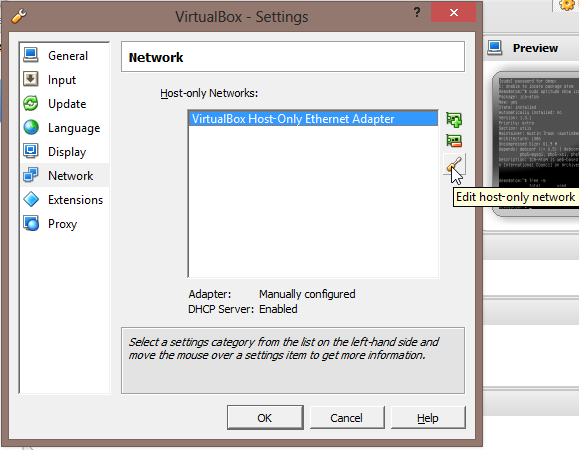
Click the screwdriver icon on the right-hand side to Edit the options for the host-only network
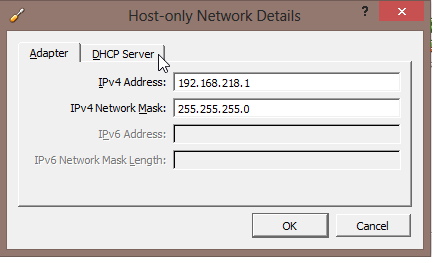
Below are some sample IP ranges for the Adapter and the DHCP Server, which should work for you as well. Ensure that the DHCP server is enabled, and if the values are empty, use the samples below:
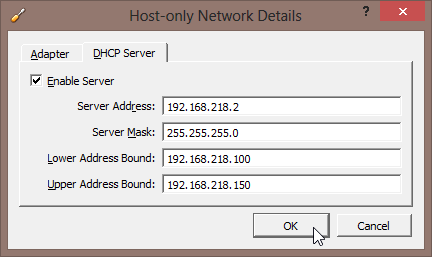
Now go back and follow the previous steps - when you select the network as "Host-Only" it should work this time!
See also: Virtual box How-to Guide for managing network settings including host-only network adapter settings.
Start the machine
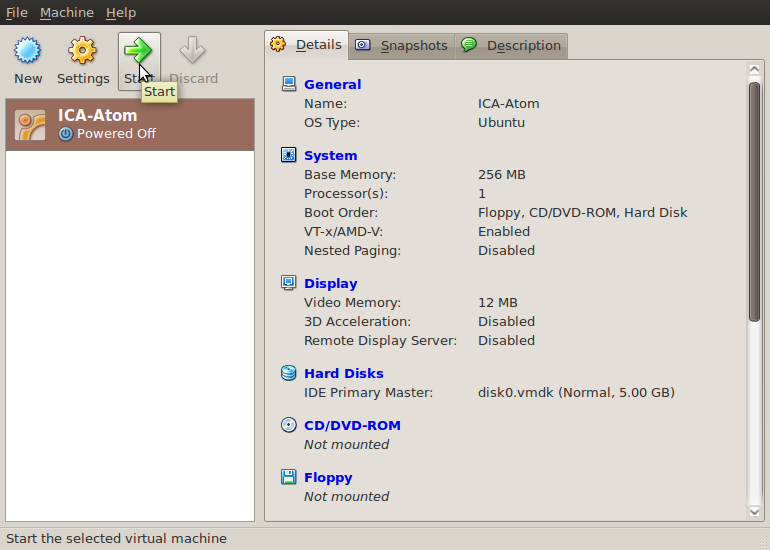
- Click Start
-
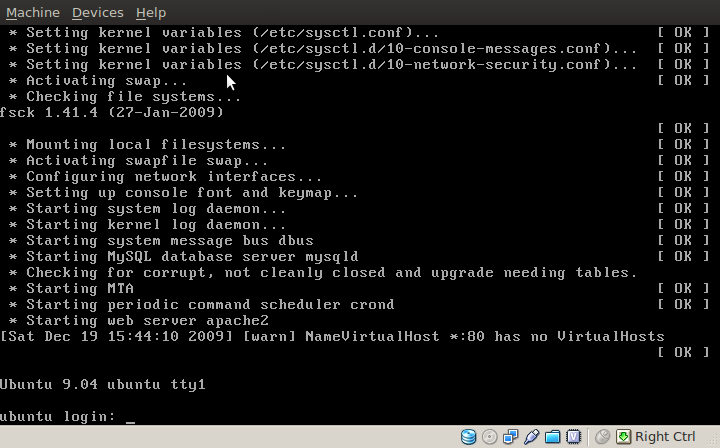
Wait for boot to complete. You do not need to enter the Ubuntu (or "ica-atom") password (bottom of the boot-up screen). You can simply minimize this window for now.
If you do wish to enter the user and password, both are simply "demo" in the ICA-AtoM virtual appliance
- Open your web browser and go to the following URL: http://192.168.56.101/
- Your web browser is now communicating directly with the server inside the virtual appliance, just as if you were pointing your web browser to http://ica-atom.org/ or any other online website
- You will now complete the basic ICA-AtoM installation steps on the copy of the application running inside the virtual appliance
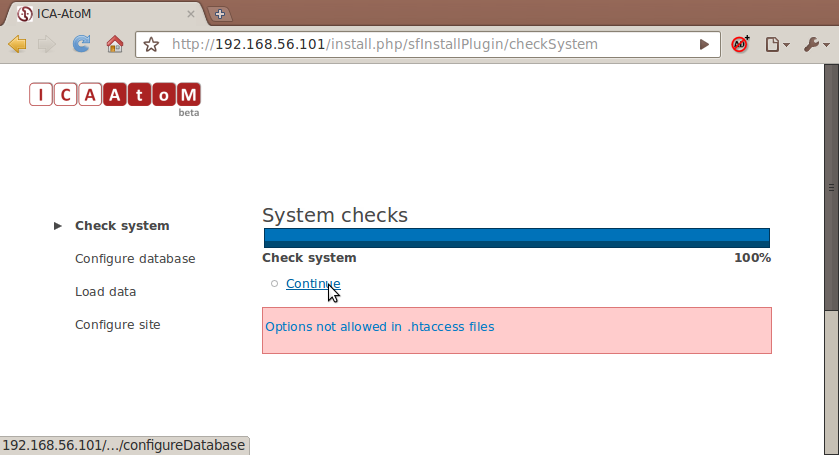
- Click the 'Continue' link on the System Checks page
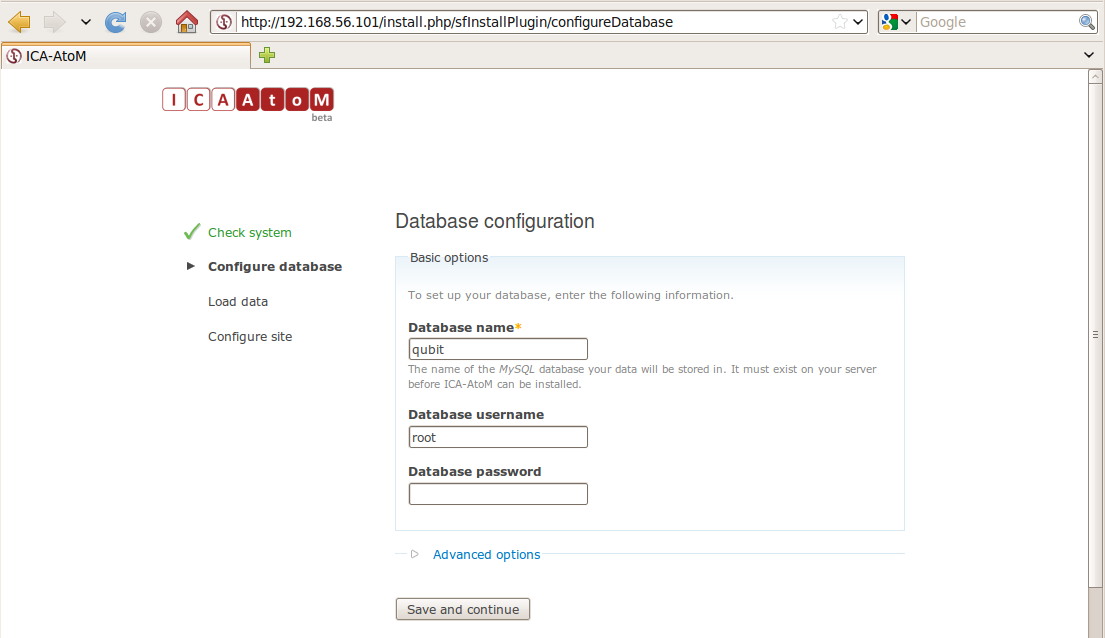
- Don't adjust the default database settings. Accept the default database name ("qubit") and user ("root"). Just press "Save and continue"
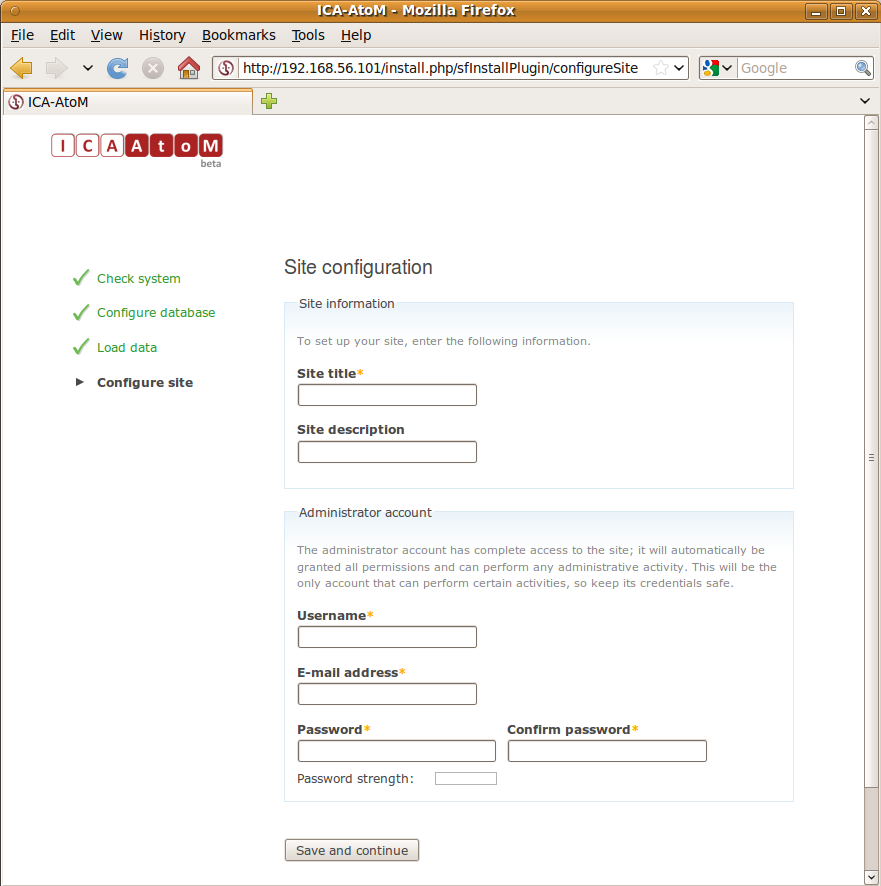
- Give your new ICA-AtoM site a title and (optional) site description
- Create an administrator account for yourself, completing the mandatory username, email, and password fields
- Click "Save and continue"
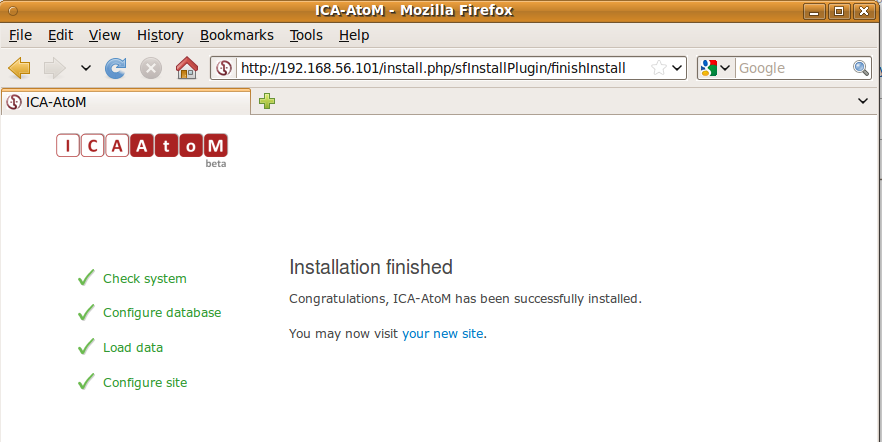
- Congratulations, you have a running copy of ICA-AtoM! See the user manual for instructions on how to use the software
- Be sure to follow the turn off virtual appliance instructions below when you are done so that you save any data you have entered and avoid starting a new ICA-AtoM installation
- The next time you want to use your ICA-AtoM virtual appliance, just open the Sun Virtual Box player, "Start" the ICA-AtoM virtual appliance and point your browser to, http://192.168.56.101/
Set up your new site
Turn off virtual appliance
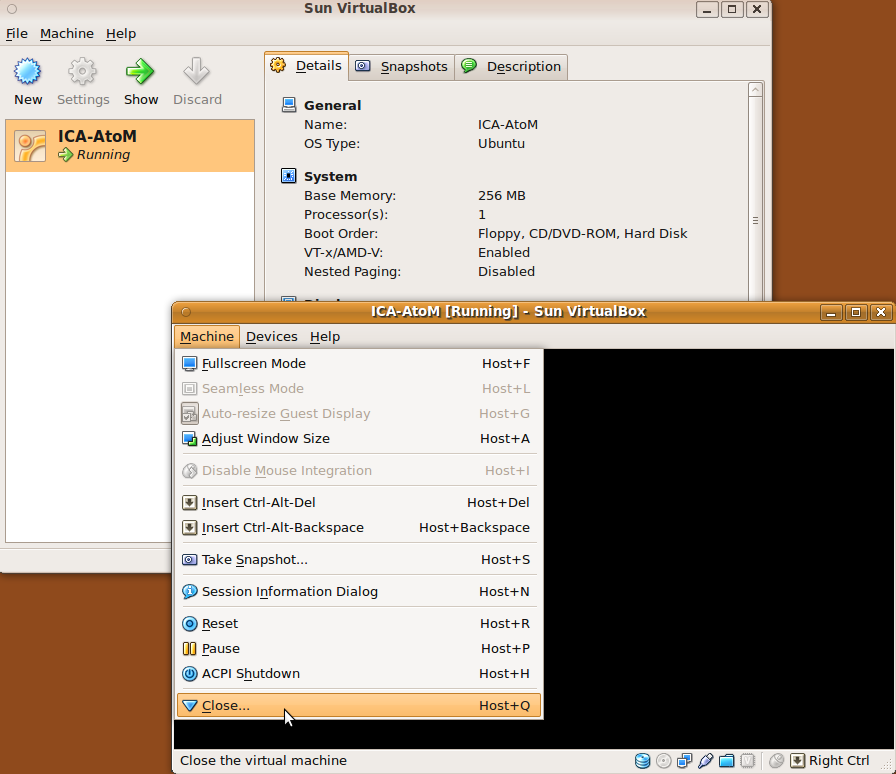
- At the end of your session, turn off the VirtualBox virtual machine by going to Machine > Close
- Select the "Save the machine state" option
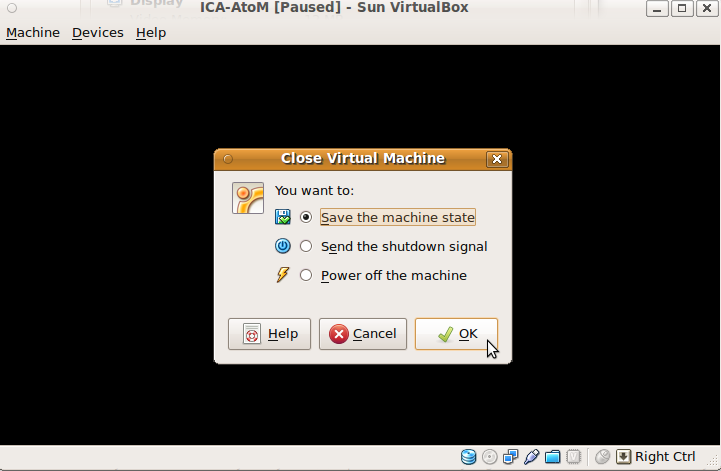
If you don't select the "Save the machine state" option you will lose any data you have entered and have to complete the ICA-AtoM installation anew the next time you start the virtual appliance.
This is from the VirtualBox help manual:
3.4.3. Saving the state of the machine
When you click on the "Close" button of your virtual machine window (at the top right of the window, just like you would close any other window on your system) (or press the Host key together with "Q"), VirtualBox asks you whether you want to "save" or "power off" the VM.
The difference between these three options is crucial. They mean:
Save the machine state: With this option, VirtualBox "freezes" the virtual machine by completely saving its state to your local disk. When you later resume the VM (by again clicking the "Start" button in the VirtualBox main window), you will find that the VM continues exactly where it was left off. All your programs will still be open, and your computer resumes operation.
Saving the state of a virtual machine is thus in some ways similar to suspending a laptop computer (e.g. by closing its lid).
Send the shutdown signal. This will send an ACPI shutdown signal to the virtual machine, which has the same effect as if you had pressed the power button on a real computer. So long as a fairly modern operating system is installed and running in the VM, this should trigger a proper shutdown mechanism in the VM.
Power off the machine: With this option, VirtualBox also stops running the virtual machine, but without saving its state.
This is equivalent to pulling the power plug on a real computer without shutting it down properly. If you start the machine again after powering it off, your operating system will have to reboot completely and may begin a lengthy check of its (virtual) system disks.
As a result, this should not normally be done, since it can potentially cause data loss or an inconsistent state of the guest system on disk.
The "Discard" button in the main VirtualBox window discards a virtual machine's saved state. This has the same effect as powering it off, and the same warnings apply.
Try searching for answers on our Google Groups disscussion page, or in the list of issues. You can also find the user manual for Oracle's VM Virtualbox here, and a Virtualbox FAQ page here. Oracle also maintains its own user forums where issues can be discussed and resolved through community support - check it out here.
KVM
This section is for Linux users only.
Install KVM
KVM is part of the Linux kernel, check with your distribution for installation methods.
Debian/Ubuntu
-
Run the following to check if your processor supports KVM (if nothing is printed you can not use KVM)
$ egrep '(vmx|svm)' --color=always /proc/cpuinfo
-
Install KVM
$ sudo aptitude -DR install qemu-kvm
Download KVM appliance
ica-atom-kvm-1.2.0.tgz (214 MB, md5)
Unzip the KVM appliance. This should result in the following two files appearing in an ubuntu-kvm folder:
- disk0.qcow2
- run.sh < this file can be modified to preserve settings
Run appliance in KVM
-
Change directory to the location of KVM image,
$ cd /path/to/image/ubuntu-kvm
-
Start KVM appliance instance (-m sets the memory in MB in this case 256MB, -redir tells the host machine to direct port 8000 to 80 on the guest instance)
$ sudo kvm -m 256 -redir tcp:8000::80 disk0.qcow2
- Wait until the machine is completely booted (you will see Ubuntu shell login)
- ICA-AtoM is now reachable at http://localhost:8000/
