Difference between revisions of "Import descriptions and terms"
| (32 intermediate revisions by 3 users not shown) | |||
| Line 1: | Line 1: | ||
[[Main Page]] > [[User manual]] > [[Import/export]] > Import descriptions and terms | [[Main Page]] > [[User manual]] > [[Import/export]] > Import descriptions and terms | ||
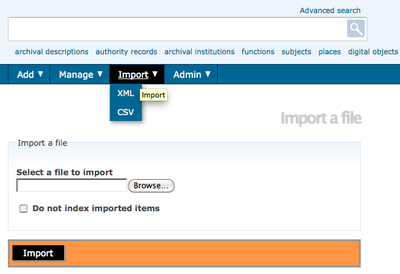
| − | [[Image:import.png| | + | [[Image:import.png|400px|right|thumb|Select an XML fle to import]] |
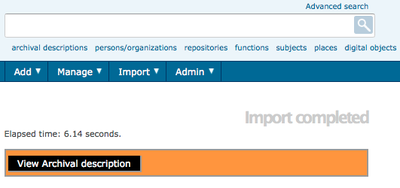
| + | [[Image:ImportComplete.png|400px|right|thumb|Select View Archival Description]] | ||
ICA-AtoM provides an import functionality that can be used to import single [[Glossary#Archival description|archival descriptions]], [[Glossary#Authority record|authority records]], [[Glossary#Archival institution|archival institutions]] and [[Glossary#Term|terms]]. | ICA-AtoM provides an import functionality that can be used to import single [[Glossary#Archival description|archival descriptions]], [[Glossary#Authority record|authority records]], [[Glossary#Archival institution|archival institutions]] and [[Glossary#Term|terms]]. | ||
| − | The following | + | The following file types can be imported: |
* EAD (hierarchical archival descriptions and associated authority records, archival institution descriptions and taxonomy terms) | * EAD (hierarchical archival descriptions and associated authority records, archival institution descriptions and taxonomy terms) | ||
* Dublin Core XML, MODS XML (archival descriptions and associated taxonomy terms) | * Dublin Core XML, MODS XML (archival descriptions and associated taxonomy terms) | ||
| Line 19: | Line 20: | ||
# Click the "View Archival Description" button in the [[Glossary#Button block|button block]] to go to the [[Glossary#View page|view page]] of the highest level of description of the imported object(s) (i.e., the fonds description for an [[Glossary#Archival description|archival description]] or the top-level term in a hierarchical taxonomy). You will be able to view and edit this description and any [[Glossary#Child record|child records]] just as you would if you had entered them in ICA-AtoM instead of importing them. | # Click the "View Archival Description" button in the [[Glossary#Button block|button block]] to go to the [[Glossary#View page|view page]] of the highest level of description of the imported object(s) (i.e., the fonds description for an [[Glossary#Archival description|archival description]] or the top-level term in a hierarchical taxonomy). You will be able to view and edit this description and any [[Glossary#Child record|child records]] just as you would if you had entered them in ICA-AtoM instead of importing them. | ||
| + | <div class="clearfix"> | ||
</div> | </div> | ||
| − | |||
| − | |||
| − | |||
| − | |||
| − | + | If you are importing large datasets please review the documentation on the Qubit-toolkit wiki: [https://www.qubit-toolkit.org/wiki/XML_import/export XML Import/Export]. The first section discussed the use of command-line interface (CLI) as a tool for import. | |
<div class="note"> | <div class="note"> | ||
| Line 32: | Line 30: | ||
</div> | </div> | ||
| + | <div class="clearfix"> </div> | ||
| + | </div> | ||
| + | </div> | ||
| − | = | + | <div class="clearfix"> |
| − | + | == CSV import == | |
| − | The | + | ICA-AtoM Release 1.3 provides a CSV import functionality. A CSV file consists of a number of records (rows), that have identical fields, separated by commas. The CSV import function allows users to import data from a spreadsheet, or another database (as long as the export from the database is CSV format). To learn more about the CSV format see: [http://en.wikipedia.org/wiki/Comma-separated_values Wiki CSV] and scroll to the General functionality section to gain an introduction to CSV and relational databases. |
| − | |||
| − | + | For small data imports (CSV files with less than 1,000 rows) the CSV import located as a drop-down under the Import tab in the [[Glossary#Main menu|Main Menu]] can be used. | |
| − | |||
| − | |||
| − | |||
| − | |||
| − | |||
| − | |||
| − | |||
| − | |||
| − | |||
| − | |||
| − | |||
| − | |||
| − | |||
| − | |||
| − | |||
| − | |||
| − | |||
| − | + | # In the [[Glossary#Main menu|main menu]], hover your cursor over the "Import" menu and select "CSV" | |
| + | # Click Browse to select a file | ||
| + | # Select the Type of information represented in the CSV file from the drop-down list (e.g., archival description, authority record, accessions or event) | ||
| + | # Click Import | ||
| + | # If the file is successfully uploaded, the page will show the elapsed time.If there are errors in the file, the page will display a message describing the errors. | ||
| + | # Use the browse buttons to locate your imported data (e.g., browse archival descriptions if you imported an archival description). | ||
| − | + | If you are importing datasets and you want them to be compatible with ICA-AtoM standards (i.e., ISAD(G) and RAD), you will want to review the first few sections on CSV Import, specifically the section titled "Column Mapping", which provides archival description csv templates. See, the Qubit-toolkit wiki [https://www.qubit-toolkit.org/wiki/CSV_import here]. | |
| − | + | If you are importing large datasets, then you will need to execute these actions using Command-Line Interface (CLI), follow the instructions found on the Qubit-toolkit wiki [https://www.qubit-toolkit.org/wiki/CSV_import here], it is the same wiki page as above. This is necessary because PHP execution limits restrict the number of records you can import using a web interface, see: [https://www.qubit-toolkit.org/wiki/PHP_script_execution_limits PHP execution limits]. We are currently working on a geo-scheduling feature for AtoM Release 2.0, which will allow these large import jobs to be run in the background. | |
| − | + | </div> | |
[[Category:User manual]] | [[Category:User manual]] | ||
Latest revision as of 14:59, 16 October 2012
Please note that ICA-AtoM is no longer actively supported by Artefactual Systems.
Visit https://www.accesstomemory.org for information about AtoM, the currently supported version.
Main Page > User manual > Import/export > Import descriptions and terms
ICA-AtoM provides an import functionality that can be used to import single archival descriptions, authority records, archival institutions and terms.
The following file types can be imported:
- EAD (hierarchical archival descriptions and associated authority records, archival institution descriptions and taxonomy terms)
- Dublin Core XML, MODS XML (archival descriptions and associated taxonomy terms)
- EAC (authority records)
- SKOS (hierarchical taxonomies)
- CSV (comma separated values)
- In the main menu, hover your cursor over the "Import" menu and select "XML".
- Click Browse to select a file
- Click Import
- If the file is successfully uploaded, the page will show the elapsed time. If there are errors in the file, the page will display a message describing the errors. However, it should still be possible to edit and view the imported descriptions. You will need to review them carefully to determine whether the errors in the import file were serious enough to affect the display of the descriptions.
- Click the "View Archival Description" button in the button block to go to the view page of the highest level of description of the imported object(s) (i.e., the fonds description for an archival description or the top-level term in a hierarchical taxonomy). You will be able to view and edit this description and any child records just as you would if you had entered them in ICA-AtoM instead of importing them.
If you are importing large datasets please review the documentation on the Qubit-toolkit wiki: XML Import/Export. The first section discussed the use of command-line interface (CLI) as a tool for import.
You can also import SKOS files from the view page of a taxonomy term. Doing so will result in the highest level term in the SKOS file being imported as a child level of the term currently being viewed.
CSV import
ICA-AtoM Release 1.3 provides a CSV import functionality. A CSV file consists of a number of records (rows), that have identical fields, separated by commas. The CSV import function allows users to import data from a spreadsheet, or another database (as long as the export from the database is CSV format). To learn more about the CSV format see: Wiki CSV and scroll to the General functionality section to gain an introduction to CSV and relational databases.
For small data imports (CSV files with less than 1,000 rows) the CSV import located as a drop-down under the Import tab in the Main Menu can be used.
- In the main menu, hover your cursor over the "Import" menu and select "CSV"
- Click Browse to select a file
- Select the Type of information represented in the CSV file from the drop-down list (e.g., archival description, authority record, accessions or event)
- Click Import
- If the file is successfully uploaded, the page will show the elapsed time.If there are errors in the file, the page will display a message describing the errors.
- Use the browse buttons to locate your imported data (e.g., browse archival descriptions if you imported an archival description).
If you are importing datasets and you want them to be compatible with ICA-AtoM standards (i.e., ISAD(G) and RAD), you will want to review the first few sections on CSV Import, specifically the section titled "Column Mapping", which provides archival description csv templates. See, the Qubit-toolkit wiki here.
If you are importing large datasets, then you will need to execute these actions using Command-Line Interface (CLI), follow the instructions found on the Qubit-toolkit wiki here, it is the same wiki page as above. This is necessary because PHP execution limits restrict the number of records you can import using a web interface, see: PHP execution limits. We are currently working on a geo-scheduling feature for AtoM Release 2.0, which will allow these large import jobs to be run in the background.

