Difference between revisions of "Physical storage"
Jump to navigation
Jump to search
| Line 4: | Line 4: | ||
[[Main Page]] > [[User manual]] > [[UM-3 | UM-3 Add / edit content]] > [[UM-3.1|UM3.1 Add / edit archival descriptions]] > UM-3.1.8 Physical storage | [[Main Page]] > [[User manual]] > [[UM-3 | UM-3 Add / edit content]] > [[UM-3.1|UM3.1 Add / edit archival descriptions]] > UM-3.1.8 Physical storage | ||
| − | [[Image:UM-3.1. | + | [[Image:UM-3.1.8_1.png|500px|right|thumb|archival description: physical storage area]] |
| − | [[Image:UM-3.1. | + | [[Image:UM-3.1.8_2.png|500px|right|thumb|Edit current container (step 3 above)]] |
Revision as of 17:25, 16 July 2009
Please note that ICA-AtoM is no longer actively supported by Artefactual Systems.
Visit https://www.accesstomemory.org for information about AtoM, the currently supported version.
archival description: Physical storage
Main Page > User manual > UM-3 Add / edit content > UM3.1 Add / edit archival descriptions > UM-3.1.8 Physical storage
Use this information area to:
- Select the archival institution which holds the records (Dublin Core and MODS templates only)
- View the resource's current container / location
- Edit the resource's current container information
- Delete an existing container
- Assign to an existing container
- Create a new container and assign the resource to it
1. Select repository (archival institution) (Dublin Core and MODS templates only)
- NOTE: Select a repository only at the highest level of description; leave this field blank at the lower levels if they are all held by the same repository. It is important to remember this because if a repository is selected for the lower levels then these lower levels will all be displayed in the holdings area of an archival institution's context menu box.
- From the drop-down menu, select the archival institution that holds the resource being described.
- The list in the drop-down menu is generated from all existing archival institution records.
- If the repository does not appear in this list, you need to create it separately; see UM-3.3 Add / edit archival institutions.
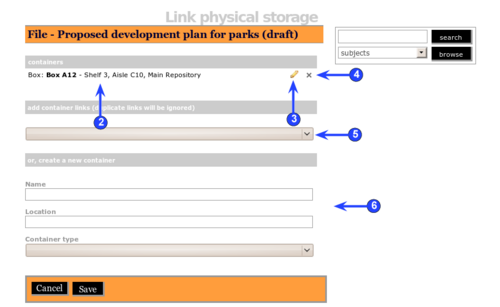
2. View current container / location
- If the resource is currently assigned to a container, the containers section will appear.
- This shows the container name, its location, and its type.
- If the resource is not currently assigned to a container, this section will not appear on your screen.
3. Edit current container
- If the resource is currently assigned to a container and the container information needs to be updated (e.g. the type is not correct or the location has changed), click the edit icon.
- ICA-AtoM routes you to an edit screen for the container; change the Name, Location or Type as required and click the save button in the button block.
- ICA-AtoM returns you to the archival description and re-loads the page, closing all information areas. Re-open the physical storage area to view results of the edit; the containers area displays the updated information.
- Note that this action updates every resource registered to the same container; e.g. if 6 resources are registered to box D9, you need only edit box D9 once and the changes will be reflected in all 6 archival descriptions.
4. Remove a resource from an existing container
- You can remove a resource from a container by clicking the delete icon in the containers section.
5. Assign to an existing container
- To assign the resource to a different container or additional container, use the drop-down menu to select the container you want to use.
- When you save the record, ICA-AtoM will update the description.
6. Create a new container
- If the container you want to use does not appear in the drop-down menu in step 5 above, it is not registered in the system and needs to be created; use the create a new container section for this.
- Enter the container name, type, and location.
- When you save the record, ICA-AtoM creates the container and assigns the resource to it.

