Edit permissions
Please note that ICA-AtoM is no longer actively supported by Artefactual Systems.
Visit https://www.accesstomemory.org for information about AtoM, the currently supported version.
Main Page > User manual > Administer > Edit permissions
- You should have two or more archival institutions in your system, with several hierarchical descriptions attached and some digital objects uploaded, in order to fully test the scenarios on this page
- You can only modify the user's settings if you are logged in as an administrator. After completing the steps in each scenario, log out and log back in as the user you've been creating and modifying in order to see the results of your modifications
Scenario one: Allow the public to view and download master digital objects
The default permissions in ICA-AtoM prevent the public ("anonymous" group) from viewing or download master digital objects (e.g. original TIFF images, original video files, original audio files). By default the public can view the "reference" representation (e.g. derivative JPEG image, derivative flash video or audio file via in-browser flash player) and thumbnail version of any digital object.
Go to admin > groups > anonymous. Click on Archival description permissions. Click Edit. Under All archival descriptions next to Access master click "Allow". Save the record. This will allow the public to view or download the master objects in addition to viewing the thumbnail and reference display copies of digital objects.
Scenario two: In a multi-repository system, add a user who can create, update, edit, delete and publish archival descriptions belonging to one archival institution only (or whatever preferences the Administrator wants to set for the User)
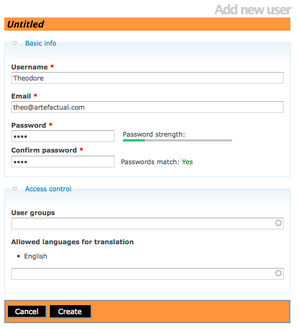
- When refining user permissions you can begin by creating a User, but do not assign them to a unique User group. Leave this blank and it will automatically assign the User to the parent group of authenticated (which is all users who have successfully logged-in)(See fig.1)
- In order to restrict permissions to descriptions of a particular institution, we need to go to Admin menu > Users. Select the User you want to restrict to specific repository permissions.(See fig.2)
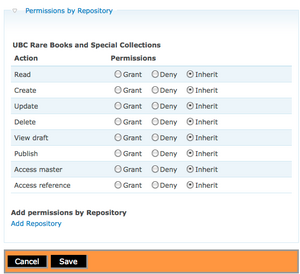
- Select information object permissions. Click Edit. Select Permissions by Repository and click Add Repository. Select Repository name from list. Click on Submit.(See fig.3)
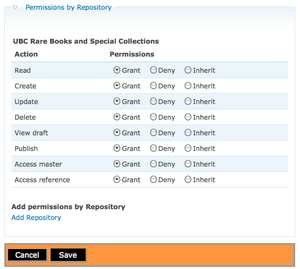
- Click on the circles to Grant Permissions to read, create, update, delete, view draft, publish, access master and access reference.(See fig.4)
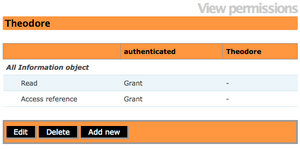
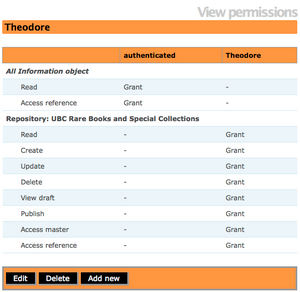
- Click on Save.The Administrator can now view the User and their permissions in relation to a specific Repository.(See fig.5)
- To test your permissions, try logging out and logging back in as the user you created. You should be able to create, edit, delete and publish descriptions belonging to the specified institution only.If you want this User to have permissions to create, update and delete Authority Records and create, update and delete Taxonomies you must "grant" those as well.The default for authenticated group does not grant those permissions.
Scenario three: Add user to the contributor group as an alternative approach
When refining user permissions, it is often useful to start with the group to which the user belongs. You can refine permissions for the group, then add users to the group, all of whom will inherit the modified permissions. Any permission that has not been "granted" by the current group (e.g., contributor, editor) or its parent group (authenticated) is considered "denied" by default. In other words the default for the system is to deny permission unless a rule explicitly grants it.
In the main menu bar, go to admin > groups > contributor. Click on Archival description permissions in the grey menu above the title bar. Your screen will show the default "Grant" permissions for the contributor group - i.e. it shows you everything the user is permitted to do. The contributor group inherits some of its settings from its parent group, authenticated (which is all users who have successfully logged-in).
Click Edit. In the edit screen, you will get a better sense of the group's permission settings. The contributor has the following permissions:
- Read: Grant (inherited from authenticated group)
- Create: Grant
- Update: Grant
- Delete: Deny (default deny)
- View draft: Grant
- Publish: Deny (default deny)
- Access master digital object: Grant
- Access reference digital object: Grant (inherited from authenticated group).
In other words, any user belonging to the contributor group automatically has been granted the ability to read, create and update descriptions, view draft descriptions, and access digital objects. However, the user has been denied the ability to delete or publish descriptions.
Scenario four: Remove the ability to create and update authority records
Permissions for authority records can be refined in some of the same ways they can be refined for archival descriptions. In a multi-repository setting it may be desirable to prevent users from creating and/or updating authority records, because one authority record may be linked to archival descriptions belonging to more than one archival institution.
Scenario five: Add the ability to translate to a specified language
There are two ways to grant translate permissions to non-administrators:
- Make the user a translator by adding them to the translator group (the same way that you added a user to the contributor group). This means that they will be able to translate to any language.
- Instead of making the user a translator, which would allow them to translate to any language, add a language to which a user can translate. This means that they will be able to translate only to the specified language, and only those archival descriptions and authority records they are allowed to update. In this scenario, we will add the ability of the user to translate to Dutch.
Go to admin > users > "UserName". You should be in looking at the View user profile screen; if not, click Profile (to the left of Archival description permissions). Click Edit, then click on the blue "Access control" link. In allowed languages for translation, select Dutch. Click Save. The user will now be able to translate from any source language to Dutch. Note that the list of languages is derived from the languages added in the settings menu. See add/remove languages. Note also that you can add more languages from this list as needed.
Scenario six: Remove the ability to view and download master digital objects
Users belonging to the contributor group automatically inherit the ability to view and download master digital objects.
Go to admin > users > "UserName". Click on Archival description permissions. Click Edit. Under All archival descriptions next to Access master click Deny. Save the record. This will allow the user to view thumbnail and reference display copies of digital objects, but not to view or download the master objects. Note that if you do not wish to have any users belonging to the Contributor group viewing or downloading masters digital objects, deny permission for this activity at the level of the group - i.e. go to admin > groups > contributor and make the change at that level instead of the level of the individual user.
Scenario seven: Add ability to create, update, and delete subject terms
Users belonging to the contributor group do not automatically inherit the ability to create, update, and delete taxonomy terms. You can change these permissions for either the contributor group or an individual user. In this case, we will add the ability to create, update and delete subject terms to our individual user.
Go to admin > users > "UserName". Click on Taxonomy permissions (next to Authority record permissions). Click Edit. Click the blue link "Permissions by taxonomy", then click "Add taxonomy". Select Subjects as the taxonomy name from the auto-complete list. Next to Create, Update and Delete select Grant, then save the record. The user should now be able to create, update and delete subject terms but not other kinds of taxonomy terms.
