Add new event
Jump to navigation
Jump to search
Please note that ICA-AtoM is no longer actively supported by Artefactual Systems.
Visit https://www.accesstomemory.org for information about AtoM, the currently supported version.
Add new event
Main Page > User manual > UM-3 Add / edit content > UM-3.1 Add / edit archival descriptions > UM-3.1.6 MODS elements > UM-3.1.6.1 Add new event
1. Add new event
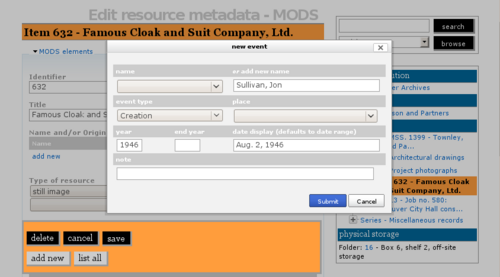
- The add new event dialogue box is used to enter the name of the creator, publisher or contributor and the date(s) of creation, publication or contribution.
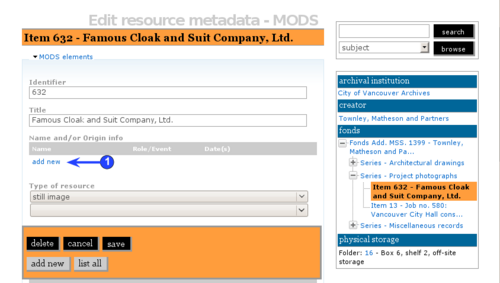
- Click the add new link under Name. A dialogue box will open up for data entry and the rest of the screen will go grey.
2. name
- Select a name from the drop-down menu. The values in this list are drawn from authority records.
3. or add new name
- If the name you want does not appear in the drop-down menu under Name, you can create a new name in this field. This automatically creates a new authority record.
4. event type
- Select an event type from the drop-down menu (for example, creation, contribution, publication, broadcasting, reproduction, etc.). The values in this list are drawn from the Event types taxonomy.
- If a lower level of description has the same creator, contributor or publisher etc. as its parent record leave this field blank. The value will be inherited from the parent record.
3. date
- Year / end year:
- Enter the opening and closing years of the date range.
- ICA-AtoM uses these values for sorting and searching purposes.
- Use only four-digit numbers.
- If the start and end years are the same, enter only the year and leave the end year blank.
- Complete at lower levels of description even if you are leaving the event type field blank (e.g. when describing an item, you do not need to repeat the creator name from the collection description, but you do need to enter the date a date for the item).
- Date display
4. place
- If desired, select a place from the drop-down menu. The places on this list are derived from the Places taxonomy.
5. submit
- Click submit. You will be returned to the original screen. To add other events, repeat the process as often as needed. Note that you must save the record before leaving the edit screen or you will lose all of the data you have just entered.

