Please note that ICA-AtoM is no longer actively supported by Artefactual Systems.
Visit https://www.accesstomemory.org for information about AtoM, the currently supported version.
Main Page > User manual > UM-3 Add / edit content > UM-3.1 Add / edit archival descriptions
Add / edit archival descriptions
This page describes how to:
Create new archival descriptions
1. Click the Add / edit tab on the Main menu bar.
2. Click the "Archival description" sub-tab on the Main menu bar; ICA-AtoM takes you to the List screen showing all existing archival descriptions.
3. Click the Add new text that appears in the "Name" column header or the Add new button at the foot of the list; ICA-AtoM creates a new record and routes you to a blank Edit screen for data entry.
4. Enter data (see Data entry: archival descriptions for detailed instructions and notes on fields]]).
5. Click the Save button to commit the new record.
6. Note that the behaviour of the Cancel button changes after you first click the Save button. Before saving, "Cancel" = "delete record". After the first save, a Delete button appears for deleting, while "Cancel" = "do not commit the data since the last save".
Edit an existing description
1. Navigate to the description you want to edit.
- Either click the AddEdit > ArchivalDescriptions tab on the and select the record from the list; or
- Use the to find the record you want to edit.
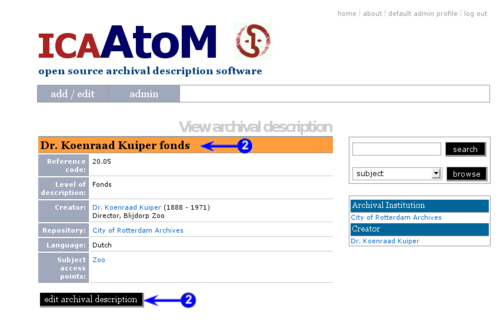
2. By any method, when you select a description from a List screen, ICA-AtoM displays the full record on the View screen, showing any fields in which information has already been entered. To begin editing, click the RecordTitleBar at the head of the record or the Edit button at the foot.
3. ICA-AtoM opens the record on the DataEntry screen. It displays the record with all RecordAreas closed; click on an area to access the fields contained under it.
4. Add / revise data as required (see below for detailed instructions and notes on fields).
5. To discard all changes, click the Cancel button; ICA-AtoM returns you to the View screen, with no changes saved.
6. To save changes, click the Save button; ICA-AtoM returns you to the View screen, all changes saved.
|width="40%" align="right"|
insertScreenshot
|}
Edit screen (data entry)
|
The Edit archival description screen is structured into six RecordAreas based on ISAD(G)'s information areas:
Click on a RecordArea to expand it (display fields); click again to collapse it (hide fields). Note that whenever you save a record, ICA-AtoM collapses all RecordAreas.
The following notes aim only to clarify ICA-AtoM procedures; for guidelines on what information to record in particular fields, consult ISAD(G) as the content standard. The notes are organized by field, with links to the applicable ISAD(G) section(s).
|
insertScreenshot
|
Identity area
|
The IdentityArea contains fields that uniquely identify the archival description.
1. Reference code (ISAD(G) 3.1.1):
- Enter the reference code that uniquely identifies the archival unit under description.
2. Title (ISAD(G) 3.1.2):
- Enter the authorized title of the unit of description.
3. Alternate title (ISAD(G) 3.1.2):
- Enter an alternate title of the unit.
- In the current version of ICA-AtoM (v0.6) you can only register one alternate title; in future iterations, you should be able to register as many alternates as you need.
4. Title notes (ISAD(G) 3.1.2, ISAD(G) 3.6.1):
- Multi-value field displaying notes in a list form.
- Create as many title notes as you need.
- Notes that have already been entered appear with a red DeleteInfoIcon beside them.
- Use the last row (with the green AddInfoIcon beside it) to add a new note.
5. Note (ISAD(G) 3.1.2, ISAD(G) 3.6.1):
6. Note type (ISAD(G) 3.6.1):
- Defaults to "Title note" and cannot be changed: any note you create here will always be a "Title note".
- To create other types of notes, go to the Control record area.
7. AddInfoIcon:
- Click to register the new title note.
8. DeleteInfoIcon:
- Click to delete an existing title note.
9. Level of description (ISAD(G) 3.1.4):
- Select the appropriate level of description from the drop-down list.
- List terms can be customized by Administrators to suit their institution's arrangement system.
10. Next upper level of description:
- Select the unit immediately above the current one in the hierarchy of arrangement ("parent record").
- Leave blank if the current unit represents the highest level of arrangement (e.g. a fonds).
11. Extent and medium (ISAD(G) 3.1.5):
- Enter information relating to the physical size, media, and formats.
- Structure data according to your institution's standards (e.g. separate entries by commas or separate lines).
|
insertScreenshot
|
Context area
|
The ContextArea contains fields that provide information about the origins and custody of the archival material being described.
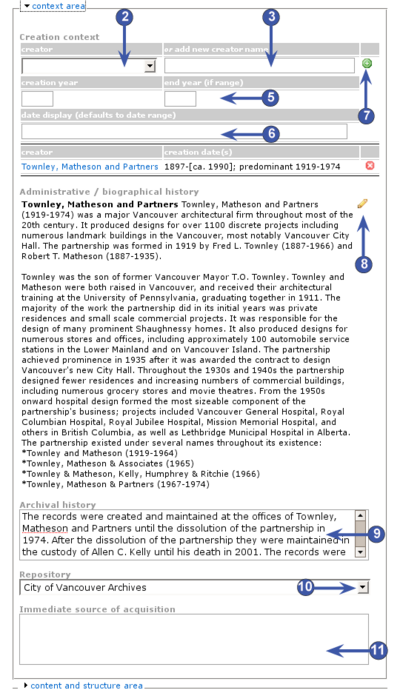
1. Creation context:
- Multi-value field displaying creation events in a list form.
- A creation event captures dates of creation: an entity creating the archival materials being described over a certain date range.
- Register as many creation events as you need. ISAD(G) recognizes more than one type of date (e.g. dates of document creation vs dates of accumulation, see ISAD(G) 3.1.3). And in some arrangement systems there may be more than one creator (e.g. in a series system, a series may be successively controlled by differen bodies over time).
- The first entry in the list (containing empty text boxes) is for registering a new creation event.
- Any subsequent entries show events already registered.
2. Creator and Add new name:
- Select the creator's name from the drop-down list in the Creator field.
- ICA-AtoM generates the list from all existing authority records.
- If the creator's name does not appear in the list, use the Add new name field to enter the creator's name.
- If you select a name from the drop-down list, ICA-AtoM will ignore any text you may have entered in the Add new name field.
- Note that you can leave both of these field blank; in this case, the unit will inherit creator information from its parent record (next highest level of description).
- At the highest level of description, you should always include the creator; the Administrative history / biographical sketch is drawn from the creator's authority record.
- Lower levels inherit creator information from higher levels: use only if creator is different than the creator of the parent record (next upper level of description).
3. Creation year / End year (ISAD(G) 3.1.3):
- Enter the opening and closing years of the date range.
- ICA-AtoM uses these values for sorting and searching purposes.
- Use only four-digit numbers.
- If the start and end years are the same, enter only in the start year and leave the end year blank.
- Complete at lower levels of description even if you are leaving the Creator name field blank (e.g. when describing a series, you do not need to repeat the Creator name from the fonds description, but you do need to enter the date range of the series).
- Do not use any qualifiers here (e.g. "ca.") or typographical symbols (e.g. "[194?]") to express uncertainty (see step4).
4. Date display ( ISAD(G) 3.1.3):
- Enter the date range as you want it to appear to the viewer.
- Add any additional text to qualify date range (e.g. "ca. 1940-1980" or "[1940]-1980; predominant 1973-1980").
- Whereas Creation year and End year are used internally for database searching and sorting purposes, this field is for display purposes.
5. AddInfoIcon (green +):
- Click to register the creation event.
- Behind the scenes, ICA-AtoM creates a related record in the Event table and displays it as the next entry in the list.
- If you selected an existing authority record as the Creator field in step2, ICA-AtoM provides a link to the creator's authority record (blue text).
- If you entered a new name in the Add new name field, ICA-AtoM creates a new authority record for that entity and provides a link to it (blue text).
6. DeleteInfoIcon (red X):
- Click to delete an existing creation event.
7. Administrative / biographical history (ISAD(G) 3.2.2):
- Text block displaying data from the creator's authority record.
- If you have registered more than 1 creator in the creator events (see steps 1-5), the administrative histories / biographical sketches of each will appear here sequentially, separately by a line (horizontal rule).
- Because the data actually resides in another record in another table, it cannot be directly edited here; to edit, click the EditInfoIcon (see step8 below).
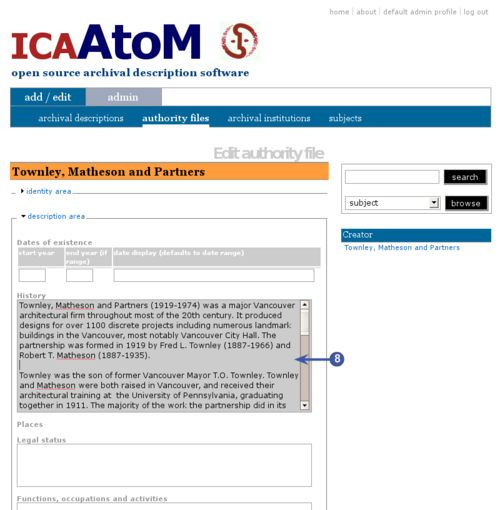
8. EditInfoIcon (pencil):
- Click to edit the Administrative / biographical history field; ICA-AtoM routes you to the related authority record.
- Make changes and save; ICA-AtoM returns you to the Edit archival description screen.
- Note that upon return all RecordAreas are collapsed.
9. Archival history (ISAD(G) 3.2.3):
- Enter information relating to the history of custody over the material being described.
10. Repository:
- Select from the drop-down list the institution that holds the archival material under description.
- ICA-AtoM generates the list from existing archival institution records.
- Typically you need only enter this information at the highest level of description (e.g. the fonds or collection; series in a series system); it can be left blank at the lower levels if they are all stored in the same repository.
11. Immediate source of acquisition (ISAD(G) 3.2.4):
- Enter information relating to the circumstances leading to the acquisition of the material by the archival institution.
|
|
Content and structure area
|
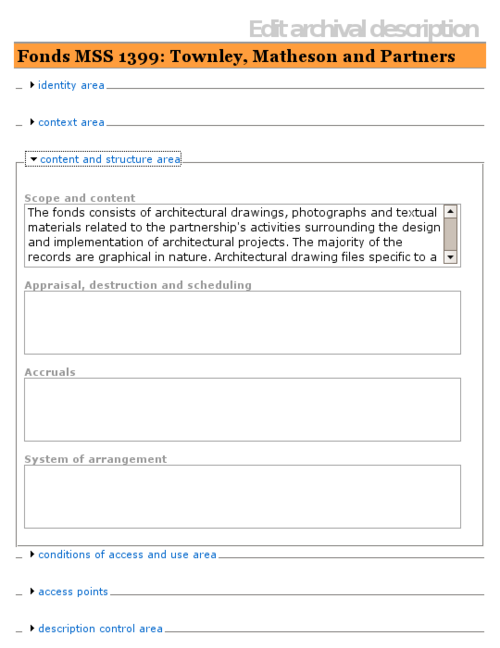
The ContentAndStructureArea contains fields that provide information relating to the content and arrangement of the materials under description. These are all basic text fields. For practical purposes there are no limits on field length (fields can hold up 16 million characters); scroll arrows will appear if needed.
1. Scope and content (ISAD(G) 3.3.1):
- Enter information relating to scope and content as per ISAD(G) rule.
2. Appraisal, destruction and scheduling information (ISAD(G) 3.3.2):
- Enter information relating to appraisal, destruction and scheduling as per ISAD(G) rule.
3. Accruals (ISAD(G) 3.3.3):
- Enter information relating to future accruals as per ISAD(G) rule.
4. System of arrangement (ISAD(G) 3.3.4):
- Enter information relating to the system of arrangement as per ISAD(G) rule.
|
|
Conditions of access and use area
|
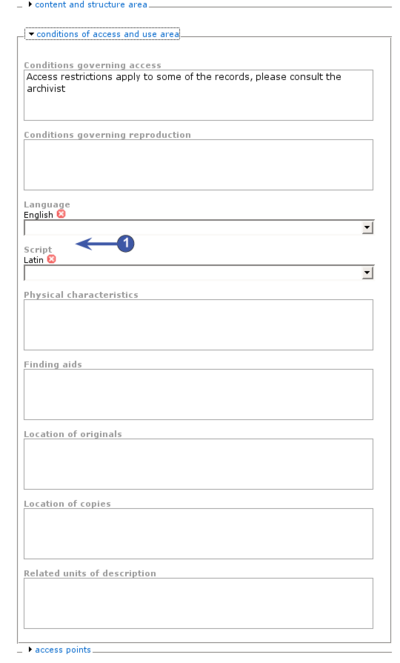
The ConditionsOfAccessAndUseArea contains fields that provide information about the availability of the material being described. Most of the fields in this area are basic text fields; the exceptions are Languages and Scripts (see steps 3 below).
1. Conditions governing access (ISAD(G) 3.4.1):
- Enter information relating to conditions governing access as per ISAD(G) rule.
2. Conditions governing reproduction (ISAD(G) 3.4.2):
- Enter information relating to conditions governing reproduction as per ISAD(G) rule.
3. Language (ISAD(G) 3.4.3):
- Multi-value fields displaying in list form the language(s) and script(s) employed in the archival material under description.
- Select the language / script from the drop-down list.
- Click the Save button.
- ICA-AtoM saves the records, collapsing the ConditionsOfAccessAndUseArea; click to re-open.
- The selected language / script now appears in the list above the data entry field.
- Repeat for other languages / scripts if required.
- To delete a language / script from the list, click the red DeleteInfoIcon beside it.
- Note that future releases of ICA-AtoM will normalize these fields to the standard behaviour of multi-value fields in the system (i.e. present to the user an AddInfoIcon button for registering an entry rather than having to save the record).
4. Physical characteristics (ISAD(G) 3.4.3):
- Enter information relating to physical characteristics that affect access to the material or technical requirements needed to access it as per ISAD(G) rule.
5. Finding aids (ISAD(G) 3.4.5):
- Enter information relating to the existence of other finding aids to the material as per ISAD(G) rule.
6. Location of originals (ISAD(G) 3.5.1):
- Enter information relating to the location of the originals of the materials described (if they are copies) as per ISAD(G) rule.
- Note that in future releases of ICA-AtoM, this field should be moved to a new record area (AlliedMaterials to better reflect the ISAD(G) standard.
7. Location of copies (ISAD(G) 3.5.2):
- Enter information relating to the location of copies of the materials described *In as per ISAD(G) rule.
- Note that in future releases of ICA-AtoM, this field should be moved to a new record area (AlliedMaterials to better reflect the ISAD(G) standard.
8. Related units of description (ISAD(G) 3.5.3):
- Enter information relating to related units of description as per ISAD(G) rule.
- Note that in future releases of ICA-AtoM, this field should be moved to a new record area (AlliedMaterials to better reflect the ISAD(G) standard.
|
|
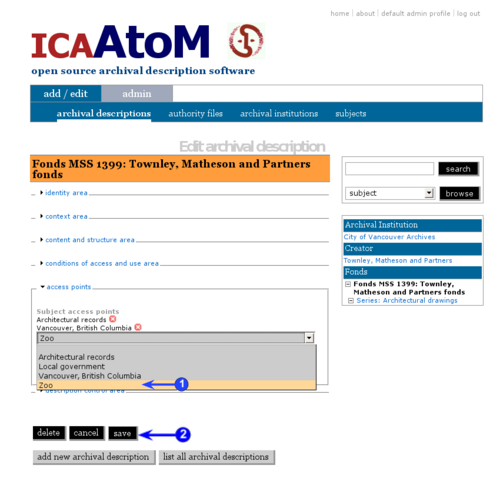
Access points
|
The AccessPoints area links archival descriptions to terms drawn from controlled vocabularies as a means of facilitating acess and retrieval. As of version 0.5, ICA-AtoM can create Subject access points; future releases should include Place and Name access points.
Access points are multi-value fields displaying terms in a list form. To create a new access point:
1. Select a term from the drop-down list.
2. Click the Save button.
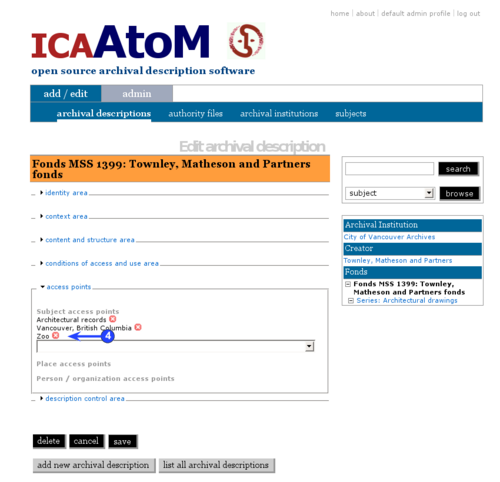
3. ICA-AtoM saves the record, collapsing the AccessPoints area; click to re-open; the selected term now appears in the list above the data entry field.
4. Repeat for other terms as required.
5. To delete an access point from the list, click the red DeleteInfoIcon beside it.
Note that future releases of ICA-AtoM will normalize these fields to the standard behaviour of multi-value fields in the system (i.e. present to the user an AddInfoIcon button for registering an entry rather than having to save the record).
|
|
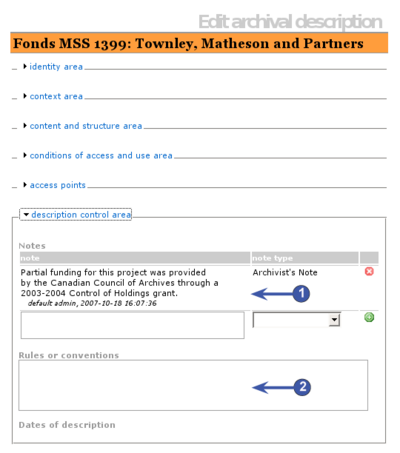
Description control area
|
The DescriptionControlArea contains fields that provide information about the creation and maintenance of the description record.
1. Notes: ISAD(G) 3.6
- Multi-value field displaying notes as a list; there is no limit to the number of notes you can add.
- Enter the note, select the type and click the green AddInfoIcon to register.
- To delete an existing note, click the red DeleteInfoIcon beside it.
- See above Multi-value fields for more information on the behaviour of multi-value fields.
2. Rules or conventions: ISAD(G) 3.7.2
3. Dates of description: ISAD(G) 3.7.3
- Not yet available (as of ICA-AtoM 0.4).
- [Multi-value field, registering the dates the description was originally created and subsequently revised.]
|
|
Delete archival descriptions
|
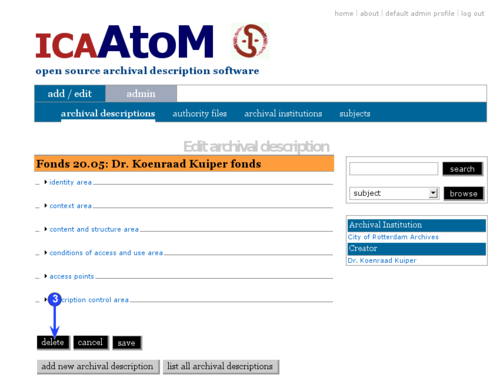
Only Editors and Administrators can delete records in ICA-AtoM. To delete an archival description:
1. Navigate to the description you want to delete.
2. Switch from the View to the Edit screen by clicking the RecordTitleBar or Edit button.
3. Click the Delete button.
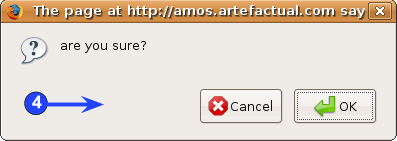
4. ICA-AtoM prompts you to confirm the delete request; click OK.
5. ICA-AtoM deletes the record and returns you to the List screen.
6. Note the following consequences of deleting an archival description:
- If the record has lower-level descriptions registered to it (is a "parent record"), all the lower-level records are also deleted - e.g. if you delete a series, any sub-series, files or items that belong to the series will also be deleted.
- Any access points assigned to the description are also deleted.
- Any date events associated with the description are also deleted.
- The authority record of the associated creator is not deleted.
- The archival institution record of the associated repository is not deleted.
|
|
