Difference between revisions of "Add/edit archival institutions"
| Line 1: | Line 1: | ||
| − | + | <span class="pageTitle">Add / edit archival institutions</span> | |
| − | + | [[Main Page]] > [[User manual|(UM) User manual]] > [[UM-3|UM-3 Add / edit content]] > UM-3.3 Add / edit archival institution descriptions | |
| + | |||
| + | == Overview == | ||
This page describes how to create, edit and delete descriptions of [[Glossary#Archival institution|archival institutions]] and how to exit the [[Glossary#Edit screen|Edit screen]] (return to the [[Glossary#View mode|view mode]]). | This page describes how to create, edit and delete descriptions of [[Glossary#Archival institution|archival institutions]] and how to exit the [[Glossary#Edit screen|Edit screen]] (return to the [[Glossary#View mode|view mode]]). | ||
| Line 7: | Line 9: | ||
For detailed notes on individual fields, see: | For detailed notes on individual fields, see: | ||
*[[UM-3.3.1|Data entry: archival institutions]]. | *[[UM-3.3.1|Data entry: archival institutions]]. | ||
| + | *[[UM-3.4 | Data entry: description control area (same for all record types)]]. | ||
| − | == Create a new archival | + | == Create a new archival institution == |
[[Image:um3-3Create1.png|500px|right|thumb|Create a new institution]] | [[Image:um3-3Create1.png|500px|right|thumb|Create a new institution]] | ||
| Line 24: | Line 27: | ||
| − | 4. Enter data | + | 4. Enter data. |
| + | *See [[UM-3.3.1|Data entry: archival institutions]] for detailed explanations and notes on fields. | ||
| − | 5. | + | 5. To quit the create process without registering the new record, click the [[Glossary#Cancel|Cancel button]] in the [[Glossary#Button block|Button block]]. ICA-AtoM returns you to your original starting point; no new record is created. |
| − | 6. | + | 6. To register the new record, click the [[Glossary#Create button|Create button]]. ICA-AtoM leaves you on the [[Glossary#Edit screen|Edit screen]] but the changes the [[Glossary#Button block|Button block]] to [[Glossary#Save button|Save]], [[Glossary#Cancel button|Cancel]], and [[Glossary#Delete|Delete]]. |
| − | |||
| − | |||
| − | |||
<br clear=right> | <br clear=right> | ||
| Line 53: | Line 54: | ||
| − | 4. To discard all changes, click the [[Glossary#Cancel button|Cancel button]]; ICA-AtoM returns you to the [[Glossary#View screen|View screen]], with no changes saved. | + | 4. To discard all changes, click the [[Glossary#Cancel button|Cancel button]] in the [[Glossary#Button block|Button block]]; ICA-AtoM returns you to the [[Glossary#View screen|View screen]], with no changes saved. |
| − | 5. To save changes, click the [[Glossary#Save button|Save button]]; ICA-AtoM commits the changes and re-loads the page. | + | 5. To save changes, click the [[Glossary#Save button|Save button]] in the [[Glossary#Button block|Button block]]; ICA-AtoM commits the changes and re-loads the page. |
*Note that re-loading the page causes all [[Glossary#Record area|record areas]] to '''close'''; this behaviour will be revised in a future release of ICA-AtoM (e.g. page will stay open as it was before save). | *Note that re-loading the page causes all [[Glossary#Record area|record areas]] to '''close'''; this behaviour will be revised in a future release of ICA-AtoM (e.g. page will stay open as it was before save). | ||
| − | |||
<br clear=right> | <br clear=right> | ||
| Line 72: | Line 72: | ||
| − | 3. Click the [[Glossary#Delete button|Delete button]]. | + | 3. Click the [[Glossary#Delete button|Delete button]] in the [[Glossary#Button block|Button block]]. |
| Line 83: | Line 83: | ||
6. Note the following consequences of deleting an archival institution: | 6. Note the following consequences of deleting an archival institution: | ||
| − | * | + | *You will be prompted whether or not to delete the related [[Glossary#Authority record|authority record]]. |
| − | |||
<br clear=right> | <br clear=right> | ||
| Line 107: | Line 106: | ||
5. Click a link on the [[Glossary#System menu|System menu]] to launch some other action. | 5. Click a link on the [[Glossary#System menu|System menu]] to launch some other action. | ||
| + | |||
| + | <span class="revision">Last revised: 2 June 2008 (ICA-AtoM v0.6)</span> | ||
Revision as of 18:04, 2 June 2008
Please note that ICA-AtoM is no longer actively supported by Artefactual Systems.
Visit https://www.accesstomemory.org for information about AtoM, the currently supported version.
Add / edit archival institutions
Main Page > (UM) User manual > UM-3 Add / edit content > UM-3.3 Add / edit archival institution descriptions
Overview
This page describes how to create, edit and delete descriptions of archival institutions and how to exit the Edit screen (return to the view mode).
For detailed notes on individual fields, see:
- Data entry: archival institutions.
- Data entry: description control area (same for all record types).
Create a new archival institution
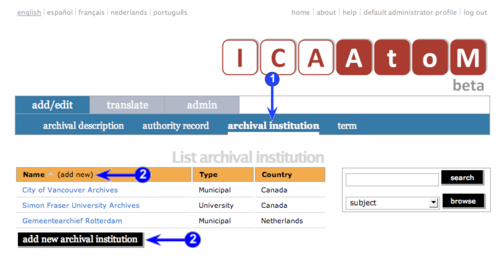
1. Click the Add / edit tab on the Main menu bar.
2. Click the "Archival institution" sub-tab on the Main menu bar; ICA-AtoM takes you to the List screen showing all existing institutions.
3. Click the Add new text that appears in the "Name" column header or the Add new button at the foot of the list; ICA-AtoM creates a new record and routes you to a blank Edit archival institution screen for data entry.
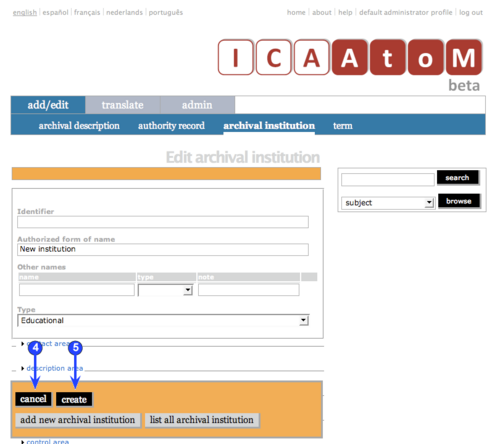
4. Enter data.
- See Data entry: archival institutions for detailed explanations and notes on fields.
5. To quit the create process without registering the new record, click the Cancel button in the Button block. ICA-AtoM returns you to your original starting point; no new record is created.
6. To register the new record, click the Create button. ICA-AtoM leaves you on the Edit screen but the changes the Button block to Save, Cancel, and Delete.
Edit an existing institution
1. Navigate to the institution you want to edit.
- For more information on navigation in ICA-AtoM, see in this manual: Access content.
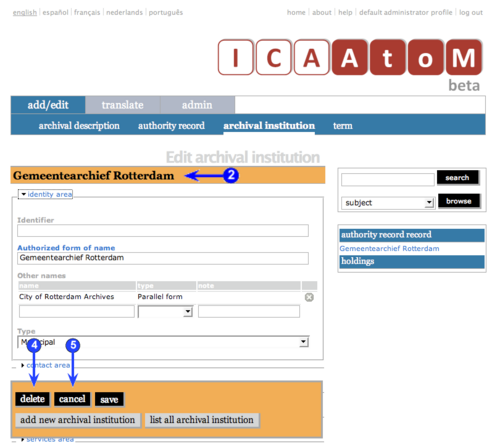
2. Switch from View mode to Edit mode by clicking the Record title bar or Edit button; this takes you to the Edit archival institution screen. It displays the record with all record areas closed; click on an area to access the fields grouped under it.
3. Add / revise data as required (see Data entry: archival institutions) for detailed explanations and notes on fields).
4. To discard all changes, click the Cancel button in the Button block; ICA-AtoM returns you to the View screen, with no changes saved.
5. To save changes, click the Save button in the Button block; ICA-AtoM commits the changes and re-loads the page.
- Note that re-loading the page causes all record areas to close; this behaviour will be revised in a future release of ICA-AtoM (e.g. page will stay open as it was before save).
Delete an existing institution
1. Navigate to the institution you want to delete.
- For more information on navigation in ICA-AtoM, see in this manual: Access content.
2. Switch from View mode to Edit mode by clicking the Record title bar or Edit button; this takes you to the Edit screen.
3. Click the Delete button in the Button block.
4. ICA-AtoM prompts you to confirm the delete request; click "OK".
5. ICA-AtoM deletes the record and returns you to the List screen.
6. Note the following consequences of deleting an archival institution:
- You will be prompted whether or not to delete the related authority record.
Exit the Edit screen
You can exit the Edit screen by a number of methods. Whatever you do, always click the Save button before exiting, otherwise any changes you made will be lost.
1. Click the Record title bar to return to the description in view mode (View screen).
2. Click a sub-tab on the Main menu bar to go to that List screen.
3. Use the Search/browse box to run a search or browse action.
4. Click the ICA-AtoM logo to return to the Home screen.
5. Click a link on the System menu to launch some other action.
Last revised: 2 June 2008 (ICA-AtoM v0.6)


