Difference between revisions of "CD-1.0-4"
| (2 intermediate revisions by the same user not shown) | |||
| Line 7: | Line 7: | ||
| − | 1. Once you have logged in (see [[CD-1.0-3|View / navigate / edit]], step 4), the [[Main menu bar]] appears. To create a new record, click the | + | 1. Once you have logged in (see [[CD-1.0-3|View / navigate / edit]], step 4), the [[Main menu bar|main menu bar]] appears. To create a new record, click the [[Add / edit tab|add/edit tab]]; click the sub-tab for the type of record you want to create ([[Archival description|archival description]], [[Authority record|authority record]], [[Archival institution|archival institution]], [[Term|term]]). ICA-AtoM displays a list of all existing records of that type. |
| − | 2. Click the | + | 2. Click the ''add new'' link at the head of the list or the [[Add new button|add new button]] at the foot of the list. ICA-AtoM will open a blank data-entry screen. |
| − | 3. Fields are organized into sections based on the [[Information area|information areas]] in the corresponding ICA descriptive standard. Click on an area to toggle it between open (display fields) and closed (hide fields). | + | 3. [[Field|Fields]] are organized into sections based on the [[Information area|information areas]] in the corresponding ICA descriptive standard. Click on an area to toggle it between open (display fields) and closed (hide fields). |
| − | 4. Enter data into the empty text fields. Some fields provide [[Drop-down menu|drop-down menu lists]] for you to select values. To upload [[Digital object|digital files]] (e.g. photos, videos, PDFs), go to the ''Digital object'' | + | 4. Enter data into the empty text fields. Some fields provide [[Drop-down menu|drop-down menu lists]] for you to select values from. To upload [[Digital object|digital files]] (e.g. photos, videos, PDFs), go to the ''Digital object information area'', click the ''browse'' button to navigate to the file, select it and click ''open'' (not illustrated). |
| − | 5. When you have completed data entry click the [[Create button]] in the floating [[Button block]] at the bottom of the screen. ICA-AtoM commits the record. The | + | 5. When you have completed data entry click the [[Create button|create button]] in the floating [[Button block|button block]] at the bottom of the screen. ICA-AtoM commits the record. The ''save'' button now appears in place of the [[Create button|create button]]. |
| − | 6. Whenever you create a new record or edit an existing one, '''always click the Create / | + | 6. Whenever you create a new record or edit an existing one, '''always click the [[Create button|create]] / ''save'' button before exiting the record''' (e.g. by clicking a link, performing a search); '''otherwise you will lose the new data when you leave the record'''. |
Latest revision as of 12:01, 17 July 2008
Please note that ICA-AtoM is no longer actively supported by Artefactual Systems.
Visit https://www.accesstomemory.org for information about AtoM, the currently supported version.
4. Add new records / enter data
Main Page > Demo CD > English > 4. Add new records / enter data
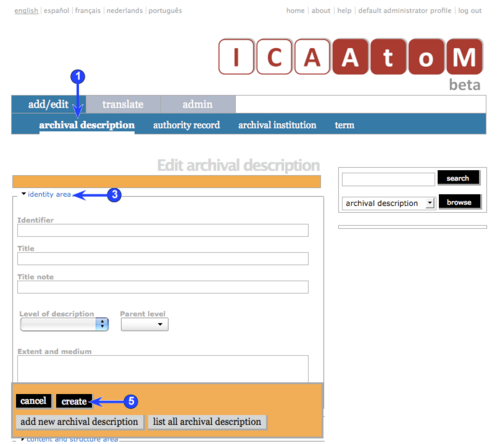
1. Once you have logged in (see View / navigate / edit, step 4), the main menu bar appears. To create a new record, click the add/edit tab; click the sub-tab for the type of record you want to create (archival description, authority record, archival institution, term). ICA-AtoM displays a list of all existing records of that type.
2. Click the add new link at the head of the list or the add new button at the foot of the list. ICA-AtoM will open a blank data-entry screen.
3. Fields are organized into sections based on the information areas in the corresponding ICA descriptive standard. Click on an area to toggle it between open (display fields) and closed (hide fields).
4. Enter data into the empty text fields. Some fields provide drop-down menu lists for you to select values from. To upload digital files (e.g. photos, videos, PDFs), go to the Digital object information area, click the browse button to navigate to the file, select it and click open (not illustrated).
5. When you have completed data entry click the create button in the floating button block at the bottom of the screen. ICA-AtoM commits the record. The save button now appears in place of the create button.
6. Whenever you create a new record or edit an existing one, always click the create / save button before exiting the record (e.g. by clicking a link, performing a search); otherwise you will lose the new data when you leave the record.
