Difference between revisions of "Global settings"
| Line 4: | Line 4: | ||
[[Main Page]] > [[User manual|(UM) User manual]] > [[UM-7|UM-7 Administer ICA-AtoM]] > [[UM-7.3|UM-7.3 Customize settings]] > UM-7.3.1 Specify width of reference images | [[Main Page]] > [[User manual|(UM) User manual]] > [[UM-7|UM-7 Administer ICA-AtoM]] > [[UM-7.3|UM-7.3 Customize settings]] > UM-7.3.1 Specify width of reference images | ||
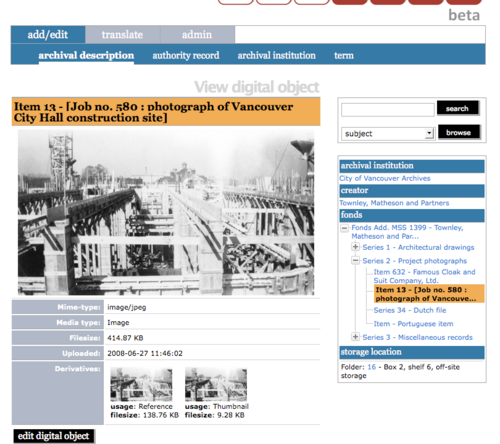
| − | [[Image:um7-3-2Width1.png|500px|right|thumb|View digital object screen showing reference display copy of image]] | + | [[Image:um7-3-2Width1.png|500px|right|thumb|''View digital object'' screen showing reference display copy of image]] |
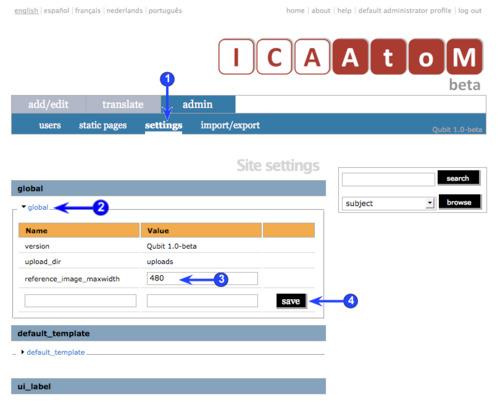
[[Image:um7-3-2Width2.png|500px|right|thumb|Edit maximum width setting]] | [[Image:um7-3-2Width2.png|500px|right|thumb|Edit maximum width setting]] | ||
Revision as of 14:13, 4 July 2008
Please note that ICA-AtoM is no longer actively supported by Artefactual Systems.
Visit https://www.accesstomemory.org for information about AtoM, the currently supported version.
Specify width of reference images
Main Page > (UM) User manual > UM-7 Administer ICA-AtoM > UM-7.3 Customize settings > UM-7.3.1 Specify width of reference images
One of ICA-AtoM's design assumptions is that the digital objects users upload typically will be too large to easily display in an ICA-AtoM field. Therefore, when you upload a digital object, ICA-AtoM creates two derivative images: a thumbnail and a reference display copy. This
- The thumbnail is for display on the View archival description screen.
- The higher-resolution reference display copy is for display on the View digital object screen.
- Typically the user clicks the thumbnail to access the View digital object screen; then clicks the reference display copy there to access the master file that was originally uploaded.
ICA-AtoM ships with a default setting for the maximum width size of the reference display copy: 480 pixels. System administrators can increase or decrease this size to suit the requirements of their institution or network.
1. Click the Admin > Settings tab.
2. Click the Global information area to display global settings.
3. Revise the reference_image_maxwidth value as required.
4. Click the Save button.

