Difference between revisions of "Manage menus"
Jump to navigation
Jump to search
| Line 1: | Line 1: | ||
| − | + | [[Main Page]] > [[User manual]] > [[UM-7|UM-7 Administer ICA-AtoM]] > [[UM-7.4|UM-7.4 Customize settings]] > UM-7.4.2 Customize menus | |
| − | |||
| − | |||
| − | [[Image: | + | [[Image:UM-7.4.2_1.png|500px|right|thumb|Site menu list screen]] |
| − | [[Image: | + | [[Image:UM-7.4.2_2.png|500px|right|thumb|Menu edit screen]] |
| + | ICA-AtoM includes a menu customization feature that allows [[administrator|administrators]] to change menu labels, move menus to different positions on the screen, create new menus and delete existing menus. | ||
| − | |||
| + | 1. Click the ''admin > menus'' tab | ||
| + | *This will open the site menu [[list screen]]. | ||
| + | *The menus are listed as links; clicking on a link will open an [[edit screen]] for the menu. | ||
| + | *Note that some menus have a lock icon next to them. This means that they cannot be deleted, although they can be edited. | ||
| − | |||
| + | 2. Edit menu | ||
| + | *In the site menu list, click on a blue menu link to edit the menu. This will open the menu [[edit screen]]. | ||
| − | |||
| + | 3. Change menu label | ||
| + | *In the Label [[field]] of the menu [[edit screen]], enter a new label for the menu. | ||
| + | *Click the ''save'' button. | ||
| − | |||
| − | |||
| − | |||
| + | 4. Move menu | ||
| + | *There are two ways to move a menu: | ||
| + | **In the site menu [[list screen]], click on the up or down arrow to the left of each menu link. | ||
| + | **In the menu [[edit screen]], use the [[drop-down menu]] in the Parent menu [[field]] to select a new parent menu. | ||
| + | ***For example, if you wish to make the ''archival institution'' menu a sub-tab of the [[admin tab]] on the [[main menu bar]], select "admin" from the [[drop-down menu]]. | ||
| + | *Click the ''save'' button. | ||
| − | |||
| − | |||
| − | |||
| + | 5. Add new menu | ||
| + | *Click the ''add new menu'' button at the bottom of the site menu [[list screen]] or the ''add new'' button on the [[button block]] in the menu [[edit screen]]. This will open an [[edit screen]] for the new menu. | ||
| + | *In the Name [[field]], enter a name for the menu. | ||
| + | *In the Label [[field]], enter the label. | ||
| + | **This need not be the same as the menu name. The label will be the name of the menu that appears on your screen. | ||
| + | *In the Path [[field]], enter the URL of the menu. | ||
| + | **This may be either a database table or a [[static page]]. | ||
| + | *In the Description [[field]], enter descriptive information about the menu if desired. | ||
| + | *In the Parent menu [[field]], use the [[drop-down menu]] to select a new parent menu. | ||
| + | *Click the ''save'' button | ||
| − | |||
| − | |||
| − | + | 6. Delete menu | |
| − | 6. | + | *To delete a menu, click on the [[delete button]] in button block in the menu's [[edit screen]]. Although this action cannot be undone, the menu can be restored as a new menu. See step 5, above. |
| − | * | ||
| − | |||
| − | |||
| − | |||
| − | |||
Revision as of 08:12, 16 June 2009
Please note that ICA-AtoM is no longer actively supported by Artefactual Systems.
Visit https://www.accesstomemory.org for information about AtoM, the currently supported version.
Main Page > User manual > UM-7 Administer ICA-AtoM > UM-7.4 Customize settings > UM-7.4.2 Customize menus
ICA-AtoM includes a menu customization feature that allows administrators to change menu labels, move menus to different positions on the screen, create new menus and delete existing menus.
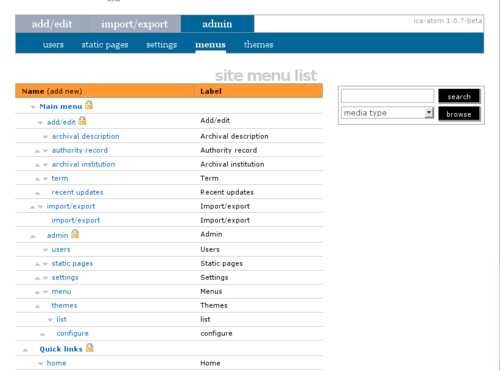
1. Click the admin > menus tab
- This will open the site menu list screen.
- The menus are listed as links; clicking on a link will open an edit screen for the menu.
- Note that some menus have a lock icon next to them. This means that they cannot be deleted, although they can be edited.
2. Edit menu
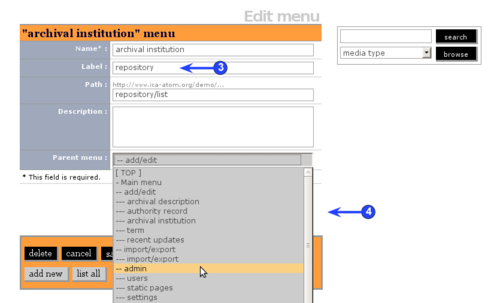
- In the site menu list, click on a blue menu link to edit the menu. This will open the menu edit screen.
3. Change menu label
- In the Label field of the menu edit screen, enter a new label for the menu.
- Click the save button.
4. Move menu
- There are two ways to move a menu:
- In the site menu list screen, click on the up or down arrow to the left of each menu link.
- In the menu edit screen, use the drop-down menu in the Parent menu field to select a new parent menu.
- For example, if you wish to make the archival institution menu a sub-tab of the admin tab on the main menu bar, select "admin" from the drop-down menu.
- Click the save button.
5. Add new menu
- Click the add new menu button at the bottom of the site menu list screen or the add new button on the button block in the menu edit screen. This will open an edit screen for the new menu.
- In the Name field, enter a name for the menu.
- In the Label field, enter the label.
- This need not be the same as the menu name. The label will be the name of the menu that appears on your screen.
- In the Path field, enter the URL of the menu.
- This may be either a database table or a static page.
- In the Description field, enter descriptive information about the menu if desired.
- In the Parent menu field, use the drop-down menu to select a new parent menu.
- Click the save button
6. Delete menu
- To delete a menu, click on the delete button in button block in the menu's edit screen. Although this action cannot be undone, the menu can be restored as a new menu. See step 5, above.

