Difference between revisions of "Translate interface"
| Line 1: | Line 1: | ||
| − | <span class="pageTitle">Translate | + | <span class="pageTitle">Translate interface</span> |
| − | [[Main Page]] > [[ | + | [[Main Page]] > [[User manual]] > [[UM-5|UM-5 Translate content / interface]] > UM-5.3 Translate interface |
| − | [[Image: | + | [[Image:UM-5.3.png|500px|right|thumb|Translate interface (English to Dutch shown)]] |
| − | |||
| + | The [[user interface]] is the set of elements that allow the user to interact with the ICA-AtoM application. These elements include the [[main menu bar]], [[Drop-down menu|drop-down menus]], [[Context menu box|context menu boxes]], [[Title bar|title bars]], [[Column header|column headers]], buttons, [[Field|fields]] and [[Field label|field labels]] and any other elements used to navigate ICA-AtoM or to search for, view, add, modify and delete [[database content]]. | ||
| − | |||
| + | 1. In the [[language menu]], click the language into which you are translating. Your selected language will appear underlined. Because you have [[translator]] [[Access privilege|access privileges]], the yellow [[translation bar]] will appear along the bottom of the screen. | ||
| − | |||
| − | + | 2. Navigate to the page you wish to translate. | |
| − | + | 3. Click the ''translate user interface'' button on the [[translation bar]]. | |
| − | + | 4. ICA-AtoM opens the [[translation panel]] in the lower frame of your screen. The panel is organized into three columns: | |
| − | + | *Column 1 (''page text'') lists all elements for translation; all elements shaded with a yellow background have not yet been translated; elements with no shading (white background) have already been translated and appear in the list under their translated name. | |
| + | *Column 2 (''source'') is activated when you click an element in column 1 and shows the name of the element in the [[default source language]] (English). | ||
| − | + | *Column 3 (''translation'') is activated when you click an element in column 1 and provides the input field for the translation. | |
| − | + | 5. Select an element for translation; ICA-AtoM bolds the selected element. | |
| − | |||
| + | 6. Add or edit the translation in column 3. | ||
| − | |||
| + | 7. When translation is complete, click or tab out of column 3; the element will now appear in column 1 unshaded and with its translated name. | ||
| − | |||
| − | + | 8. Continue until all elements on the page have been translated. | |
| + | 9. Note that some element names include a number enclosed by percent sign (e.g. "%1%", "%2%"). This is a template token indicating a variable whose value is dynamically generated by the context in which the template is displayed. The template token must be included in the translation. | ||
| − | + | *For an enumeration of elements that include tokens, see [[UM-5.3.1|UM-5.3.1 Translate template tokens]]. | |
| + | |||
| + | |||
| + | 10. Click the ''save'' button; ICA-AtoM closes the [[translation panel]]. All [[user interface]] elements on the screen will now appear in their translations. | ||
Revision as of 16:26, 16 June 2009
Please note that ICA-AtoM is no longer actively supported by Artefactual Systems.
Visit https://www.accesstomemory.org for information about AtoM, the currently supported version.
Translate interface
Main Page > User manual > UM-5 Translate content / interface > UM-5.3 Translate interface
The user interface is the set of elements that allow the user to interact with the ICA-AtoM application. These elements include the main menu bar, drop-down menus, context menu boxes, title bars, column headers, buttons, fields and field labels and any other elements used to navigate ICA-AtoM or to search for, view, add, modify and delete database content.
1. In the language menu, click the language into which you are translating. Your selected language will appear underlined. Because you have translator access privileges, the yellow translation bar will appear along the bottom of the screen.
2. Navigate to the page you wish to translate.
3. Click the translate user interface button on the translation bar.
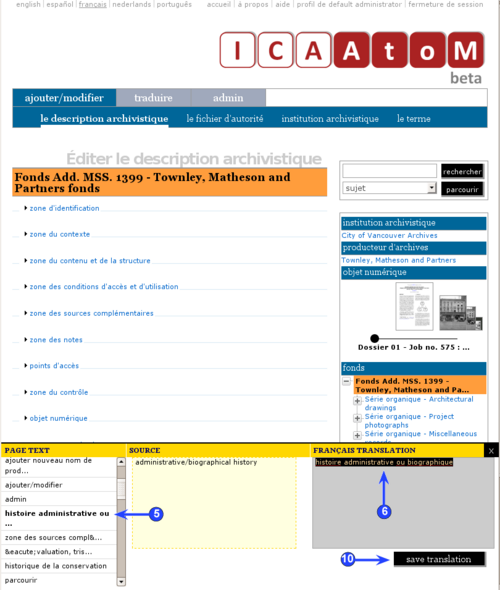
4. ICA-AtoM opens the translation panel in the lower frame of your screen. The panel is organized into three columns:
- Column 1 (page text) lists all elements for translation; all elements shaded with a yellow background have not yet been translated; elements with no shading (white background) have already been translated and appear in the list under their translated name.
- Column 2 (source) is activated when you click an element in column 1 and shows the name of the element in the default source language (English).
- Column 3 (translation) is activated when you click an element in column 1 and provides the input field for the translation.
5. Select an element for translation; ICA-AtoM bolds the selected element.
6. Add or edit the translation in column 3.
7. When translation is complete, click or tab out of column 3; the element will now appear in column 1 unshaded and with its translated name.
8. Continue until all elements on the page have been translated.
9. Note that some element names include a number enclosed by percent sign (e.g. "%1%", "%2%"). This is a template token indicating a variable whose value is dynamically generated by the context in which the template is displayed. The template token must be included in the translation.
- For an enumeration of elements that include tokens, see UM-5.3.1 Translate template tokens.
10. Click the save button; ICA-AtoM closes the translation panel. All user interface elements on the screen will now appear in their translations.
