Difference between revisions of "Add a new donor record"
Jump to navigation
Jump to search
| (19 intermediate revisions by the same user not shown) | |||
| Line 3: | Line 3: | ||
<div class="clearfix"> | <div class="clearfix"> | ||
| − | == Add a new donor record == | + | |
| + | == Add a new donor to the accession record == | ||
[[File:Adddonor.png|500px|right|thumb| Donor dialog]] | [[File:Adddonor.png|500px|right|thumb| Donor dialog]] | ||
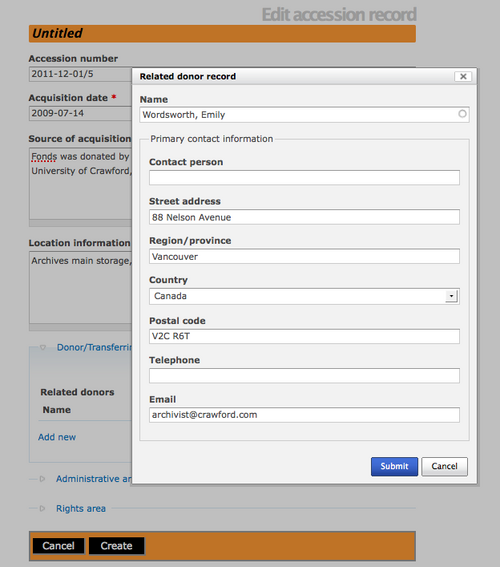
#In the [[Glossary#Accession record|accession record]] edit page, open the Donor/Transferring body area and you click on the "Add new" hyperlink. A dialog will pop-up and you can enter the names and contact information for related donors using the [[Glossary#Donor dialog| donor dialog]]. The dialog allows you to include the donor name and give an alternative contact person. | #In the [[Glossary#Accession record|accession record]] edit page, open the Donor/Transferring body area and you click on the "Add new" hyperlink. A dialog will pop-up and you can enter the names and contact information for related donors using the [[Glossary#Donor dialog| donor dialog]]. The dialog allows you to include the donor name and give an alternative contact person. | ||
#Once you have completed entering the donor information click on the "Submit" button to save and return to the [[Glossary#Accession record|accession record edit template.]] | #Once you have completed entering the donor information click on the "Submit" button to save and return to the [[Glossary#Accession record|accession record edit template.]] | ||
| − | #You need to click on the "Save | + | #Click on the "Create" button in the accession record button block to save the donor record and the accession record. |
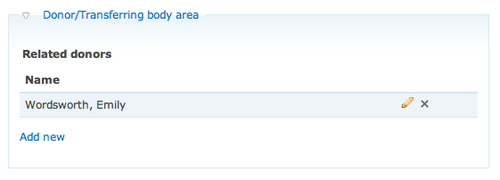
| + | #[[File:addnewdonor.png|500px|right|thumb|Add new donor record by selecting hyperlink "Add new" or edit existing donor record using pencil icon or delete existing donor record with x icon.]] If you choose to add another donor to the accession record, simply click on the "Edit" button in the button block and select the Donor/Transferring area. Click on the "Add new" hyperlink and another [[Glossary#Donor dialog|donor dialog]] will open for data entry. You can also choose to edit the existing donor record by selecting the "pencil" icon. Add an additional donor and click on the "Submit" button. | ||
| + | #You need to click on the "Create" button in the button block of the accession record to complete adding the new donor. | ||
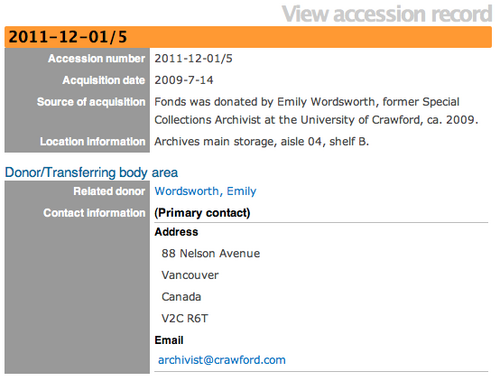
| + | #[[File:viewdonoraccession.png|500px|right|thumb|View the donor hyperlink in the related accession record]]ICA-AtoM will take you to a view accession record screen and the related donor name should be hyperlinked under the donor area. | ||
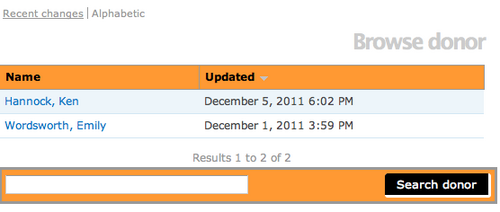
| + | #[[File:BrowseDonor.png|500px|right|thumb|Browse donor list]]You can also navigate to the Browse donor screen and see your new donor's name in the list. | ||
| + | </div> | ||
| + | |||
| + | <div class="clearfix"> | ||
| + | |||
| + | </div> | ||
| + | |||
| + | <div class="note"> | ||
| + | |||
| + | Depending upon your workflow, you might want to add donors to ICA-AtoM during the accession process or you might want to add donors to ICA-AtoM as a separate process. The first approach is the easiest and most logical. The second approach requires you to create the donor and then add the donor to the accession record - this approach also requires that you have donors existing in the database, otherwise you cannot browse the list and "add a new" donor. | ||
| + | |||
| + | </div> | ||
| + | |||
| + | == Add a donor == | ||
| + | |||
| + | [[File:ManageMenu.png|500px|right|thumb| Manage menu with drop-down list]] | ||
| + | #Navigate to the Manage menu and select "Donors" from the drop-down list. | ||
| + | #[[File:BrowseDonor.png|500px|right|thumb|Browse menu for donors]]ICA-AtoM takes you to a Browse menu. Click on the hyperlink of an existing donor name. | ||
| + | #[[File:ViewDonor.png|500px|right|thumb|View donor record]]ICA-AtoM takes you to the view donor record screen. Click on the "Add new" button in the button block. | ||
| + | #[[File:blankeditdonor.png|500px|right|thumb|Blank edit donor template]]ICA-AtoM takes you to the blank edit donor screen, ready for data entry. Enter the new donor name and select "Add new" under the contact area to enter contact information about your new donor. Click on the "Submit" button and ICA-AtoM returns you to the edit donor screen. Select "Create" to save the new donor information. | ||
| + | #[[File:adddonorname.png|500px|right|thumb|Select donor name from drop-down list.]]The new donor record is saved and can be added to a new or existing accession record by selecting the "Add new" hyperlink under Donor/Transferring body area and selecting the donor name from the drop-down list in the Name field. Remember to click on the "Submit" button after selecting the donor name and adding any additional contact information.The final step is to Save the accession record. Your donor record will now be linked to an accession record. | ||
| + | |||
| + | |||
| + | </div> | ||
| + | |||
| + | |||
| + | |||
| + | [[Category:User manual]] | ||
Latest revision as of 18:17, 8 December 2011
Please note that ICA-AtoM is no longer actively supported by Artefactual Systems.
Visit https://www.accesstomemory.org for information about AtoM, the currently supported version.
Main Page > User manual > Add/edit content > Add/edit donors > Add a new donor record
Add a new donor to the accession record
- In the accession record edit page, open the Donor/Transferring body area and you click on the "Add new" hyperlink. A dialog will pop-up and you can enter the names and contact information for related donors using the donor dialog. The dialog allows you to include the donor name and give an alternative contact person.
- Once you have completed entering the donor information click on the "Submit" button to save and return to the accession record edit template.
- Click on the "Create" button in the accession record button block to save the donor record and the accession record.
- If you choose to add another donor to the accession record, simply click on the "Edit" button in the button block and select the Donor/Transferring area. Click on the "Add new" hyperlink and another donor dialog will open for data entry. You can also choose to edit the existing donor record by selecting the "pencil" icon. Add an additional donor and click on the "Submit" button.
- You need to click on the "Create" button in the button block of the accession record to complete adding the new donor.
- ICA-AtoM will take you to a view accession record screen and the related donor name should be hyperlinked under the donor area.
- You can also navigate to the Browse donor screen and see your new donor's name in the list.
Depending upon your workflow, you might want to add donors to ICA-AtoM during the accession process or you might want to add donors to ICA-AtoM as a separate process. The first approach is the easiest and most logical. The second approach requires you to create the donor and then add the donor to the accession record - this approach also requires that you have donors existing in the database, otherwise you cannot browse the list and "add a new" donor.
Add a donor
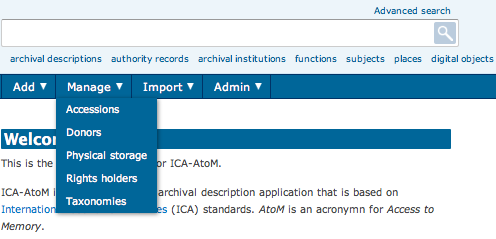
- Navigate to the Manage menu and select "Donors" from the drop-down list.
- ICA-AtoM takes you to a Browse menu. Click on the hyperlink of an existing donor name.
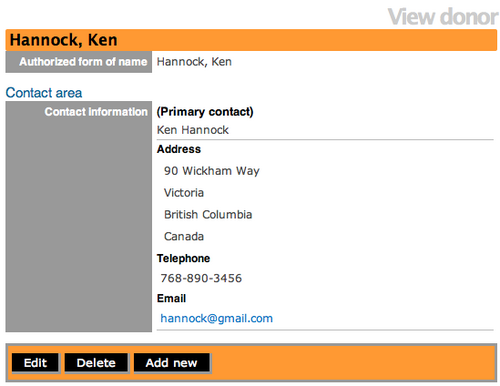
- ICA-AtoM takes you to the view donor record screen. Click on the "Add new" button in the button block.
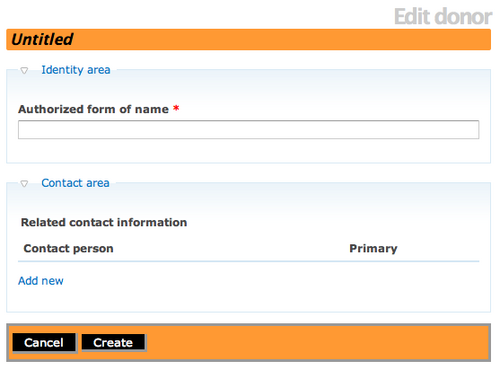
- ICA-AtoM takes you to the blank edit donor screen, ready for data entry. Enter the new donor name and select "Add new" under the contact area to enter contact information about your new donor. Click on the "Submit" button and ICA-AtoM returns you to the edit donor screen. Select "Create" to save the new donor information.
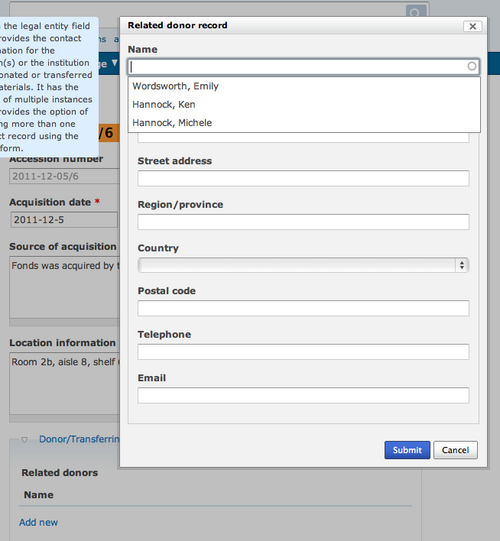
- The new donor record is saved and can be added to a new or existing accession record by selecting the "Add new" hyperlink under Donor/Transferring body area and selecting the donor name from the drop-down list in the Name field. Remember to click on the "Submit" button after selecting the donor name and adding any additional contact information.The final step is to Save the accession record. Your donor record will now be linked to an accession record.
