Difference between revisions of "Add a new archival description"

From ICA-AtoM
Jump to navigation Jump to search
 
(159 intermediate revisions by 7 users not shown)
Line 1: Line 1:
<span class="pageTitle">Data entry: archival descriptions</span>
+
[[Main Page]] > [[User manual]] > [[Add/edit content]] > [[Add/edit archival descriptions]] > Create a new archival description
  
[[Main Page]] > [[User manual|(UM) User manual]] > [[UM-3 | UM-3 Add / edit content]] > [[UM-3.1|UM3.1 Add / edit archival descriptions]] > UM-3.1.1 Data entry: archival descriptions
 
  
== Overview ==
+
<div class="clearfix">
  
[[Image:um3-1-1ArchivalDescription.png|500px|right|thumb|Edit screen: all record areas collapsed]]
+
== Add a new top level description ==
  
The [[Glossary#Edit screen|Edit screen]] for archival descriptions is structured into six [[Glossary#Area of description|area of descriptions based on [[ISAD(G)]]'s "information areas". Click on a [[Glossary#Area of description|area of description]] to expand it (display fields); click again to collapse it (hide fields). Note that as of ICA-AtoM version 0.6, whenever you save a record ICA-AtoM re-loads the page, collapsing all areas.
+
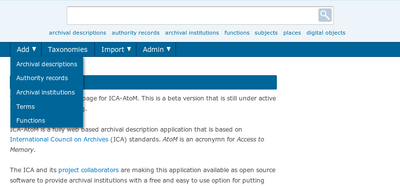
# In the [[Glossary#Main menu|main menu]], hover your cursor over the "Add" menu.[[Image:addNew.png|400px|right|thumb|Go to Add > Archival descriptions]]
 +
# Select "Archival descriptions" from the drop-down menu.
 +
# ICA-AtoM takes you to a blank [[Glossary#Edit page|edit page]] for data entry.
 +
# On loading, the [[Glossary#Edit page|edit page]] displays the record with all [[Glossary#Information area|information areas]] closed; click on an [[Glossary#Information area|information area]] to access the [[Glossary#Field|fields]] grouped under it. Enter data as required.
 +
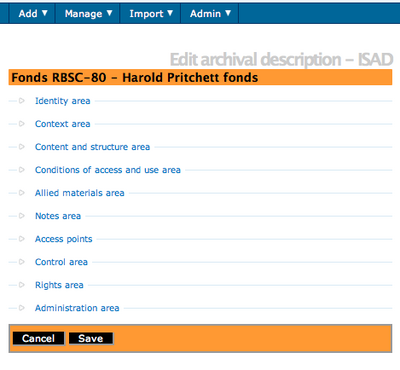
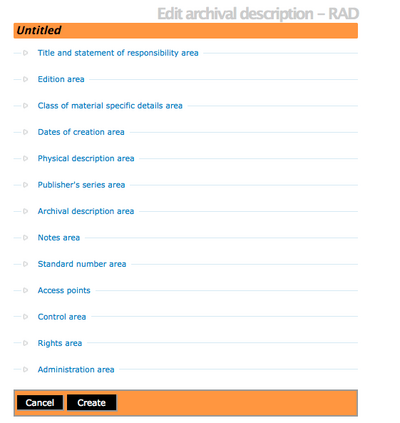
# You can quit the create process at any time by clicking the "Cancel" button in the [[Glossary#Button block|button block]]; no new record will be created.[[Image:archDescCreate.png|400px|right|thumb|Save (create) or cancel the new record ISAD template]] [[Image:RAD_ArchivalDesc.png|400px|right|thumb|Save (create) or cancel the new record RAD template]]
 +
# Click the [[Glossary#Create button|"Create" button]] in the [[Glossary#Button block|button block]] to save the new record.
  
 +
</div>
  
The following notes aim only to clarify ICA-AtoM procedures; for guidelines on what information to record in particular fields, consult [[ISAD(G)]] as the content standard. The notes are organized by field, with links to the applicable [[ISAD(G)]] section(s).
+
<div class="note">
  
<br clear=right>
+
[[Image:ArchDescPublish.png|500px|right|thumb|Default draft, Select published]]
== Identity area ==
 
  
[[Image:um3-1-1Identity.png|500px|right|thumb|Archival description: Identity area]]  
+
The default status of a newly created archival description is DRAFT. Under the [[Glossary#Administration area|Administration area]] users with publication privileges can select [[Glossary#Published record|PUBLISHED]] as the new status of the archival description, making it available for read access to the public.
  
The "Identity area" contains fields that uniquely identify the archival description.
+
</div>
  
 +
<div class="note">
  
1. '''Reference code''' ([[ISAD(G)#isad3.1.1|ISAD(G) 3.1.1]]):
+
Introduced in Release 1.3, the number of characters allowed in the "Title" data entry field has been increased. See Issue 1628.
*Enter the reference code that uniquely identifies the archival unit under description.
 
  
 +
</div>
  
2. '''Title''' ([[ISAD(G)#isad3.1.2|ISAD(G) 3.1.2]]):
+
<div class="clearfix">
*Enter the authorized title of the unit of description.
 
  
 +
== Add a new child description ==
  
3. '''Title notes''' ([[ISAD(G)#isad3.1.2|ISAD(G) 3.1.2]], [[ISAD(G)#isad3.6.1|ISAD(G) 3.6.1]]):
+
Create new [[Glossary#Child record|child records]] in one of two ways:
*Enter a note relating to the title if applicable.
 
*You can add multiple title notes: in the current version of ICA-AtoM (v0.6), you must save the record before you can add another note.


4. '''Version''' ([[ISAD(G)]]:
+
== New child description: OPTION ONE ==
*Enter the version number of the description if applicable; structure according to local / institutional standards.
 
  
 +
* In the [[Glossary#Archival description|archival description]] [[Glossary#Edit page|edit page]], in the ISAD identity [[Glossary#Information area|information area]], or the RAD title and statement responsibility area, enter the relevant data under "Add new child levels".
  
5. '''Level of description''' ([[ISAD(G)#isad3.1.4|ISAD(G) 3.1.4]]):
+
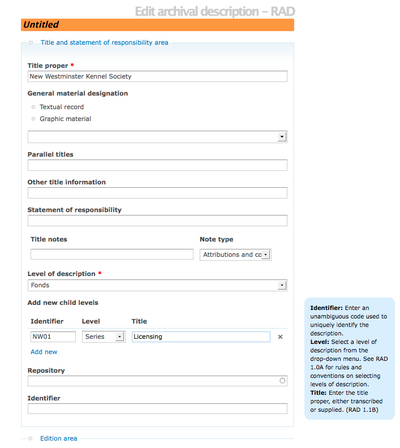
* Note that you can add as many levels as needed at one time; for example, to add multiple series to a fonds or collection, fill in the [[Glossary#Field|fields]] under the "Add new child levels" and add as many lower levels as desired. When the record is saved, you will be able to see the new [[Glossary#Child record|child records]] in the [[Glossary#Context menu|context menu]]. The example provided uses the RAD template for a Fonds level description in which the user has started adding a new child at the series level, titled: "Licensing". [[Image:RAD-ChildLevels.png|400px|right|thumb|RAD title and statement area, add new child level]]
*Select the appropriate level of description from the drop-down list.
 
*List terms can be customized by [[Glossary$Administrator|administrators]] to suit their institution's arrangement system.
 
  
 +
</div>
  
6. '''Next upper level of description''':
+
<div class="clearfix">
*Select the unit immediately above the current one in the hierarchy of arrangement ("parent record").
 
*Leave blank if the current unit represents the highest level of arrangement (e.g. a fonds).
 
  
 +
*Here is an example of the ISAD data entry template for an existing fonds that the user is adding new child levels.Remember to save all changes.[[Image:archDescAddNew.png|400px|right|thumb|ISAD - Add multiple new child records to a parent record]]
  
7. '''Extent and medium''' ([[ISAD(G)#isad3.1.5|ISAD(G) 3.1.5]]):
+
</div>
*Enter information relating to the physical size, media, and formats.
 
*Structure data according to your institution's local standards (e.g. separate entries by commas or separate lines).
 
  
 +
<div class="clearfix">
  
8. Note that the [[ISAD(G)]] '''Dates''' element (ISAD(G)#isad3.1.3|3.1.3]]) is implemented by ICA-AtoM in the '''Context area''', where dates are linked to a [[Glossary#Creator|creator]] in a [[Glossary#Event|creation event]].
+
*Once you have saved the child levels, you can see in this RAD example that the "Licensing" series is now in the context menu/ treeview.[[Image:RAD-ArchivalDesc-Addnew01.png|400px|right|thumb|RAD - view archival description]]
  
<br clear="right">
+
</div>
== Context area ==
 
  
[[Image:um3-1-1Context.png|500px|right|thumb|Archival description: Context area]]
+
<div class="clearfix">
  
The "Context area" contains fields that provide information about the origins and custody of the archival material being described.  
+
* If the levels need to be changed. From within the context menu, logged-in users with permission can re-arrange child level descriptions (e.g., Series, Files, Items) within the Fonds treeview by simply dragging and dropping the selected resources.
  
 +
</div>
  
Note that date ranges are handled in ICA-AtoM as creation [[Glossary#Event|events]].
+
<div class="clearfix">
*At the highest [[Glossary#Level of description|level of description]], the [[Glossary#Archival unit|archival unit]] is associated with its [[Glossary#Creator|creator]] over a date range.
 
*At lower [[Glossary#Level of description|levels]], enter the date range, but leave the '''Creator name''' blank to inherit the [[Glossary#Creator|creator]] from the higher [[Glossary#Level of description|level]].
 
*If you want to associate a lower [[Glossary#Level of description|level]] with a [[Glossary#Creator|creator]] different than the higher [[Glossary#Level of description|level]], enter / select a different '''Creator name'''.
 
  
 +
</div>
  
1. '''Creation context''':
+
== New child description: OPTION TWO ==
*Use this area to register a new create [[Glossary#Event|event]] and view existing ones.
 
*Register as many creation events as you need. ISAD(G) recognizes more than one type of date (e.g. dates of document creation vs dates of accumulation, see [[ISAD(G)#isad3.1.3 |ISAD(G) 3.1.3]]). And in some arrangement systems there may be more than one creator (e.g. in a series system, a series may be successively controlled by differen bodies over time).
 
*The first entry in the list (containing empty text boxes) is for registering a new creation event.
 
*Any subsequent entries show events already registered.
 
  
 +
* In the [[Glossary#Archival description|archival description]] [[Glossary#View page|view page]], click the "Add new" button in the [[Glossary#Button block|button block]] at the bottom of the page; this will create a new description that is one [[Glossary#Level of description|level of description]] below the description currently in the [[Glossary#View page|view page]]. When the record is saved, you will be able to see the new [[Glossary#Child record|child records]] in the [[Glossary#Context menu|context menu]].
  
2. '''Creator''' and '''Add new creator name''':
+
*This approach, lets the logged-in user navigate to the archival description and then add new child levels using the button, instead of editing within the fonds description. Here is an example from an ISAD archival description [[Image:archDescButtonBlock.png|400px|right|thumb|Click the "Add new" button in the button block to create a new child record]]
*Select the [[Glossary#Creator|creator's]] name from the "Creator" drop-down list (generated from the names of all existing [[Glossary#Authority record|authority records]].
 
*If the [[Glossary#Creator|creator's]] name does '''not''' appear in the list, use the "Add new creator name" field to enter the [[Glossary#Creator|creator's]] name.
 
*If you select a name from the drop-down list, ICA-AtoM will ignore any text you may have entered in the '''Add new creator name''' field.
 
*Note that you can leave both of these fields blank; in this case, the unit will inherit creator information from its [[Glossary#Parent level of description|parent record]] (next highest [[Glossary#Level of description|level of description]]).
 
*At the highest [[Glossary#Level of description|level of description]], you should always include the [[Glossary#Creator|creator]]; the "Administrative history / biographical sketch" is drawn from the [[Glossary#Creator|creator's]] [[Glossary#Authority record|authority record]].
 
*Lower levels inherit creator information from higher levels: use only if the [[Glossary#Creator|creator]] is different at the lower and higher [[Glossary#Level of description|levels]].
 
  
 +
</div>
  
3. '''Creation year / End year''' ([[ISAD(G)#isad3.1.3 |ISAD(G) 3.1.3]]):
+
<div class="clearfix">
*Enter the opening and closing years of the date range.
 
*ICA-AtoM uses these values for sorting and searching purposes.
 
*Use only four-digit numbers.
 
*If the start and end years are the same, enter only in the start year and leave the end year blank.
 
*Complete at lower levels of description even if you are leaving the "Creator name" field blank (e.g. when describing a series, you do not need to repeat the "Creator name" from the fonds description, but you do need to enter the date range of the series).
 
*Do not use any qualifiers here (e.g. "ca.") or typographical symbols (e.g. "[194?]") to express uncertainty (see step4).
 
  
 +
*It is important to note that after clicking on the add new record button, the edit archival description template will appear, but no reference is made to the parent archival fonds. The example shown is using the RAD template, and you can see that the header is "untitled". Enter appropriate information into the template for the lower-level descriptions, and remember to select the level of description. [[Image:RAD-ArchDesc-Addnew02.png|400px|right|thumb|RAD Archival description edit template for new child level]]
  
4. '''Date display''' ([[ISAD(G)#isad3.1.3 | ISAD(G) 3.1.3]]):
+
*Remember to click save once you have completed entering the data.
*Enter the date range as you want it to appear in [[Glossary#View mode|view mode]].
 
*Add any additional text to qualify date range (e.g. "ca. 1940-1980" or "[1940]-1980, predominant 1973-1980").
 
*Whereas "Creation year" and "End year" are used internally for database searching and sorting purposes, this field is for display purposes.
 
  
 +
</div>
  
5. When you save the record, ICA-AtoM registers the creation [[Glossary#Event|event]] and displays it in the list; to delete an entry from the list, cick the [[Glossary#Delete icon|Delete icon]].
+
<div class="clearfix">
  
 +
*After clicking save, the user is returned to the Archival Description for the fonds level, but the new child-level has been added. You can see this in the RAD example provided. [[Image:RAD-ArchDesc-Addnew03.png|400px|right|thumb|RAD view archival description with new child level]]
  
6. '''Administrative / biographical history''' ([[ISAD(G)#isad3.2.2 |ISAD(G) 3.2.2]]):
+
</div>
*Text block displaying data from the [[Glossary#Creator|creator's]] [[Glossary#Authority record|authority record]].
 
*If you have registered more than one creator in the creator [[Glossary#Event|events]], the administrative histories / biographical sketches of each will appear here sequentially, separated by a line (horizontal rule).
 
*Because the data actually resides in another record in another table, it cannot be directly edited here; to edit, click the [[Glossary#Edit icon|Edit icon]] (see step 7 below).
 
  
 +
<div class="clearfix">
  
7. '''Edit administrative / biographical history''' ([[ISAD(G)#isad3.2.2 |ISAD(G) 3.2.2]]):
+
== Duplicate an existing description ==
*Click the [[Glossary#Edit icon|Edit icon]] to edit the "Administrative / biographical history" field; ICA-AtoM routes you to the related authority record in [[Glossary#Edit mode|edit mode]].
 
*Make changes and save; ICA-AtoM returns you to the [[Glossary#Edit screen|Edit archival description]] screen.
 
*Note that upon return all, ICA-AtoM re-loads the page, collapsing all [[Glossary#Area of description|area of descriptions]].
 
  
 +
# At the bottom of the archival description [[Glossary#edit page|edit page]] click the [[Glossary#Duplicate button|duplicate button]] in the button block to make a duplicate archival description.[[Image:duplicateButtonBlock.png|400px|right|thumb|Click the "Duplicate" button in the button block to make a duplicate descriptive record]]
 +
# The user is directed to a new screen and can [[Glossary#Edit duplicate|edit the duplicate archival description]], which is an exact duplicate of the original archival description. Before starting the [[Glossary#edit page|edit page]] provides a warning.
 +
# After editing the duplicate archival description, the user can cancel or save the changes.[[Image:editduplicate.png|400px|right|thumb|Warning shown to user in duplicate record edit page]]
 +
# Saving the changes creates a new [[Glossary#Archival description|archival description]].
  
8. '''Repository''':
+
</div>
*Select the institution that holds the archival material under description from the drop-down list in the "Repository" field (list is generated from all existing [[Glossary#Archival institution|archival institution]] records.
 
*Typically you need only enter this information at the highest level of description (e.g. the fonds or collection; series in a series system); it can be left blank at the lower levels if they are all stored in the same repository.


+
[[Category:User manual]]
9. '''Immediate source of acquisition''' ([[ISAD(G)#isad3.2.4 |ISAD(G) 3.2.4]]):
 
*Enter information relating to the circumstances leading to the acquisition of the material by the archival institution.


10. '''Archival history''' ([[ISAD(G)#isad3.2.3 |ISAD(G) 3.2.3]]):
 
*Enter information relating to the history of custody of the material being described.


<br clear="right">
 
== Content and structure area ==


[[Image:um3-1-1Content.png|500px|right|thumb|Archival description: Content and structure area]]


The "Content and structure" area contains fields that provide information relating to the content and arrangement of the materials under description. These are all basic text fields. For practical purposes there are no limits on field length (fields can hold up 16 million characters); scroll arrows will appear if needed.


1. '''Scope and content''' ([[ISAD(G)#isad3.3.1 |ISAD(G) 3.3.1]]):
 
*Enter information relating to scope and content as per ISAD(G) rule.


2. '''Appraisal, destruction and scheduling information''' ([[ISAD(G)#isad3.3.2 |ISAD(G) 3.3.2]]):
 
*Enter information relating to appraisal, destruction and scheduling as per ISAD(G) rule.


3. '''Accruals''' ([[ISAD(G)#isad3.3.3 |ISAD(G) 3.3.3]]):
 
*Enter information relating to future accruals as per ISAD(G) rule.


4. '''System of arrangement''' ([[ISAD(G)#isad3.3.4 |ISAD(G) 3.3.4]]):
 
*Enter information relating to the system of arrangement as per ISAD(G) rule.


<br clear="right">
 
== Conditions of access and use area ==


[[Image:um3-1-1Access.png|500px|right|thumb|Archival description: Content and structure area]]


The "Conditions of access and use" area contains fields that provide information about the availability of the material being described. Most of the fields in this area are basic text fields; the exceptions are "Languages" and "Scripts" (see step 3 and 4 below).


1. '''Conditions governing access''' ([[ISAD(G)#isad3.4.1 |ISAD(G) 3.4.1]]):
 
*Enter information relating to conditions governing access as per ISAD(G) rule.


2. '''Conditions governing reproduction''' ([[ISAD(G)#isad3.4.2 |ISAD(G) 3.4.2]]):
 
*Enter information relating to conditions governing reproduction as per ISAD(G) rule.


3. '''Language''' and '''Script''' ([[ISAD(G)#isad3.4.3 |ISAD(G) 3.4.3]]):
 
*Select the language / script from the drop-down list (lists are generated by [[Glossary#Taxonomy|taxonomies]] maintained by the system [[Glossary#Administrator|administrator]].


4. When you save the record, ICA-AtoM registers the language / script [[Glossary#Event|event]] and displays it in the list above the data entry field; to delete an entry from the list, cick the [[Glossary#Delete icon|Delete icon]].


5. '''Physical characteristics''' ([[ISAD(G)#isad3.4.3 |ISAD(G) 3.4.3]]):
 
*Enter information relating to physical characteristics that affect access to the material or technical requirements needed to access it as per ISAD(G) rule.


6. '''Finding aids''' ([[ISAD(G)#isad3.4.5 |ISAD(G) 3.4.5]]):
 
*Enter information relating to the existence of other finding aids to the material as per ISAD(G) rule.


<br clear="right">
 
== Allied materials area ==


[[Image:um3-1-1Allied.png|500px|right|thumb|Archival description: Allied materials area]]


The "Allied materials" area contains fields that provide information about materials having an important relationship to the unit of description. With the exception of the "Publication note" field (see step 4 below), these are all basic text fields with no practical limits on field length.


1. '''Location of originals''' ([[ISAD(G)#isad3.5.1 |ISAD(G) 3.5.1]]):
 
*Enter information relating to the location of the originals of the materials described (if they are copies) as per ISAD(G) rule.


2. '''Location of copies''' ([[ISAD(G)#isad3.5.2 |ISAD(G) 3.5.2]]):
 
*Enter information relating to the location of copies of the materials described *In as per ISAD(G) rule.


3. '''Related units of description''' ([[ISAD(G)#isad3.5.3 |ISAD(G) 3.5.3]]):
 
*Enter information relating to related units of description as per ISAD(G) rule.


4. '''Publication note''' ([[ISAD(G)isad3.5.4|ISAD(G) 3.5.4]]):
 
*Enter information relating to publications based on use, study or analysis of the material described.
 
*You can add mulitple notes: when you save the record, ICA-AtoM registers the note and displays it in the list below the field label; to delete an entry from the list, cick the [[Glossary#Delete icon|Delete icon]].


<br clear="right">
 
== Notes area ==


[[Image:um3-1-1Notes.png|500px|right|thumb|Archival description: Notes area]]


The "Notes area" displays any notes already registered in other [[Glosssary#Area of description|areas of description]] (e.g. "Title notes" or "Publication notes") and provides fields for creating notes for any additional information that cannot be accommodated in any other [[Glosssary#Area of description|areas of description]].


1. Enter the note text.


2. Select the "Type of note" from the drop-down list (generated by a [[Glossary#Taxonomy|taxonomy]] maintained by the [[Glossary#Administrator|administrator]].


3. When you save the record, ICA-AtoM registers the note and displays it in the list above the data entry field; to delete an entry from the list, cick the [[Glossary#Delete icon|Delete icon]].


== Access points area ==


[[Image:um3-1-1AccessPoints.png|500px|right|thumb|Archival description: Access points area]]


The "Access points" area links [[Glossary#Archival description|archival descriptions]] to terms drawn from controlled vocabularies as a means of facilitating acess and retrieval. As of version 0.6, ICA-AtoM can create ''subject'', ''place'', and ''name'' [[Glossary#Access point|access points]].


There is no limit to the number of [[Glossary#Access point|access points]] you can create. In the current version of ICA-AtoM (v0.6), however, you can only create one access point of each type at a time; you must save the record before you can add another one.


1. Select a term from one or each of the drop-down lists.


2. When you save the record, ICA-AtoM registers the [[Glossary#Access point|access point]] and displays it in the list above the data entry field; to delete an entry from the list, cick the [[Glossary#Delete icon|Delete icon]].


3. Repeat as required.


5. To delete an access point from the list, click the red <span class="button">DeleteInfoIcon</span> beside it.


<br clear="right">
 
== Control area ==


The "Control area" contains fields for information about the creation and maintenance of the description record itself. This [[Glossary#Area of description|area of description]] has been standardized in ICA-AtoM for [[Glossary#Archival description|archival descriptions]], [[Glossary#Authority record|authority records]], and [[Glossary#Archival institution|archival institutions]] and is described on a separate page:
 
*See [[UM-3.4|Data entry: control area]].


<br clear="right">
 
== Digital object ==


[[Image:um3-1-1Digital.png|500px|right|thumb|Archival description: Digital object area]]


The "DIgital object" area is for uploading a digital file of the material under description (e.g. a digital photograph, scanned image, or born-digital electronic record). Typically this will be done at the '''item''' level.


1. Click the [[Glossary#Browse digital object button (upload)|Browse button]] to navigate to and select the digital object.


2. In the dialog box, click the "Open" button.


3. ICA-AtoM stores a link to the digital object's path. It creates two additional images: a thumbnail and a reference display copy (in case the original image is too large to display in the ICA-AtoM interface).


4. Click the [[Glossary#Save button|Save button]]. When you return to the [[Glossary#View screen|View screen]], either the original or (if it is too large) the reference copy will be displayed in the "Digital object" field.
 

Latest revision as of 15:59, 4 September 2012

Please note that ICA-AtoM is no longer actively supported by Artefactual Systems.
Visit https://www.accesstomemory.org for information about AtoM, the currently supported version.

Main Page > User manual > Add/edit content > Add/edit archival descriptions > Create a new archival description


Add a new top level description

  1. In the main menu, hover your cursor over the "Add" menu.
    Go to Add > Archival descriptions
  2. Select "Archival descriptions" from the drop-down menu.
  3. ICA-AtoM takes you to a blank edit page for data entry.
  4. On loading, the edit page displays the record with all information areas closed; click on an information area to access the fields grouped under it. Enter data as required.
  5. You can quit the create process at any time by clicking the "Cancel" button in the button block; no new record will be created.
    Save (create) or cancel the new record ISAD template
    Save (create) or cancel the new record RAD template
  6. Click the "Create" button in the button block to save the new record.
Default draft, Select published

The default status of a newly created archival description is DRAFT. Under the Administration area users with publication privileges can select PUBLISHED as the new status of the archival description, making it available for read access to the public.

Introduced in Release 1.3, the number of characters allowed in the "Title" data entry field has been increased. See Issue 1628.

Add a new child description

Create new child records in one of two ways:


New child description: OPTION ONE

  • Note that you can add as many levels as needed at one time; for example, to add multiple series to a fonds or collection, fill in the fields under the "Add new child levels" and add as many lower levels as desired. When the record is saved, you will be able to see the new child records in the context menu. The example provided uses the RAD template for a Fonds level description in which the user has started adding a new child at the series level, titled: "Licensing".
    RAD title and statement area, add new child level
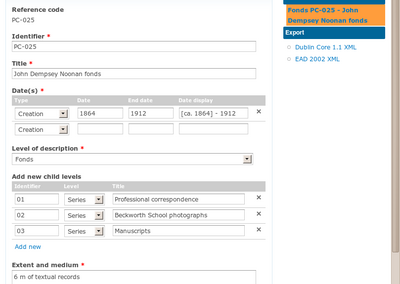
  • Here is an example of the ISAD data entry template for an existing fonds that the user is adding new child levels.Remember to save all changes.
    ISAD - Add multiple new child records to a parent record
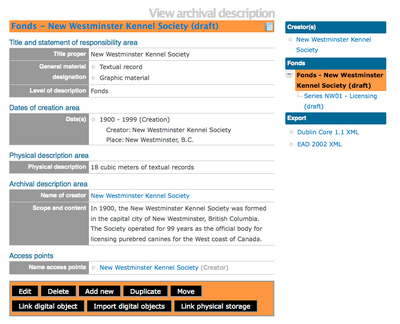
  • Once you have saved the child levels, you can see in this RAD example that the "Licensing" series is now in the context menu/ treeview.
    RAD - view archival description
  • If the levels need to be changed. From within the context menu, logged-in users with permission can re-arrange child level descriptions (e.g., Series, Files, Items) within the Fonds treeview by simply dragging and dropping the selected resources.

New child description: OPTION TWO

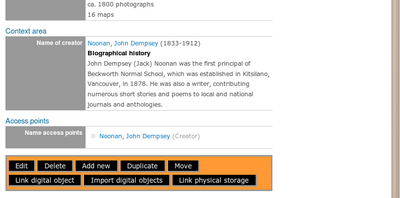
  • This approach, lets the logged-in user navigate to the archival description and then add new child levels using the button, instead of editing within the fonds description. Here is an example from an ISAD archival description
    Click the "Add new" button in the button block to create a new child record
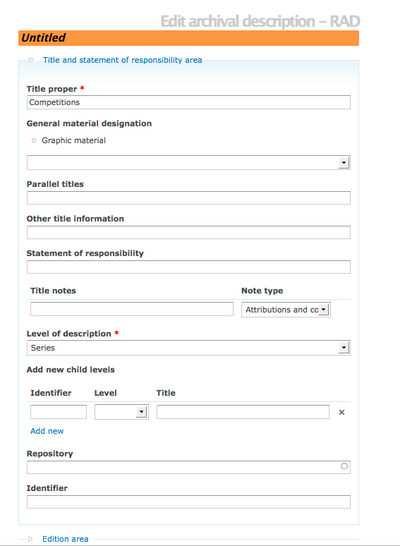
  • It is important to note that after clicking on the add new record button, the edit archival description template will appear, but no reference is made to the parent archival fonds. The example shown is using the RAD template, and you can see that the header is "untitled". Enter appropriate information into the template for the lower-level descriptions, and remember to select the level of description.
    RAD Archival description edit template for new child level
  • Remember to click save once you have completed entering the data.
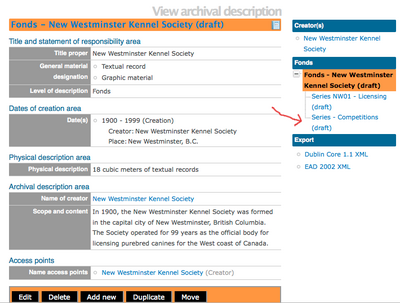
  • After clicking save, the user is returned to the Archival Description for the fonds level, but the new child-level has been added. You can see this in the RAD example provided.
    RAD view archival description with new child level

Duplicate an existing description

  1. At the bottom of the archival description edit page click the duplicate button in the button block to make a duplicate archival description.
    Click the "Duplicate" button in the button block to make a duplicate descriptive record
  2. The user is directed to a new screen and can edit the duplicate archival description, which is an exact duplicate of the original archival description. Before starting the edit page provides a warning.
  3. After editing the duplicate archival description, the user can cancel or save the changes.
    Warning shown to user in duplicate record edit page
  4. Saving the changes creates a new archival description.