Difference between revisions of "Add a new archival description"
Jump to navigation
Jump to search
| (41 intermediate revisions by 2 users not shown) | |||
| Line 6: | Line 6: | ||
== Add a new top level description == | == Add a new top level description == | ||
| − | # In the [[Glossary#Main menu|main menu]], hover your cursor over the "Add" menu.[[Image:addNew.png| | + | # In the [[Glossary#Main menu|main menu]], hover your cursor over the "Add" menu.[[Image:addNew.png|400px|right|thumb|Go to Add > Archival descriptions]] |
# Select "Archival descriptions" from the drop-down menu. | # Select "Archival descriptions" from the drop-down menu. | ||
# ICA-AtoM takes you to a blank [[Glossary#Edit page|edit page]] for data entry. | # ICA-AtoM takes you to a blank [[Glossary#Edit page|edit page]] for data entry. | ||
# On loading, the [[Glossary#Edit page|edit page]] displays the record with all [[Glossary#Information area|information areas]] closed; click on an [[Glossary#Information area|information area]] to access the [[Glossary#Field|fields]] grouped under it. Enter data as required. | # On loading, the [[Glossary#Edit page|edit page]] displays the record with all [[Glossary#Information area|information areas]] closed; click on an [[Glossary#Information area|information area]] to access the [[Glossary#Field|fields]] grouped under it. Enter data as required. | ||
| − | # You can quit the create process at any time by clicking the "Cancel" button in the [[Glossary#Button block|button block]]; no new record will be created.[[Image:archDescCreate.png| | + | # You can quit the create process at any time by clicking the "Cancel" button in the [[Glossary#Button block|button block]]; no new record will be created.[[Image:archDescCreate.png|400px|right|thumb|Save (create) or cancel the new record ISAD template]] [[Image:RAD_ArchivalDesc.png|400px|right|thumb|Save (create) or cancel the new record RAD template]] |
# Click the [[Glossary#Create button|"Create" button]] in the [[Glossary#Button block|button block]] to save the new record. | # Click the [[Glossary#Create button|"Create" button]] in the [[Glossary#Button block|button block]] to save the new record. | ||
| Line 16: | Line 16: | ||
<div class="note"> | <div class="note"> | ||
| − | The default status of a newly created archival description is | + | |
| + | [[Image:ArchDescPublish.png|500px|right|thumb|Default draft, Select published]] | ||
| + | |||
| + | The default status of a newly created archival description is DRAFT. Under the [[Glossary#Administration area|Administration area]] users with publication privileges can select [[Glossary#Published record|PUBLISHED]] as the new status of the archival description, making it available for read access to the public. | ||
| + | |||
| + | </div> | ||
| + | |||
| + | <div class="note"> | ||
| + | |||
| + | Introduced in Release 1.3, the number of characters allowed in the "Title" data entry field has been increased. See Issue 1628. | ||
| + | |||
| + | </div> | ||
| + | |||
| + | <div class="clearfix"> | ||
== Add a new child description == | == Add a new child description == | ||
| Line 22: | Line 35: | ||
Create new [[Glossary#Child record|child records]] in one of two ways: | Create new [[Glossary#Child record|child records]] in one of two ways: | ||
| − | + | ||
| − | + | == New child description: OPTION ONE == | |
| − | + | ||
| + | * In the [[Glossary#Archival description|archival description]] [[Glossary#Edit page|edit page]], in the ISAD identity [[Glossary#Information area|information area]], or the RAD title and statement responsibility area, enter the relevant data under "Add new child levels". | ||
| + | |||
| + | * Note that you can add as many levels as needed at one time; for example, to add multiple series to a fonds or collection, fill in the [[Glossary#Field|fields]] under the "Add new child levels" and add as many lower levels as desired. When the record is saved, you will be able to see the new [[Glossary#Child record|child records]] in the [[Glossary#Context menu|context menu]]. The example provided uses the RAD template for a Fonds level description in which the user has started adding a new child at the series level, titled: "Licensing". [[Image:RAD-ChildLevels.png|400px|right|thumb|RAD title and statement area, add new child level]] | ||
| + | |||
| + | </div> | ||
| + | |||
| + | <div class="clearfix"> | ||
| + | |||
| + | *Here is an example of the ISAD data entry template for an existing fonds that the user is adding new child levels.Remember to save all changes.[[Image:archDescAddNew.png|400px|right|thumb|ISAD - Add multiple new child records to a parent record]] | ||
</div> | </div> | ||
<div class="clearfix"> | <div class="clearfix"> | ||
| + | |||
| + | *Once you have saved the child levels, you can see in this RAD example that the "Licensing" series is now in the context menu/ treeview.[[Image:RAD-ArchivalDesc-Addnew01.png|400px|right|thumb|RAD - view archival description]] | ||
</div> | </div> | ||
| + | |||
| + | <div class="clearfix"> | ||
| + | |||
| + | * If the levels need to be changed. From within the context menu, logged-in users with permission can re-arrange child level descriptions (e.g., Series, Files, Items) within the Fonds treeview by simply dragging and dropping the selected resources. | ||
| + | |||
| + | </div> | ||
| + | |||
| + | <div class="clearfix"> | ||
| + | |||
| + | </div> | ||
| + | |||
| + | == New child description: OPTION TWO == | ||
| + | |||
| + | * In the [[Glossary#Archival description|archival description]] [[Glossary#View page|view page]], click the "Add new" button in the [[Glossary#Button block|button block]] at the bottom of the page; this will create a new description that is one [[Glossary#Level of description|level of description]] below the description currently in the [[Glossary#View page|view page]]. When the record is saved, you will be able to see the new [[Glossary#Child record|child records]] in the [[Glossary#Context menu|context menu]]. | ||
| + | |||
| + | *This approach, lets the logged-in user navigate to the archival description and then add new child levels using the button, instead of editing within the fonds description. Here is an example from an ISAD archival description [[Image:archDescButtonBlock.png|400px|right|thumb|Click the "Add new" button in the button block to create a new child record]] | ||
| + | |||
| + | </div> | ||
| + | |||
| + | <div class="clearfix"> | ||
| + | |||
| + | *It is important to note that after clicking on the add new record button, the edit archival description template will appear, but no reference is made to the parent archival fonds. The example shown is using the RAD template, and you can see that the header is "untitled". Enter appropriate information into the template for the lower-level descriptions, and remember to select the level of description. [[Image:RAD-ArchDesc-Addnew02.png|400px|right|thumb|RAD Archival description edit template for new child level]] | ||
| + | |||
| + | *Remember to click save once you have completed entering the data. | ||
| + | |||
| + | </div> | ||
| + | |||
| + | <div class="clearfix"> | ||
| + | |||
| + | *After clicking save, the user is returned to the Archival Description for the fonds level, but the new child-level has been added. You can see this in the RAD example provided. [[Image:RAD-ArchDesc-Addnew03.png|400px|right|thumb|RAD view archival description with new child level]] | ||
| + | |||
| + | </div> | ||
| + | |||
| + | <div class="clearfix"> | ||
== Duplicate an existing description == | == Duplicate an existing description == | ||
| − | # At the bottom of the archival description [[Glossary#edit page|edit page]] click the [[Glossary#Duplicate button|duplicate button]] in the button block to make a duplicate archival description.[[Image:duplicateButtonBlock.png| | + | # At the bottom of the archival description [[Glossary#edit page|edit page]] click the [[Glossary#Duplicate button|duplicate button]] in the button block to make a duplicate archival description.[[Image:duplicateButtonBlock.png|400px|right|thumb|Click the "Duplicate" button in the button block to make a duplicate descriptive record]] |
# The user is directed to a new screen and can [[Glossary#Edit duplicate|edit the duplicate archival description]], which is an exact duplicate of the original archival description. Before starting the [[Glossary#edit page|edit page]] provides a warning. | # The user is directed to a new screen and can [[Glossary#Edit duplicate|edit the duplicate archival description]], which is an exact duplicate of the original archival description. Before starting the [[Glossary#edit page|edit page]] provides a warning. | ||
| − | # After editing the duplicate archival description, the user can cancel or save the changes.[[Image:editduplicate.png| | + | # After editing the duplicate archival description, the user can cancel or save the changes.[[Image:editduplicate.png|400px|right|thumb|Warning shown to user in duplicate record edit page]] |
# Saving the changes creates a new [[Glossary#Archival description|archival description]]. | # Saving the changes creates a new [[Glossary#Archival description|archival description]]. | ||
Latest revision as of 15:59, 4 September 2012
Please note that ICA-AtoM is no longer actively supported by Artefactual Systems.
Visit https://www.accesstomemory.org for information about AtoM, the currently supported version.
Main Page > User manual > Add/edit content > Add/edit archival descriptions > Create a new archival description
Add a new top level description
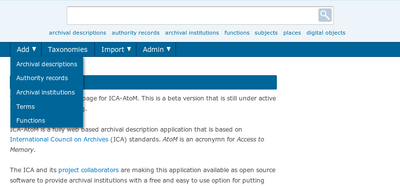
- In the main menu, hover your cursor over the "Add" menu.
- Select "Archival descriptions" from the drop-down menu.
- ICA-AtoM takes you to a blank edit page for data entry.
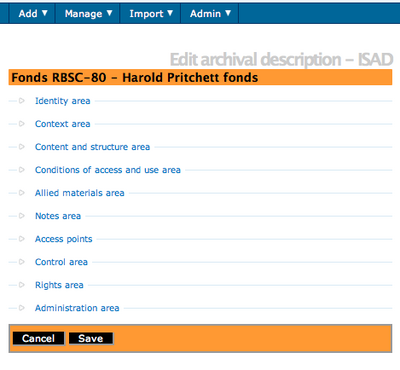
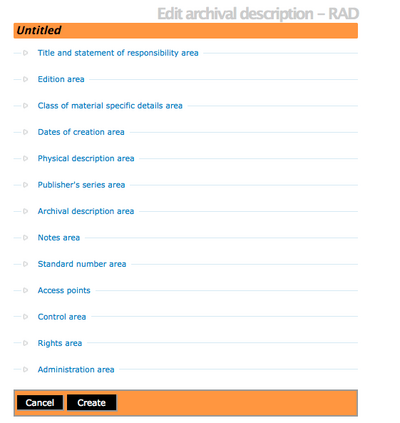
- On loading, the edit page displays the record with all information areas closed; click on an information area to access the fields grouped under it. Enter data as required.
- You can quit the create process at any time by clicking the "Cancel" button in the button block; no new record will be created.
- Click the "Create" button in the button block to save the new record.
The default status of a newly created archival description is DRAFT. Under the Administration area users with publication privileges can select PUBLISHED as the new status of the archival description, making it available for read access to the public.
Introduced in Release 1.3, the number of characters allowed in the "Title" data entry field has been increased. See Issue 1628.
Add a new child description
Create new child records in one of two ways:
New child description: OPTION ONE
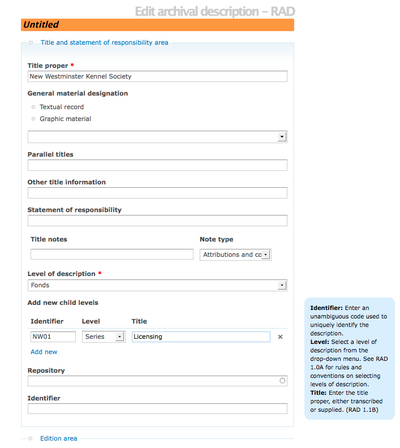
- In the archival description edit page, in the ISAD identity information area, or the RAD title and statement responsibility area, enter the relevant data under "Add new child levels".
- Note that you can add as many levels as needed at one time; for example, to add multiple series to a fonds or collection, fill in the fields under the "Add new child levels" and add as many lower levels as desired. When the record is saved, you will be able to see the new child records in the context menu. The example provided uses the RAD template for a Fonds level description in which the user has started adding a new child at the series level, titled: "Licensing".
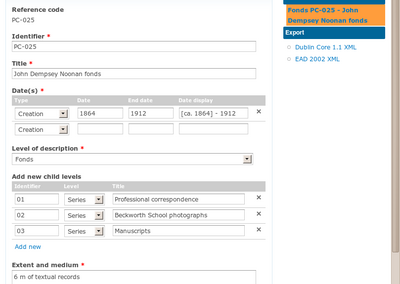
- Here is an example of the ISAD data entry template for an existing fonds that the user is adding new child levels.Remember to save all changes.
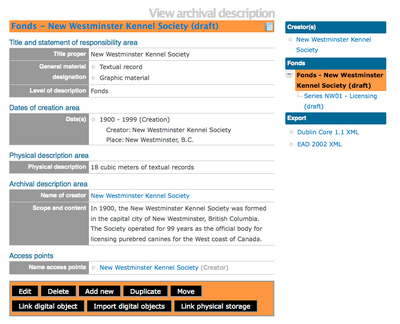
- Once you have saved the child levels, you can see in this RAD example that the "Licensing" series is now in the context menu/ treeview.
- If the levels need to be changed. From within the context menu, logged-in users with permission can re-arrange child level descriptions (e.g., Series, Files, Items) within the Fonds treeview by simply dragging and dropping the selected resources.
New child description: OPTION TWO
- In the archival description view page, click the "Add new" button in the button block at the bottom of the page; this will create a new description that is one level of description below the description currently in the view page. When the record is saved, you will be able to see the new child records in the context menu.
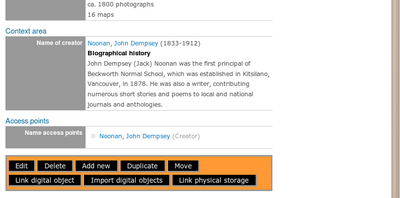
- This approach, lets the logged-in user navigate to the archival description and then add new child levels using the button, instead of editing within the fonds description. Here is an example from an ISAD archival description
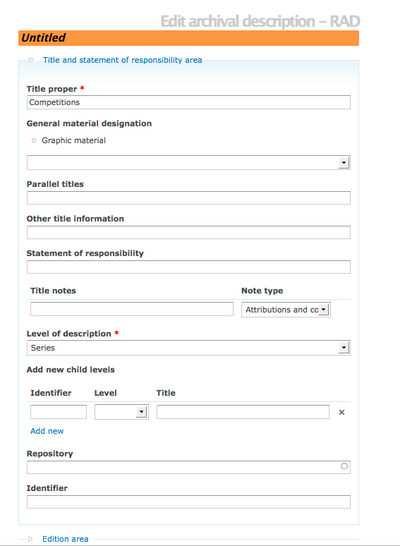
- It is important to note that after clicking on the add new record button, the edit archival description template will appear, but no reference is made to the parent archival fonds. The example shown is using the RAD template, and you can see that the header is "untitled". Enter appropriate information into the template for the lower-level descriptions, and remember to select the level of description.
- Remember to click save once you have completed entering the data.
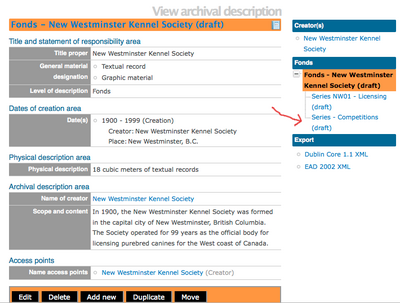
- After clicking save, the user is returned to the Archival Description for the fonds level, but the new child-level has been added. You can see this in the RAD example provided.
Duplicate an existing description
- At the bottom of the archival description edit page click the duplicate button in the button block to make a duplicate archival description.
- The user is directed to a new screen and can edit the duplicate archival description, which is an exact duplicate of the original archival description. Before starting the edit page provides a warning.
- After editing the duplicate archival description, the user can cancel or save the changes.
- Saving the changes creates a new archival description.
