Difference between revisions of "Physical storage"
| (43 intermediate revisions by 3 users not shown) | |||
| Line 1: | Line 1: | ||
| − | [[Main Page]] > [[User manual]] > [[ | + | [[Main Page]] > [[User manual]] > [[Add/edit content]] > [[Add/edit archival descriptions]] > Physical storage |
| − | |||
| − | [[ | + | You can add a physical storage container and location to an archival description or you can view the [[Glossary#Archival description|archival description's]] current container and location, edit the current container information, delete an existing container, assign to an existing container or assign to a new container. |
| + | In ICA-AtoM 1.2 release, you can Manage physical storage from the main menu and you can create a physical storage report (e.g., box list) and print it, see [http://ica-atom.org/doc/Create_physical_storage_locations_report_%26_print create physical storage locations report and print page.] | ||
| − | + | <div class="clearfix"> | |
| − | |||
| − | |||
| − | |||
| − | |||
| − | |||
| + | == Add physical storage == | ||
| − | + | [[File:Nostorage.png|400px|right|thumb| No physical storage found in context menu]] | |
| − | + | In the View archival description screen under the right-hand context menu you can see that there is no physical storage location associated with these records. | |
| + | </div> | ||
| − | + | <div class="clearfix"> | |
| − | + | == Go to Link physical storage == | |
| − | + | [[Image:archDescButtonBlockSmall.png|400px|right|thumb|The Link physical storage button is on the lower right of the archival description button block]] | |
| − | + | In the [[Glossary#Archival description|archival description]] [[Glossary#View page|view page]] click the "Link physical storage" button in the button block. | |
| + | </div> | ||
| − | < | + | <div class="clearfix"> |
| − | |||
| − | + | == Add container information == | |
| − | + | [[File:Defaultphysicalstorage.png|400px|right|thumb| Empty physical storage container screen]] | |
| − | + | The default dialog for containers is empty. You can select a container name from existing containers in the database by clicking in the field under "Containers". A list of existing containers will appear for you to select from. If you want to create a new container, enter data into "Name", "Location" and select a type from the drop-down list. Once you have entered all the information remember to click on the "Save" button in the button block. If you click on "Cancel" ICA-AtoM will return you to the View archival description screen but no physical storage container will be added. | |
| − | + | </div> | |
| + | <div class="clearfix"> | ||
| − | + | == View physical storage location == | |
| − | |||
| − | + | [[File:ViewStoragecontextmenu.png|400px|right|thumb| View archival description shows Physical storage location in context menu]] | |
| + | After you save the physical storage container and location information, ICA-AtoM takes you to the View archival description screen. In the context menu on the right-side of the screen and at the bottom, you will now see the Physical Storage location information. | ||
| − | + | If you click on the hyperlink Container Name, ICA-AtoM will take you to the View Physical storage screen and you can choose to print the information, edit or delete. See, [http://ica-atom.org/doc/Create_physical_storage_locations_report_%26_print Physical storage report & print.] Note: Only logged-in users will be presented with a hyperlink and be able to view the actual location. Unauthorized users will see the Name (without hyperlink) and the box type, but not the location. | |
| − | |||
| − | + | == View current container/location == | |
| − | + | [[File:Containers.png|400px|right|thumb|The "containers" section in the physical storage edit page]] | |
| + | If the [[Glossary#Archival description|archival description]] is currently assigned to a container, the "containers" section will appear. This shows the container name, its location, and its type. If the resource is not currently assigned to a container, this section will not appear. | ||
| − | + | </div> | |
| − | |||
| − | + | <div class="clearfix"> | |
| − | + | == Edit current container == | |
| − | + | [[File:Editphysicalstorage.png|400px|right|thumb| Edit physical storage]] | |
| + | If the [[Glossary#Archival description|archival description]] is currently assigned to a container and the container information needs to be updated (e.g. the type is not correct or the location has changed), click the "pencil"[[Glossary#Edit icon|edit icon]]. ICA-AtoM routes you to the Edit physical storage screen for the container; change the "Name", "Location", or "Type" as required and click the "save" button in the [[Glossary#Button block|button block]]. ICA-AtoM returns you to the [[Glossary#Archival description|archival description]] [[Glossary#View page|view page]]. | ||
| + | |||
| + | </div> | ||
| + | |||
| + | <div class="note"> | ||
| + | |||
| + | This action updates '''every''' [[Glossary#Archival description|archival description]] registered to the same container; e.g. if six descriptions are registered to box D9, you need only edit box D9 once and the changes will be reflected in all six descriptions. | ||
| + | |||
| + | </div> | ||
| + | |||
| + | </div> | ||
| + | |||
| + | <div class="clearfix> | ||
| + | |||
| + | == Assign to an existing container == | ||
| + | |||
| + | [[Image:SelectContainer.png|400px|right|thumb|Select an existing container from the drop-down menu]] | ||
| + | |||
| + | To assign the resource to a different container or additional container, use the [[Glossary#Drop-down menu|drop-down menu]] to select the container you want to use. When you save the record, ICA-AtoM will update the description. | ||
| + | |||
| + | </div> | ||
| + | |||
| + | <div class="clearfix"> | ||
| + | |||
| + | == Assign to a new container == | ||
| + | |||
| + | [[Image:createContainer.png|400px|right|thumb|Create a new container]] | ||
| + | |||
| + | If the container you want to use does not appear in the [[Glossary#Drop-down menu|drop-down menu]], it is not registered in the system and needs to be created; use the "create a new container" section for this. Enter the container name, type, and location. When you save the record, ICA-AtoM creates the container and assigns the resource to it. | ||
| + | |||
| + | </div> | ||
| + | |||
| + | <div class="clearfix"> | ||
| + | |||
| + | == Delete a container == | ||
| + | |||
| + | Navigate to the container from the context menu of an [[Glossary#Archival description|archival description]] by selecting the "Link physical storage" button in the button block and under the Containers area, click the "X" delete icon. This will delete the container from all linked [[Glossary#Archival description|archival descriptions]] but will not delete the descriptions themselves. | ||
| + | |||
| + | </div> | ||
| + | |||
| + | __NOTOC__ | ||
[[Category:User manual]] | [[Category:User manual]] | ||
Latest revision as of 11:32, 20 July 2012
Please note that ICA-AtoM is no longer actively supported by Artefactual Systems.
Visit https://www.accesstomemory.org for information about AtoM, the currently supported version.
Main Page > User manual > Add/edit content > Add/edit archival descriptions > Physical storage
You can add a physical storage container and location to an archival description or you can view the archival description's current container and location, edit the current container information, delete an existing container, assign to an existing container or assign to a new container.
In ICA-AtoM 1.2 release, you can Manage physical storage from the main menu and you can create a physical storage report (e.g., box list) and print it, see create physical storage locations report and print page.
Add physical storage
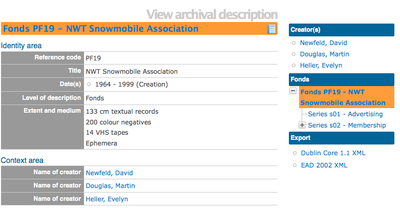
In the View archival description screen under the right-hand context menu you can see that there is no physical storage location associated with these records.
Go to Link physical storage
In the archival description view page click the "Link physical storage" button in the button block.
Add container information
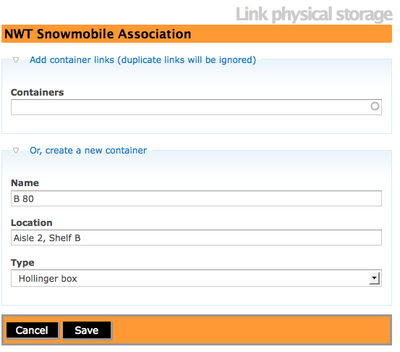
The default dialog for containers is empty. You can select a container name from existing containers in the database by clicking in the field under "Containers". A list of existing containers will appear for you to select from. If you want to create a new container, enter data into "Name", "Location" and select a type from the drop-down list. Once you have entered all the information remember to click on the "Save" button in the button block. If you click on "Cancel" ICA-AtoM will return you to the View archival description screen but no physical storage container will be added.
View physical storage location
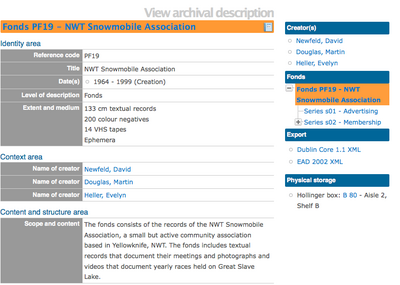
After you save the physical storage container and location information, ICA-AtoM takes you to the View archival description screen. In the context menu on the right-side of the screen and at the bottom, you will now see the Physical Storage location information.
If you click on the hyperlink Container Name, ICA-AtoM will take you to the View Physical storage screen and you can choose to print the information, edit or delete. See, Physical storage report & print. Note: Only logged-in users will be presented with a hyperlink and be able to view the actual location. Unauthorized users will see the Name (without hyperlink) and the box type, but not the location.
View current container/location
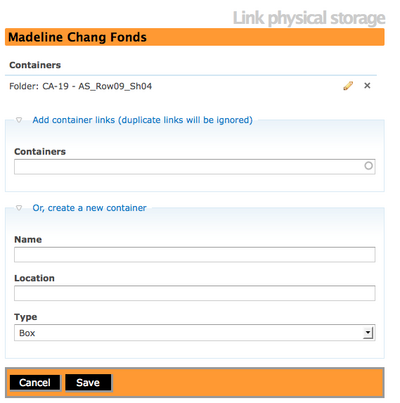
If the archival description is currently assigned to a container, the "containers" section will appear. This shows the container name, its location, and its type. If the resource is not currently assigned to a container, this section will not appear.
Edit current container
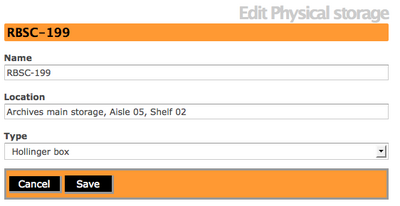
If the archival description is currently assigned to a container and the container information needs to be updated (e.g. the type is not correct or the location has changed), click the "pencil"edit icon. ICA-AtoM routes you to the Edit physical storage screen for the container; change the "Name", "Location", or "Type" as required and click the "save" button in the button block. ICA-AtoM returns you to the archival description view page.
This action updates every archival description registered to the same container; e.g. if six descriptions are registered to box D9, you need only edit box D9 once and the changes will be reflected in all six descriptions.
Assign to an existing container
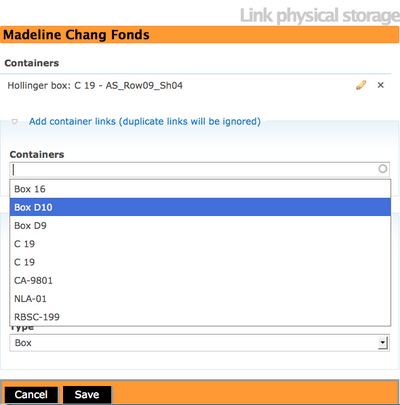
To assign the resource to a different container or additional container, use the drop-down menu to select the container you want to use. When you save the record, ICA-AtoM will update the description.
Assign to a new container
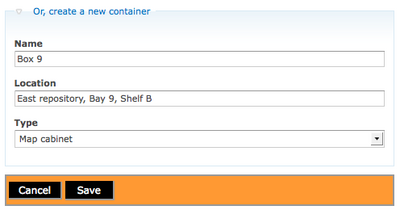
If the container you want to use does not appear in the drop-down menu, it is not registered in the system and needs to be created; use the "create a new container" section for this. Enter the container name, type, and location. When you save the record, ICA-AtoM creates the container and assigns the resource to it.
Delete a container
Navigate to the container from the context menu of an archival description by selecting the "Link physical storage" button in the button block and under the Containers area, click the "X" delete icon. This will delete the container from all linked archival descriptions but will not delete the descriptions themselves.
