Difference between revisions of "ISDIAH contact area"
Jump to navigation
Jump to search
m (moved UM-3.3.5 to ISDIAH contact area) |
|||
| Line 1: | Line 1: | ||
| − | + | [[Main Page]] > [[User manual]] > [[UM-3|UM-3 Add / edit content]] > [[UM-3.3|UM-3.3 Add / edit archival institutions]] > UM-3.3.5 Contact area | |
| − | |||
| − | |||
| − | [[Main Page]] > [[User manual]] > [[UM-3 | UM-3 Add / edit content]] > [[UM-3.3|UM-3.3 Add / edit archival institutions]] > UM-3.3.5 Contact area | ||
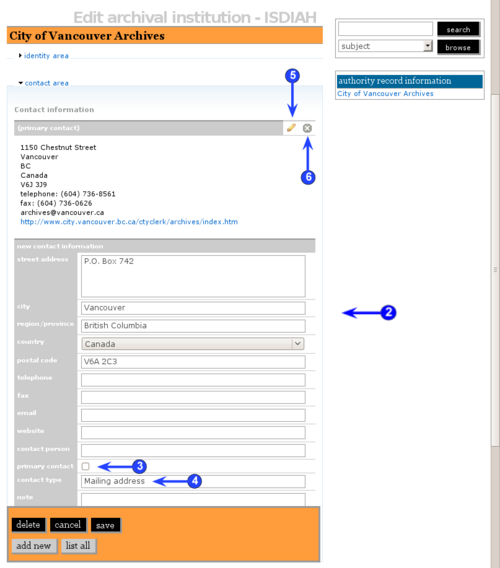
[[Image:UM-3.3.5.png|500px|right|thumb|Archival institution: contact area]] | [[Image:UM-3.3.5.png|500px|right|thumb|Archival institution: contact area]] | ||
Revision as of 10:12, 23 March 2010
Please note that ICA-AtoM is no longer actively supported by Artefactual Systems.
Visit https://www.accesstomemory.org for information about AtoM, the currently supported version.
Main Page > User manual > UM-3 Add / edit content > UM-3.3 Add / edit archival institutions > UM-3.3.5 Contact area
The contact area contains fields conveying information "on how to contact the institution with archival holdings" (ISDIAH 4.4).
1. Contact information
- This is a multi-value field for registering and displaying the institution's contact information.
- Enter the data (see steps 2-4 below); when you save the record the contact address will be registered and will now appear in the list above the data entry fields.
- There is no limit to the number of contacts you can add, but as of the current version of ICA-AtoM (v1.0 beta) you can only register them one at a time, i.e. enter the data, click the save button, repeat for each additional contact.
- For rules and examples, see ISDIAH 5.2.1 and 5.2.2.
2. Address
- Enter information as applicable.
3. Primary contact
- Click the box if you wish to flag an entry as the primary address for contacting the institution.
4. Contact type
- Enter the type of contact / address.
5. Edit existing contact information
- To edit existing contact information, click the edit icon to the right of the contact.
6. Delete a contact
- To delete a contact, click the delete icon to the right of the contact.
