|
|
| (77 intermediate revisions by 4 users not shown) |
| Line 1: |
Line 1: |
| − | <span class="pageTitle">Add / edit authority records</span>
| + | [[Main Page]] > [[User manual]] > [[Add/edit content]] > [[Add/edit authority records]] > Create a new authority record |
| | | | |
| − | [[Main Page]] > [[User manual]] > [[UM-3|UM-3 Add / edit content]] > UM-3.2 Add / edit authority records
| |
| | | | |
| − | == Data entry screen ==
| + | <div class="clearfix"> |
| − | {| border="0" cellpadding="2"
| |
| | | | |
| − | |- valign="top"
| + | == From the main menu == |
| − | |width="60%" |
| |
| | | | |
| − | The <span class="screen">Edit authority record</span> screen is structured into four <span class="area">RecordAreas</span> based on ISAAR(CPF)'s <span class="docElement">information areas</span>.
| + | <div class="clearfix"> |
| − | *[[#Identity area | Identity area]]
| |
| − | *[[#Description area | Description area]]
| |
| − | *[[#Relationships area | Relationships area]]
| |
| − | *[[#Control area | Control area]]
| |
| | | | |
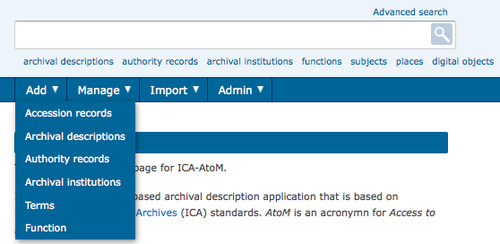
| | + | [[Image:addMenu.png|500px|right|thumb|Add a new authority record from the main menu]]In the [[Glossary#Main menu|main menu]], hover your cursor over "Add" and select "Authority records". Alternatively, navigate to an [[Glossary#Authority record|authority record]] [[Glossary#View page|view page]] and click the [[Glossary#Add new button|"Add new" button]] in the [[Glossary#Button block|button block]]. ICA-AtoM takes you to a blank [[Glossary#Edit page|edit page]] for data entry. |
| | | | |
| − | Click on a <span class="area">RecordArea</span> to expand it (display fields); click again to collapse it (hide fields). Note that whenever you save a record, ICA-AtoM collapses all <span class="area">RecordAreas</span>.
| + | </div> |
| | | | |
| | + | <div class="clearfix"> |
| | | | |
| − | The following notes aim only to clarify ICA-AtoM procedures; for guidelines on what information to record in particular fields, consult ISAAR(CPF) as the content standard. The notes are organized by field, with links to the applicable ISAAR(CPF) section(s).
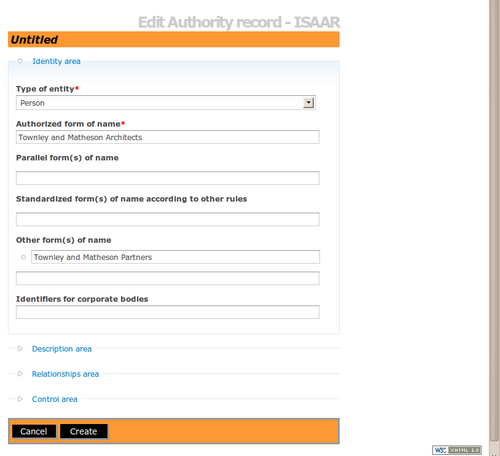
| + | [[Image:editIsaar.png|500px|right|thumb|Save or cancel the new record]]On loading, the [[Glossary#Edit page|edit page]] displays the record with all [[Glossary#Information area|information areas]] closed; click on an [[Glossary#Information area|information area]] to access the [[Glossary#Field|fields]] grouped under it. |
| | | | |
| | + | </div> |
| | | | |
| − | |width="40%" align="right"|
| + | <div class="clearfix"> |
| | | | |
| − | ''insertScreenshot''
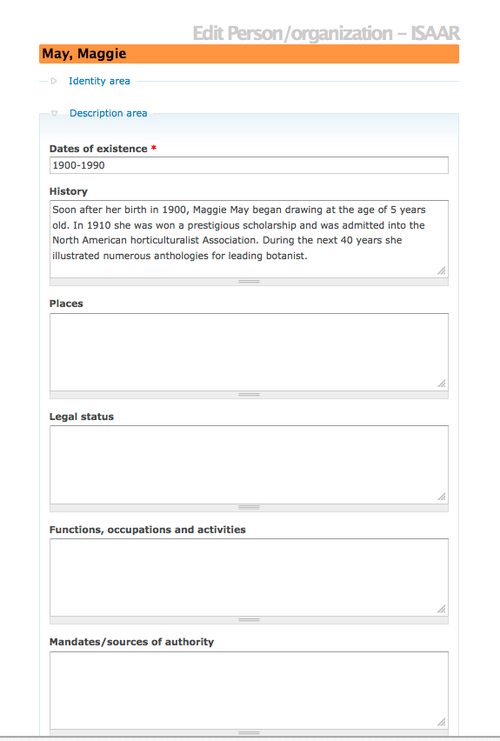
| + | [[Image:AuthorityRecordDescription.png|500px|right|thumb|Description Area in Authority Record edit template]] In the ISAAR authority record edit template there is a "Descriptive Area" that holds a number of data entry fields. The "History" field contains information in a narrative form about the main events of the person, organization or corporate entity. |
| | | | |
| − | |}
| + | </div> |
| | | | |
| | + | <div class="clearfix"> |
| | | | |
| − | === Identity area ===
| + | *You can quit the process at any time by clicking the "cancel" button in the [[Glossary#Button block|button block]]; no new record will be added. |
| | + | *Click the [[Glossary#Create button|create button]] in the [[Glossary#Button block|button block]] to save the new record. |
| | | | |
| − | {| border="0" cellpadding="2"
| + | </div> |
| | | | |
| − | |- valign="top"
| + | <div class="clearfix"> |
| − | |width="60%" |
| |
| | | | |
| − | The <span class="area">IdentityArea</span> contains fields for information "which uniquely identifies the entity being described and which defines standardized access points for the record" (ISAAR(CPF) 4.4.1).
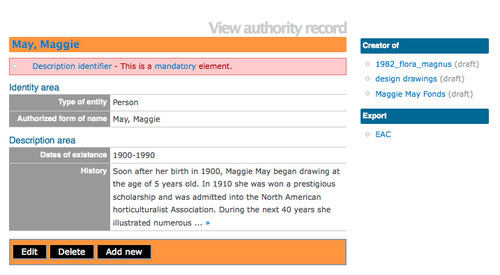
| + | [[Image:AuthorityRecordView.png|500px|right|thumb|View Authority Record]] Once the record is saved, you can view the information entered. |
| | | | |
| | + | </div> |
| | | | |
| − | 1. <span class="field">Authorized form of name</span>: [[ISAAR(CPF)#isaar5.1.2 |ISAAR(CPF) 5.1.2]]
| + | <div class="note"> |
| − | *Enter the name that uniquely identifies the entity.
| |
| − | *Drop-down lists of names that appear throughout the system are generated from the values entered in this field.
| |
| | | | |
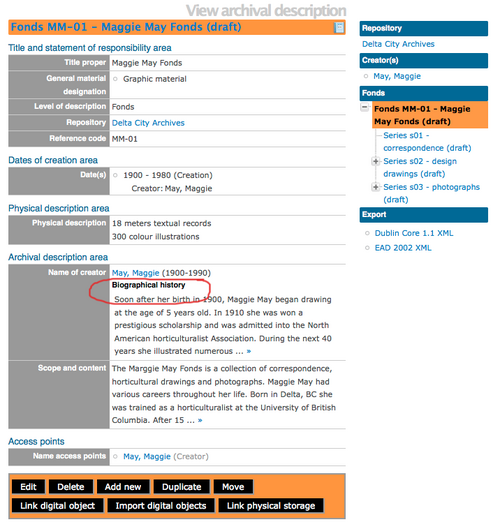
| | + | Note: The related Archival Description now includes the Biographical History (taken from the authority record "history" field). |
| | | | |
| − | 2. <span class="field">Type of entity</span>: [[ISAAR(CPF)#isaar5.1.1 |ISAAR(CPF) 5.1.1]]
| + | [[Image:BioHistArchivalDesc.png|500px|right|thumb|View Archival Description (RAD template) section Admin/Bio History]] |
| − | *Select "Corporate body," "Person" or "Family".
| |
| | | | |
| | + | </div class="note"> |
| | | | |
| − | 3. <span class="field">Other names</span>:
| + | <div class="clearfix"> |
| − | *Multi-value field displaying alternate names for the entity.
| + | </div> |
| − | *Register as many names as you need.
| |
| − | *The last row in the list contains text boxes for data entry.
| |
| − | *Note that as of the current version of ICA-AtoM (v0.5), <span class="button">Other names</span> are not included in drop-down name lists.
| |
| | | | |
| | + | == From a related ISAD(G) archival description (Name of creator field) == |
| | | | |
| − | 4. <span class="field">Name</span> ([[ISAAR(CPF)#isaar |ISAAR(CPF) ]]):
| + | In the Name of creator [[Glossary#Field|field]] in the ISAD [[Glossary#Edit page|edit page]], type in a new name. The name will be saved as a new [[Glossary#Authority record|authority record]] when you save the [[Glossary#Archival description|archival description]] |
| − | *Enter the alternate name.
| |
| | | | |
| | | | |
| − | 5. <span class="field">Type [of name]</span> ([[ISAAR(CPF)#isaar5.1.3 |ISAAR(CPF) 5.1.3]], [[ISAAR(CPF)#isaar5.1.4 |ISAAR(CPF) 5.1.4]], [[ISAAR(CPF)#isaar5.1.5 |ISAAR(CPF) 5.1.5]]):
| + | <div class="clearfix"> |
| − | *Select the type of name from the drop-down list (e.g. "Previous name", "Parallel form").
| |
| | | | |
| | + | == From a related RAD, Dublin Core or MODS archival description (Actor name field) == |
| | | | |
| − | 6. <span class="field">Note</span> ([[ISAAR(CPF)# |ISAAR(CPF) ]]):
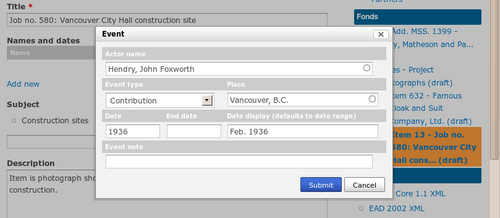
| + | # [[Image:dcEvent2.png|500px|right|thumb|A new actor name added to the event dialogue box creates a new authority record (RAD, Dublin Core, MODS templates only)]]In an [[Glossary#Archival description|archival description]] [[Glossary#Edit page|edit page]], add a new [[Glossary#Event|event]]. In the Actor name field, type in a new name. When you save the [[Glossary#Archival description|archival description]], ICA-AtoM creates a new [[Glossary#Authority record|authority record]] for the name. |
| − | *Add explanatory text if required.
| |
| | | | |
| | + | </div> |
| | | | |
| − | 7. <span class="button">AddInfoIcon</span> (green + sign):
| |
| − | *Click to register the alternate name.
| |
| − | *ICA-AtoM saves the record, collapsing the <span class="area">IdentityArea</span>; click again to re-open.
| |
| − | *The registered name now appears as the next entry in the list of other names.
| |
| | | | |
| | + | == From a related ISAD(G) or RAD archival description (Name access point) == |
| | | | |
| − | 8. <span class="button">DeleteInfoIcon</span> (red X sign):
| + | Type a new name into a Name [[Glossary#Access point|access point]] [[Glossary#Field|field]]. When you save the [[Glossary#Archival description|archival description]] record, ICA-AtoM creates a new [[Glossary#Authority record|authority record]] for the name. |
| − | *Click to delete an alternate name already entered.
| |
| − | *ICA-AtoM deletes the name, saves the records, and collapses all record areas; click <span class="area">IdentityArea</span> again to re-open.
| |
| | | | |
| | | | |
| − | 9. <span class="field">Identifiers for corporate bodies</span> [[ISAAR(CPF)#isaar5.1.6 |ISAAR(CPF) 5.1.6]]:
| + | == From an authority record view page == |
| − | *Enter numbers or other identifiers that were used to identify the corporate body in a specific jurisdiction (e.g. registered company number).
| |
| − | *Do not confuse with the <span class="field">Authority record identifier</span> assigned by the archival institution as a unique identifier of the authority record.
| |
| | | | |
| | + | Click the [[Glossary#Add new button|Add new button]] in the [[Glossary#Button block|button block]] of an [[Glossary#Authority record|authority record]] [[Glossary#View page|view page]]. This will open a blank [[Glossary#Edit page|edit page]] for data entry. |
| | | | |
| − | |width="40%" align="right"|
| |
| | | | |
| − | [[Image:Add AuthorityIdentity.png|400px|right]] | + | [[Category:User manual]] |
| | | | |
| − | |}
| + | __NOTOC__ |
| − | | |
| − | === Description area ===
| |
| − | | |
| − | {| border="0" cellpadding="2"
| |
| − | | |
| − | |- valign="top"
| |
| − | |width="60%" |
| |
| − | | |
| − | The <span class="area">DescriptionArea</span> contains fields that for information "about the nature, context and activities of the entity being described" (ISAAR(CPF) 4.4.2). With the exception of date-related fields (see steps 1-3 below), all fields are basic text fields. For practical purposes there are no limits on length in text fields (fields can hold up 16 million characters); scroll arrows will appear if needed.
| |
| − | | |
| − | | |
| − | 1. <span class="field">Start year</span> and <span class="field">End year</span>: ([[ISAAR(CPF)#isaar5.2.1 |ISAAR(CPF) 5.2.1]]):
| |
| − | *Enter the start and end years.
| |
| − | *For corporate bodies: years of establishment and dissolution.
| |
| − | *For persons: birth and death year.
| |
| − | *Leave end year blank if the entity is still in existence.
| |
| − | *Use four-digit numbers only.
| |
| − | *Do not use qualifiers (e.g. "ca.") or typographical symbols (e.g. "[197-]") to express uncertain dates.
| |
| − | *Start and end values will be used in searches (earlier than, later than) and sorting.
| |
| − | | |
| − | | |
| − | 2. <span class="field">Date display</span> ([[ISAAR(CPF)#isaar5.2.1 |ISAAR(CPF) 5.2.1]]):
| |
| − | *Enter dates of existence as a date range (yearX - yearY).
| |
| − | *Add qualifiers (e.g. "ca.", "predominant") and typographical symbols if required.
| |
| − | *This is the value that will appear on the <span class="screen">View</span> screen as the <span class="field">Dates of existence</span>.
| |
| − | | |
| − | | |
| − | 3. The remaining fields in this area are basic text fields. See [[ISAAR(CPF)]] for guidelines:
| |
| − | *[[ISAAR(CPF)#History | ISAAR(CPF) 5.2.2: History]]
| |
| − | *[[ISAAR(CPF)#Places | ISAAR(CPF) 5.2.3: Places]]
| |
| − | *[[ISAAR(CPF)#Legal status | ISAAR(CPF) 5.2.4: Legal status]]
| |
| − | *[[ISAAR(CPF)#Functions, occupations and activities | ISAAR(CPF) 5.2.5: Functions, occupations and activities]]
| |
| − | *[[ISAAR(CPF)#Mandates/Sources of authority | ISAAR(CPF) 5.2.6: Mandates/Sources of authority]]
| |
| − | *[[ISAAR(CPF)#Internal structures/Genealogy | ISAAR(CPF) 5.2.7: Internal structures/Genealogy]]
| |
| − | *[[ISAAR(CPF)#General context | ISAAR(CPF) 5.2.8: General context]]
| |
| − | | |
| − | | |
| − | |width="40%" align="right"|
| |
| − | | |
| − | [[Image:Add AuthorityDescription.png|400px|right]]
| |
| − | | |
| − | |}
| |
| − | | |
| − | === Relationships area ===
| |
| − | | |
| − | {| border="0" cellpadding="2"
| |
| − | | |
| − | |- valign="top"
| |
| − | |width="60%" |
| |
| − | | |
| − | The <span class="area">RelationshipsArea</span> contains fields for documenting relationships with other corporate bodies, persons and/or families (ISAAR(CPF) 4.4.3).
| |
| − | | |
| − | *Not yet available as of ICA-AtoM 0.4.
| |
| − | | |
| − | | |
| − | |width="40%" align="right"|
| |
| − | | |
| − | [[Image:AuthorityRelationship.png|400px|right]]
| |
| − | | |
| − | |}
| |
| − | | |
| − | === Control area ===
| |
| − | | |
| − | {| border="0" cellpadding="2"
| |
| − | | |
| − | |- valign="top"
| |
| − | |width="60%" |
| |
| − | | |
| − | The <span class="area">ControlArea</span> is "where the authority record is uniquely identified and information is recorded on how, when and by which agency the authority record was created and maintained" (ISAAR(CPF) 4.4.4).
| |
| − | | |
| − | | |
| − | 1. <span class="field">Authority record identifier</span>: [[ISAAR(CPF)#Authority record identifier | ISAAR(CPF) 5.4.1]]
| |
| − | *Enter the unique identifier the <span class="entity">archival institution</span> has assigned to the authority record.
| |
| − | *Do not confuse with <span class="field">Identifiers for corporate bodies</span> in the <span class="area">IdentityArea</span> (which are identifier used by the corporate body itself in a specific jurisdiction, e.g. corporation number).
| |
| − | | |
| − | | |
| − | 2. <span class="field">Institution identifier</span>: [[ISAAR(CPF)#Institution identifier | ISAAR(CPF) 5.4.2]]
| |
| − | *Enter the name or institution code of the body responsible for creating and maintaining the authority record.
| |
| − | | |
| − | | |
| − | 3. <span class="field">Rules or conventions</span>: [[ISAAR(CPF)#Rules and/or conventions | ISAAR(CPF) 5.4.3]]
| |
| − | *Text field.
| |
| − | | |
| − | | |
| − | 4. <span class="field">Status</span> and <span class="field">Level of detail</span>: [[ISAAR(CPF)#Status | ISAAR(CPF) 5.4.4]] and [[ISAAR(CPF)#Level of detail | ISAAR(CPF) 5.4.5]]
| |
| − | *Select status and level of detail of authority record from drop-down lists.
| |
| − | *ICA-AtoM ships with default lists ("Draft, Final, Revised, Deleted" for status; and "Minimal, Partial, Full" for level of detail); <span class="role">Administrators</span> can customize to institution's own standards.
| |
| − | | |
| − | | |
| − | 5. <span class="field">Language and scripts</span>: [[ISAAR(CPF)#Language(s) and script(s) | ISAAR(CPF) 5.4.7]]
| |
| − | *Select language and script of the authority record from drop-down lists.
| |
| − | | |
| − | | |
| − | 6. <span class="field">Sources</span>: [[ISAAR(CPF)#Sources | ISAAR(CPF) 5.4.8]]
| |
| − | *Text field.
| |
| − | | |
| − | | |
| − | 7. <span class="field">Notes</span>: [[ISAAR(CPF)#Dates of creation, revision or deletion | ISAAR(CPF) 5.4.6]], [[ISAAR(CPF)#Maintenance notes | ISAAR(CPF) 5.4.9]]
| |
| − | *Multi-value field displaying notes.
| |
| − | *Use this field to register dates of creation, revision, deletion.
| |
| − | *Enter the text of the note, select the type of note, click the green <span class="button">AddInfoIcon</span> to register.
| |
| − | *To delete an existing note, click the red <span class="button">DeleteInfoIcon</span> beside it.
| |
| − | | |
| − | | |
| − | |width="40%" align="right"|
| |
| − | | |
| − | [[Image:Add AuthorityControl.png|400px|right]]
| |
| − | | |
| − | |}
| |
